You can install a whirlybird on a tin roof yourself in a few hours with basic tools, the right fasteners, and a good sealant. The key steps are: confirm your whirlybird type and base size, pick a spot near the roof peak with open wind exposure, cut your hole, fasten the base into the roof structure (not just the sheet), and seal every fastener head and the base perimeter with a metal-compatible urethane or neutral-cure silicone sealant. Get those four things right and you'll have a leak-free, spinning unit that lasts years.
How to Install a Whirly Bird on a Tin Roof Step by Step

Marcus Hendricks
6 May 2026
Know your whirlybird type and the parts you need
Before you get anywhere near a roof, figure out exactly what you have. The word 'whirlybird' gets used for two very different things, and confusing them leads to buying the wrong hardware.
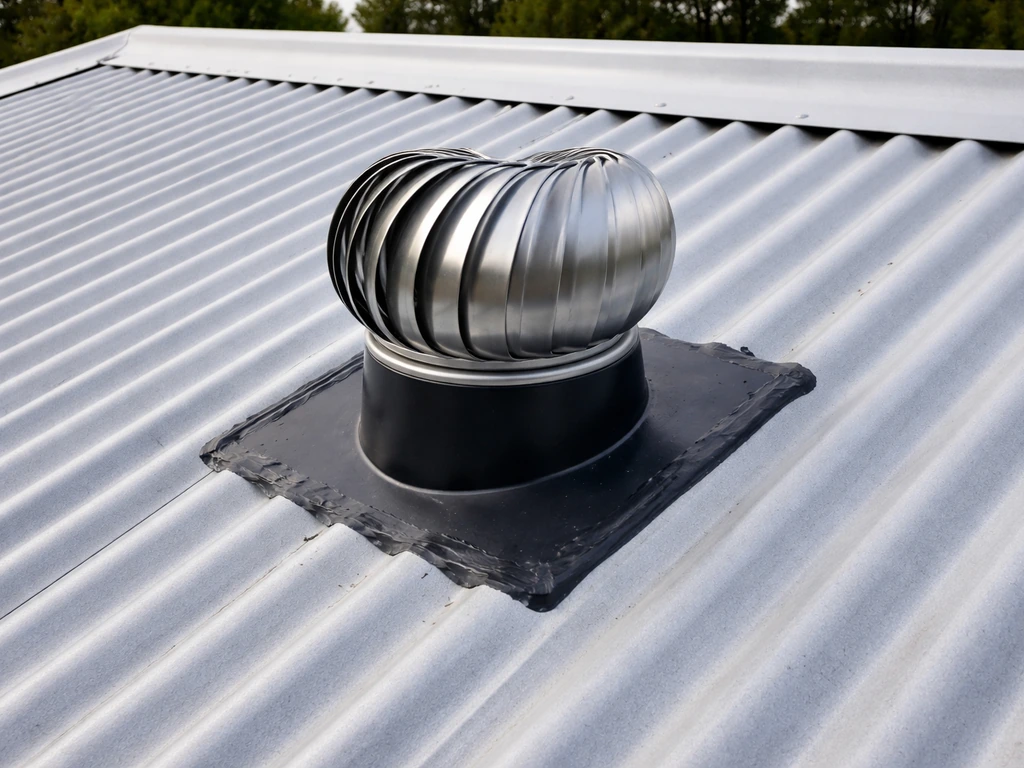
- Roof turbine vent (the most common type): A spinning aluminum or galvanised steel head that sits on a flared base, draws hot air out of your roof cavity through convection and wind, and penetrates the roof sheet. Brands like Lomanco (BIB-12, BEB-12) and GAF Master Flow are typical examples. These require a hole cut in the roof.
- Bird deterrent spinner: A lightweight, decorative spinning device mounted on a spike or bracket on the roof surface, designed to scare birds away with movement and flash. It does NOT require a roof penetration and installs very differently.
- Ornamental wind spinner: Purely decorative, bracket-mounted, no roof penetration needed.
If yours is a deterrent or decorative spinner, skip the sections about cutting holes and sealing penetrations. If yours is a turbine vent (the big spinning dome that ventilates your roof cavity), that's what most of this guide covers. Check your model number and pull up the manufacturer's PDF before you do anything else. For Lomanco units, the model prefix and number tell you the base size: a BIB-12 or BEB-12 uses a 12-inch base, while the 14-inch family uses a 14-inch base. Getting the wrong replacement base is one of the most common (and annoying) mistakes.
A standard turbine vent kit includes: the spinning turbine head, a flared base (sometimes called a flashing base or elbow), sheet metal screws, and a paper or cardboard cutting template. Some kits include a jig, some don't. Check the box and lay everything out before you start. You'll also need to buy sealant separately (more on that in the weatherproofing section).
Tools and safety for working on a tin roof

Tin and metal roofs are slippery, edges are sharp, and heights are unforgiving. I'm not going to lecture you, but I will tell you what I always use because I've seen what happens when people skip this part.
PPE and fall protection
- Slip-resistant rubber-soled boots: Soft-soled boots grip metal sheeting far better than work boots with hard soles. This matters more than almost anything else on a metal roof.
- Cut-resistant gloves: Metal roof edges and freshly cut sheet metal are razor sharp. The Metal Construction Association specifically calls out cut protection as part of metal roof PPE.
- Safety glasses: Metal swarf and debris go everywhere when you're drilling or cutting.
- Personal fall arrest system (PFAS): If your roof pitch is above about 4:12 or you're working higher than 3 metres, use a properly anchored harness system. OSHA guidance is clear that ad-hoc methods are not sufficient for metal roof work. Use engineered anchor points rated for fall arrest.
- A spotter or helper on the ground: Not optional if you're cutting and carrying materials.
Tools you'll need

- Tape measure
- Pencil or marker
- Jig saw with a metal-cutting blade (or tin snips for the final trim)
- Utility knife
- Cordless drill with screwdriver bits
- Spirit level
- Hammer (for tapping the base flange flat if needed)
- Caulking gun
- Ladder rated for your weight plus tools
Lomanco's own installation documentation lists this same core kit, so you're not over-preparing. Have everything in a bucket or tool belt before you go up. Making multiple trips up and down a metal roof is where accidents happen.
Picking the best mounting spot on a metal roof
Location makes or breaks how well a turbine vent performs. Both Lomanco and GAF's Master Flow instructions are specific about this: mount near the roof peak, on the rear slope (the side away from the primary wind direction), and in a spot exposed to wind from all directions with no obstructions overhead or alongside.
Here's what to look for and avoid:
- Aim for the top third of the roof slope, as close to the ridge as the base flange allows. Low placement reduces the temperature differential that drives air movement and puts the turbine in the turbulent air layer near the eaves.
- Keep at least 600mm (24 inches) clearance from the ridge cap, gutters, and any eaves overhang.
- Avoid the low point of a corrugated or trimdek pan (the valley). You want to mount on the high rib or crown of the profile if possible, or on a saddle/flat section between ribs. More on this in the next section.
- If installing multiple units, space them evenly across the roof width. Lomanco's documentation includes spacing diagrams for two and three turbines on the same roof.
- Check inside the roof cavity below your chosen spot. You want to land between purlins (the horizontal structural timbers or steel that span across the rafters), not directly on top of one. The turbine base needs open space below it to draw air.
- Avoid proximity to sky lights, ridge vents, or other roof penetrations by at least 1 metre.
- Check for any electrical cables or plumbing pipes running through the cavity below before marking your cut point.
Install method for corrugated vs flat tin (fasteners and structure)
This is where most DIY installs go wrong. Corrugated and ribbed metal roofing profiles require a different approach to flat or near-flat tin because the wavy surface means your base flange won't sit flat against the sheet. If you're dealing with a bird beak style vent or opening, follow a bird-beak-specific filing and sealing approach so the waterproofing lines up correctly with the base how to file bird beak. Here's how to handle both.
Step-by-step for corrugated or ribbed tin
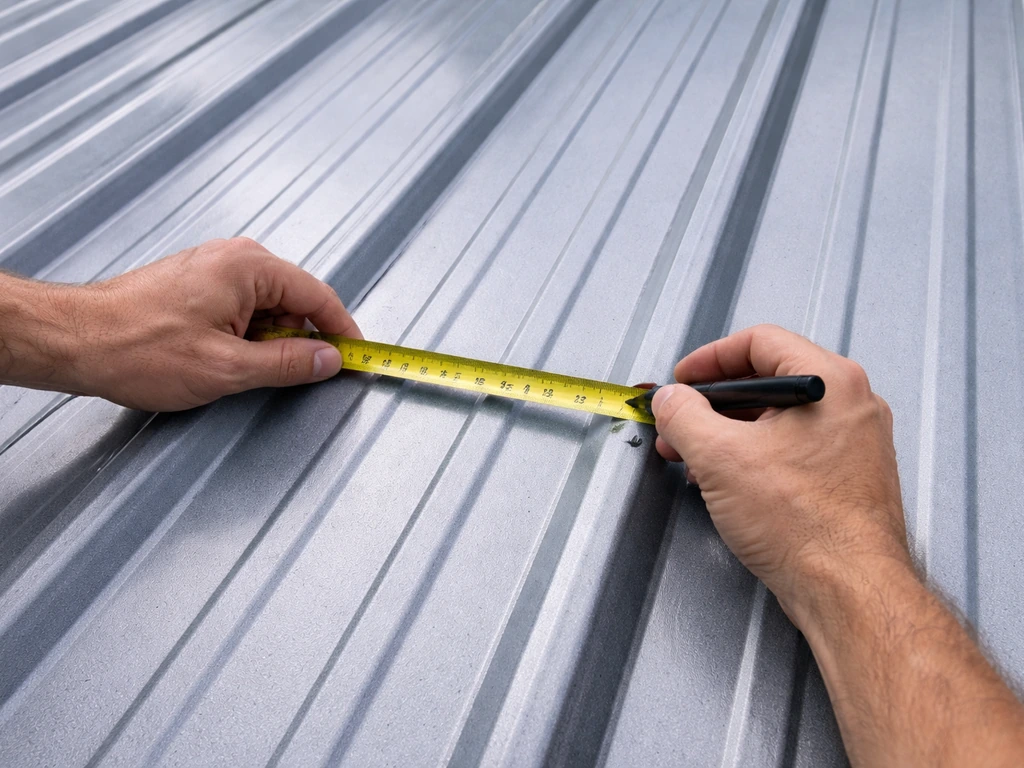
- Mark your centre point on the roof using the tape measure and marker. Centre it over a rib crown or between two ribs depending on your base style. Some bases are designed to saddle a rib; check your instructions.
- Use the cardboard template from the kit (or measure the base opening diameter) to mark the cut circle. For most 12-inch turbine vents, the hole is around 11 to 12 inches in diameter.
- Drill a starter hole inside the marked circle using a metal-rated drill bit, then cut out the circle with a jig saw fitted with a fine-tooth metal blade. Cut slowly and steadily. Hold down the cut-out piece so it doesn't fall into the roof cavity.
- Deburr the cut edge with a file or the back of your utility knife blade. Sharp edges here will slice through sealant over time.
- Slide the base flange under the upslope roof sheets (the sheets above the hole, toward the ridge) and over the top of the downslope sheets (toward the gutter). This is critical. It mirrors how flashing works: water runs down over the top of the flange on the uphill side, not under it.
- On corrugated roofing, the base flange will have gaps between it and the sheet where the corrugations rise. Fill these gaps with a foam closure strip or a generous bead of urethane sealant before fastening. Don't skip this step or you'll have a funnel for water.
- Fasten the base flange using self-drilling hex-head screws with EPDM rubber-bonded washers. Drive them into the roof sheet AND into the underlying purlin where possible. Fasteners into purlins give you structural pull-out resistance. Sheet-only fasteners can work loose over time, especially on corrugated profiles that flex in the wind.
- Seat the turbine head onto the base stack. Align it per the manufacturer's diagram (usually a specific orientation relative to the prevailing wind). Hand-tighten any retention screws first, then check for level with your spirit level before fully tightening.
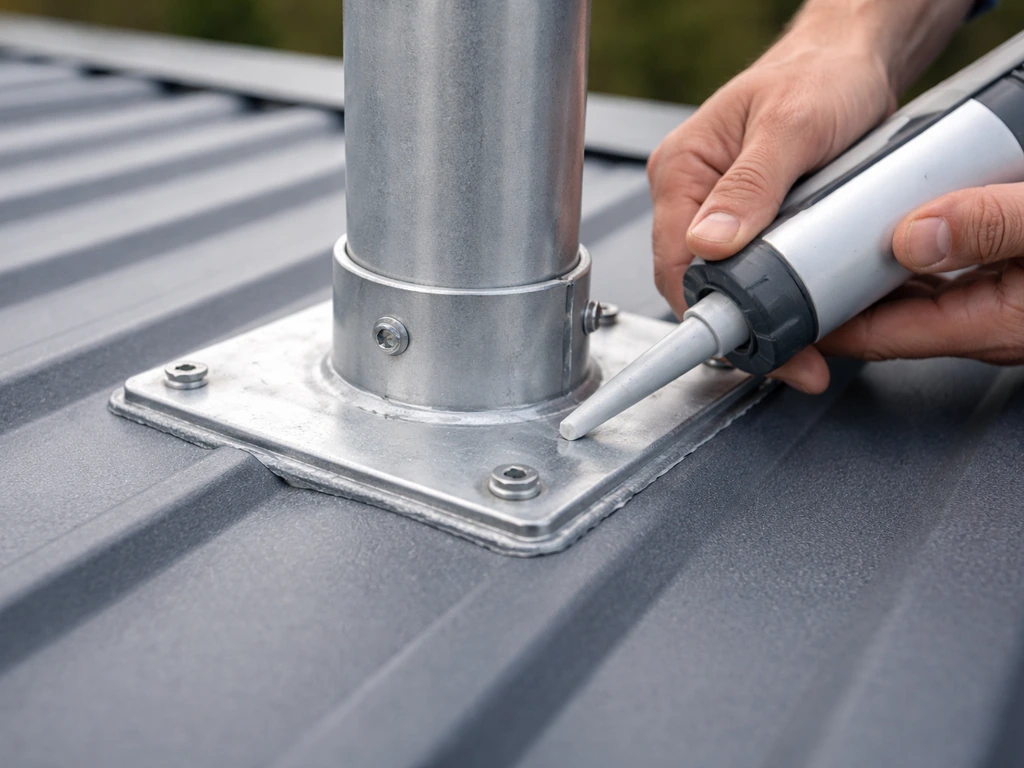
- Apply urethane sealant (or roofing cement as specified in the Lomanco BIB/BEB guide) around the base-to-stack joint and over every screw head. Don't be stingy here.
Step-by-step for flat or low-pitch tin
- On flat or near-flat profiles (like Colorbond flat sheet, Zincalume, or standing-seam tin), the base flange sits flush, which makes sealing easier but drainage more critical.
- Follow the same hole-cutting process as above, deburring the edge.
- Apply a continuous bead of urethane sealant around the underside perimeter of the base flange before setting it in place. This creates a bedding seal.
- On flat roofs especially, consider using a self-adhesive leak barrier membrane (like GAF WeatherWatch or an equivalent) as an extra waterproofing layer under the base flange. GAF's Master Flow instructions reference this step specifically.
- Fasten as above: hex-head screws with EPDM washers, into purlins or structural framing where accessible. On standing-seam metal, use seam clamps rated for the profile rather than penetrating fasteners wherever possible.
- Seal all screw heads with urethane sealant after fastening.
Corrugated vs flat tin: a quick comparison
| Factor | Corrugated / Ribbed Tin | Flat / Low-Pitch Tin |
|---|---|---|
| Base flange fit | Gaps under flange where corrugations are | Flange sits flush |
| Gap filling needed? | Yes: foam closures or heavy sealant bead | No gaps, but bedding bead still needed |
| Fastener type | Hex-head self-driller with EPDM washer into purlin | Same, or seam clamps on standing seam |
| Extra waterproofing layer | Recommended at upslope edge | Strongly recommended (self-adhesive membrane) |
| Water drainage risk | Lower (slope sheds water) | Higher (water sits longer on low-pitch sections) |
Weatherproofing and leak-proof sealing steps
This is the step most people rush, and it's the one that costs them a repair bill later. Sealing a roof penetration on metal isn't just about plugging the hole. You're protecting against three separate water paths: water running under the flange, water wicking into fastener holes, and water tracking down the turbine stack into the base joint.
Which sealant to use
Use a neutral-cure silicone or a urethane sealant rated for metal roofing. Do not use acetoxy-cure (acid-cure) silicone on bare or coated metal: the acetic acid it releases during curing attacks metal coatings and causes corrosion under the seal. Products like NovaFlex metal roof sealant or W. R. Meadows KNIGHTSHIELD KS-5600 are purpose-built for this application. GAF's Master Flow instructions specifically call out urethane sealant for the turbine-to-stack joint and around screw heads. Lomanco's instructions reference roofing cement for the base seam sealing on their BIB/BEB units. Read your specific product sheet and match the sealant to the instruction.
The three sealing points you must not skip
- Under the base flange perimeter: Apply a continuous bead of sealant under the flange before it goes down, and tool a fillet around the outside edge once the flange is fastened. Run a second bead along the upslope edge (the side closer to the ridge) for extra insurance.
- Every fastener head: Each screw that penetrates the roof sheet is a potential water entry point. Apply a dab of urethane sealant over every screw head and washer immediately after driving. Don't wait and 'come back to it'.
- The turbine-to-stack joint: Where the spinning turbine head connects to the fixed base stack, apply sealant or roofing cement around the seam as directed by your brand's instructions. This joint expands and contracts with temperature, so use a sealant with good movement capability, not a rigid compound.
If you're working on a painted Colorbond or Zincalume roof, choose a sealant in a matching or neutral colour. Some brands offer colour-matched sealant. It won't perform better, but it looks far less obvious when you're done.
Testing, tuning, and troubleshooting wobble or poor spin
Once the sealant has cured (usually 24 hours for most urethane products), test the installation before you call it done.
The two tests to run
- Spin test: Flick the turbine head with your finger. It should rotate freely with minimal resistance and spin down gradually. If it sticks, grinds, or stops abruptly, something is misaligned or a fastener is pressing against the rotating assembly.
- Water test: Run a garden hose over the installation for several minutes, simulating rain, and then go into the roof cavity and check for any drips or wet spots around the base. If you can wait, the first real rain after installation is even better. Walk through the roof cavity with a torch the day after.
Fixing wobble
Wobble usually means the turbine head is sitting slightly off-level on the base stack. Lomanco's own installation instructions address this directly: if wobble exists, gently pry the lowest point of the turbine head upward to re-level it. Small adjustments here make a big difference. If the wobble persists, check that the base flange is sitting flat and that no corrugation gap has caused one side of the base to sit higher than the other.
Fixing poor spin or noise
- Poor spin in wind: Check for obstructions around the turbine head (a nearby ridge cap flashing, a satellite dish, tree branches). Also check that the turbine head hasn't been installed too low on the slope where wind shadow from the roof itself reduces airflow.
- Clattering or rattling noise: Usually loose fasteners. Go around every screw and tighten it. Then re-seal the screw heads.
- Grinding or squealing: Worn or corroded bearings in the turbine head. On most units, the head can be replaced separately from the base, which is cheaper than a full replacement.
- Cross-threaded screws: If a screw went in at an angle and stripped, remove it, slightly reposition the hole, and use a new fastener. Don't try to drive more sealant around a stripped fastener hole and hope for the best.
- Misaligned base: If the base was fastened slightly off-centre and the cut hole is visible around the edge of the flange, that's a problem. You may need to remove the flange, enlarge the hole slightly in the right direction, reposition, and re-seal.
Maintenance, inspection, and when to get help
A well-installed turbine vent on a tin roof is mostly low-maintenance, but 'mostly' is not 'never.' A quick annual check keeps small issues from becoming expensive ones.
Annual maintenance checklist
- Spin the turbine head by hand. It should still rotate freely. Resistance or grinding suggests bearing wear.
- Visually inspect all sealant beads around the base flange and screw heads. Look for cracking, shrinkage, or separation from the metal surface. Re-apply sealant to any area that looks compromised.
- Check for rust around fastener heads and at the base flange edges, especially at cut edges of the roof sheet where the coating is absent. Treat any rust spots with a zinc-based primer and a dab of matching sealant.
- Check that the turbine head hasn't shifted or that the retention screws between the head and stack haven't loosened.
- Clear any debris (leaves, bird nests, dirt) from around the turbine base that could trap moisture against the metal.
Lubrication
Most modern turbine vents use sealed or permanently lubricated bearings and don't need oiling. Check your manufacturer's documentation. If yours is an older style with open bearings, a small amount of light machine oil applied to the bearing race once a year is usually sufficient. Avoid WD-40 as a long-term lubricant: it displaces moisture but evaporates quickly and leaves bearings dry. Use a proper bearing oil or white lithium grease instead.
When to stop and call a professional roofer
There are a few situations where the right call is to hand the job over rather than push through:
- The roof pitch is steep (above about 6: 12) or the surface is particularly slippery and you don't have proper fall arrest equipment. No installation job is worth a fall.
- You discover corrosion, rust through, or damaged roof sheets around the area where you planned to install. Installing a turbine vent over compromised sheeting will fail quickly and may accelerate the sheet damage.
- You can't identify the structural frame (purlins/rafters) below the installation point and aren't confident in your fastener placement.
- The existing roof has a coating or warranty that a penetration might void. Check with the roofing material manufacturer before cutting.
- You've already cut the hole and water is getting in and you can't stop it with sealant alone. At this point a roofer can assess whether the flashing approach needs changing or whether the sheet needs to be patched.
If you enjoyed getting into the structural side of this project, topics like calculating a bird mouth cut and fitting a bird comb follow a similar logic of working out where structural members sit and cutting or fitting components accurately to match. Calculating a birdsmouth (often called a bird mouth cut) means measuring the rafter angle and the seat cut so the joint sits correctly on the top plate calculating a bird mouth cut. They're worth a look if you're doing broader roof or rafter work at the same time. If you're also doing rafter work, make sure you bird-mouth the rafter correctly so the roof deck sits tight and square how to bird mouth a rafter.
FAQ
What if my tin roof is corrugated, and the whirly bird base flange will not sit flat?
Do not force the flange down with extra screws, that can create pinholes. Dry-fit the base, then check whether you need a different base/flashing for your vent style or profile, and file the opening to match the base curvature so the flange contacts evenly across the perimeter.
Can I install a whirly bird on top of insulation or through a roof deck that is not accessible?
You still must secure the base to structural framing, not only the sheet. If you cannot verify where battens or rafters sit, locate them with a stud finder or by measuring from known internal ceiling members before cutting, otherwise the vent can loosen and leak later.
What size hole should I cut, can I use the template as-is?
Use the manufacturer template, then cut slightly conservative on the first pass and trim to fit. If you cut too large, you will rely on sealant to compensate, sealant is not structural and will not reliably prevent leakage under movement.
Is there a wrong sealant type even if it is labeled “roof sealant”?
Yes. Avoid acetoxy or acid-cure silicone on metal that has coatings, because the curing chemistry can attack the coating and cause corrosion under the seal. Stick to neutral-cure silicone or metal-rated urethane specified for roof penetrations, and keep the sealant compatible with any existing coatings.
How do I know if the whirly bird is mounted in the right spot relative to wind direction?
Follow the “rear slope” guidance in your kit instructions, then verify you are not behind eaves, roof ridges, or nearby walls. If you expect frequent wind from more than one direction at your location, choose a peak-near position with clear overhead, the goal is unobstructed airflow around the vent.
After sealing, how long should I wait before testing or running the roof through rain?
Do not assume “touch-dry” equals fully cured. Wait the full cure time in the product sheet, often around 24 hours for many urethanes, then run the hose or do light water testing to confirm there is no seepage around fastener heads and the base seam.
What is the best way to test for leaks without damaging the roof finish?
Use a gentle garden hose flow, low enough that it does not drive water upward like a power washer. Start at the top of the penetration area, observe for dampness inside the roof, and check the base perimeter and screw heads first.
My turbine spins but the head looks slightly tilted, is that normal?
Minor issues are not always normal. Re-level the turbine head if the wobble is caused by off-level seating, and if it persists, inspect that the base flange is fully contacting across the perimeter and that corrugation gaps did not lift one side.
Should I add extra screws if I feel the base is not tight enough?
Usually no. More fasteners can mean more leak points. Tighten to the installation instructions, then re-check alignment and flange contact, if the base is not sitting flat you need a fit correction, not additional penetrations.
Do I need to oil a whirly bird, and what should I avoid using?
Most modern units use sealed or permanently lubricated bearings, so lubrication may be unnecessary. If your model has open bearings, use the manufacturer-recommended bearing oil, or white lithium grease where appropriate, and avoid WD-40 as a long-term solution because it evaporates and can leave bearings dry.
When should I stop and hire a pro for this type of roof work?
If you cannot confidently find structural mounting points, or your roof pitch and access make safe positioning unrealistic, the risk is not worth it. Also consider pro help if you discover deteriorated decking around where the hole will be, because you may need repairs before sealing can work reliably.
Next Article
How to File Bird Beak: Vet-Safe Steps and DIY Toy Fixes
Safe steps to fix a bird beak by filing: for real birds, get vet care; for toys, shape edges safely.
