Bird photography gets better fast once you know exactly what to fix. The frustrating truth is that most beginners are losing their shots at the settings stage or the approach stage, not because they have the wrong gear. This guide walks you through the full process: what to bring, where to go, how to get close without being a nuisance, which settings to dial in, and how to actually improve from one session to the next. If you want a condensed repeatable plan for your exact session goals, see the related option on how to guide skye's bird.
Bird Photography How To: Beginner Steps for Better Shots

Marcus Hendricks
7 Apr 2026
Getting set up: gear basics and camera choices
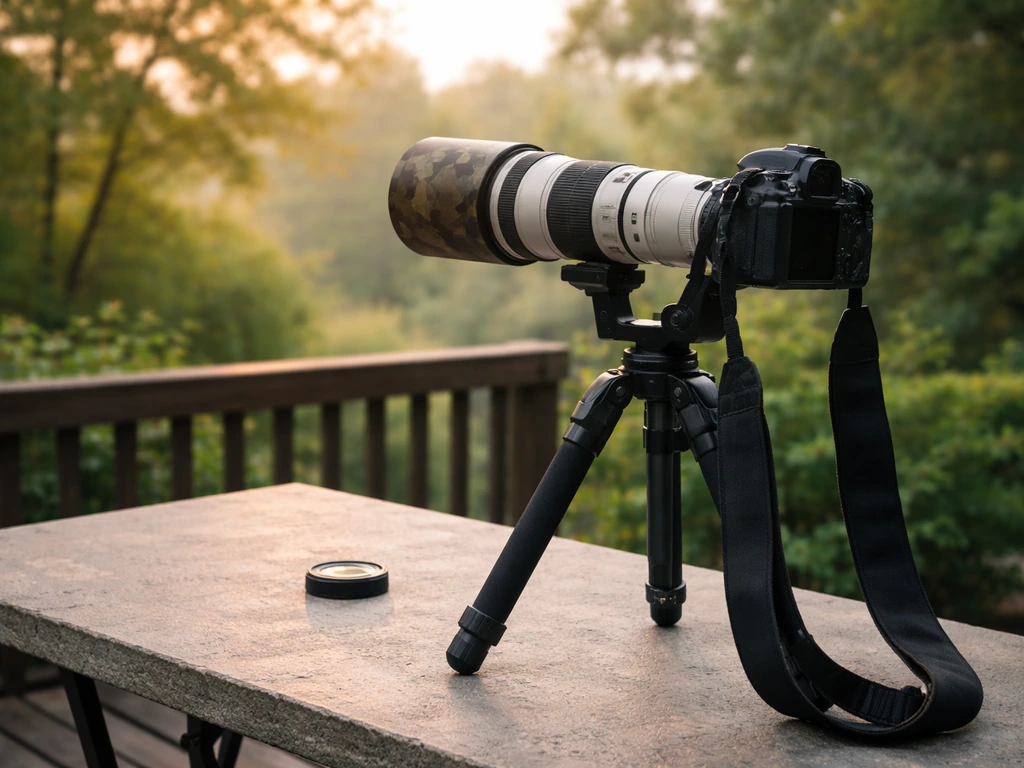
You do not need a $10,000 rig to start. What you do need is a camera that can shoot fast and a lens long enough to fill the frame with a bird that won't let you within 20 feet. A mirrorless camera or a DSLR with a crop sensor is a solid starting point because the crop factor effectively extends your reach. A 300mm or 400mm prime lens, or a 100-400mm zoom, covers most situations. Longer is better, but a sharp 300mm beats a soft 600mm every time.
For support, the options matter more than people think. A gimbal head on a tripod gives you the ideal combination of stability and smooth movement for long lenses, which is why experienced bird photographers swear by them. Bean bags work well too when you have a car window or fence rail to rest on. Monopods sound convenient, but many experienced shooters avoid them for super-telephoto work because they don't provide enough stability and can actually be less comfortable than just handholding. If you're handholding, know that even great technique and image stabilization cannot match rock-solid tripod support when you're pushing a long lens.
On accessories: keep it minimal in the field. Some photographers go out with just the camera and lens on a neck strap, with spare batteries and memory cards in their pockets. That's genuinely all you need. Wildlife action is unpredictable, and the worst feeling is missing a great moment because you were fumbling with a bag or swapping a dead battery. Carry at least two charged batteries and two memory cards. This is one of those "learned it the hard way" lessons that costs you exactly one amazing shot to understand.
Finding birds and choosing the right location and time
The single best tool for finding birds near you right now is eBird. The Hotspot Explorer is a map-based tool that shows you where other birders are reporting sightings, what species they're seeing, and even gives seasonal habitat cues (waterbird hotspots in summer, for example). Use it to find productive spots within driving distance before you ever leave the house. Traveling Birder is a route-based birding planner that can route to hotspots and supports species search and date filtering, powered by eBird and Google Maps.
iNaturalist is another useful layer, especially for seeing exactly where a species has been observed recently. You can filter by location by typing a place name in the search and selecting a boundary, which gives you a map of recent sightings with photo confirmation. iNaturalist Help notes that searching observations shows verifiable observations by default in a map view. It's particularly handy when you're chasing a specific species in a new area.
Timing matters as much as location. The two to three hours after sunrise are consistently the most productive for bird activity, especially for songbirds. Late afternoon before sunset is the second-best window. Midday in summer is usually dead. Weather plays a role too: the morning after a cold front pushes through often produces exceptional diversity as migrating birds drop in to rest and feed. Overcast days actually make for more flattering light than harsh midday sun, so don't skip a cloudy morning.
Habitat reading is a skill worth building. Water attracts birds at predictable times. Dense shrub edges hold more diversity than open lawns. Forest clearings and power line cuts create transition zones that many species prefer. Once you start noticing these patterns, you'll spend a lot less time walking and a lot more time shooting.
Fieldcraft: approach, hiding, and ethical distance
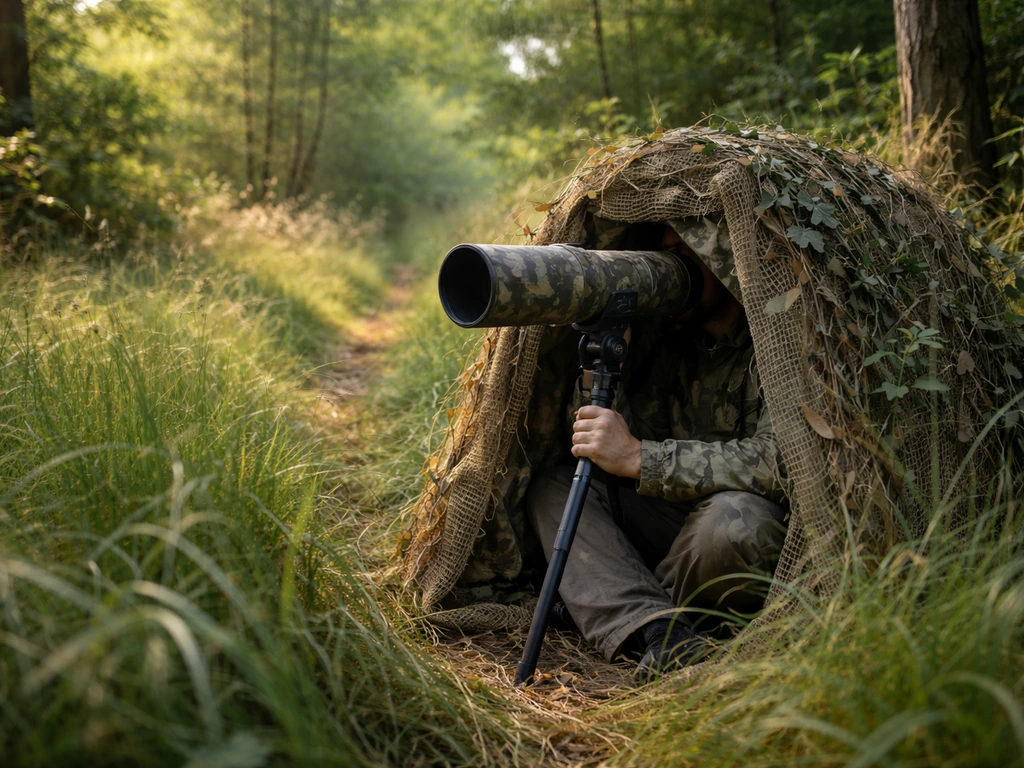
Getting close is the central challenge of bird photography, and the ethical lines here are real. The core principle is simple: if the bird changes its behavior because of you, you're too close. That means no flushing, no alarm calling, no birds abandoning food or nests because you pushed too near.
Use a long telephoto lens and let it do the work of closing the distance optically. Move slowly, avoid direct eye contact with the bird (it reads as predatory behavior), and approach at an angle rather than head-on. Crouch or sit to reduce your profile. Wear muted, natural colors. Birds are not fooled by camouflage the way mammals are, but standing still and low absolutely helps.
Two things to avoid entirely: flash and playback. Do not use a flash in the field. It disturbs birds and produces unnatural, flat results anyway. Skip it completely. Playback (using recorded bird calls to attract birds) is a bigger issue than most beginners realize. It can be illegal in national parks and wildlife refuges, it stresses birds during nesting season when they're defending territory, and it's particularly harmful when used repeatedly for rare or threatened species. Leave the playback app alone.
Active nests deserve special attention. Be extra cautious around nesting sites, roosting areas, and colony displays. A bird that seems to tolerate your presence may still abandon the nest if it senses something is wrong. The fact that a precise flush distance can't always be defined in advance is exactly why erring far on the side of caution is the right call. The photo is never worth a failed nest.
Camera settings for sharp photos
Shutter speed is your most important variable. Birds move fast, long lenses magnify every bit of camera shake, and slow shutter speeds produce blurry results even when everything else is right. Here's where to start:
| Situation | Target Shutter Speed |
|---|---|
| Perched or still bird | 1/500s–1/1000s |
| Bird in moderate flight | 1/2000s–1/2500s |
| Fast flight, rapid wing beats (small songbirds, hummingbirds) | 1/3200s–1/4000s+ |
The mode that makes this easiest is full Manual with Auto ISO. Set your shutter speed where you need it, set your aperture to its sharpest usable point (usually f/5.6 to f/8 on most telephoto lenses), and let Auto ISO adjust exposure as the light changes. This is especially useful on partly cloudy days when light swings constantly. You can also apply exposure compensation in this mode to fine-tune results without touching the other settings. Some mirrorless cameras let you achieve a similar result in Aperture Priority by setting a minimum shutter speed in the Auto ISO menu, which is a decent alternative if you prefer that mode.
Getting autofocus right
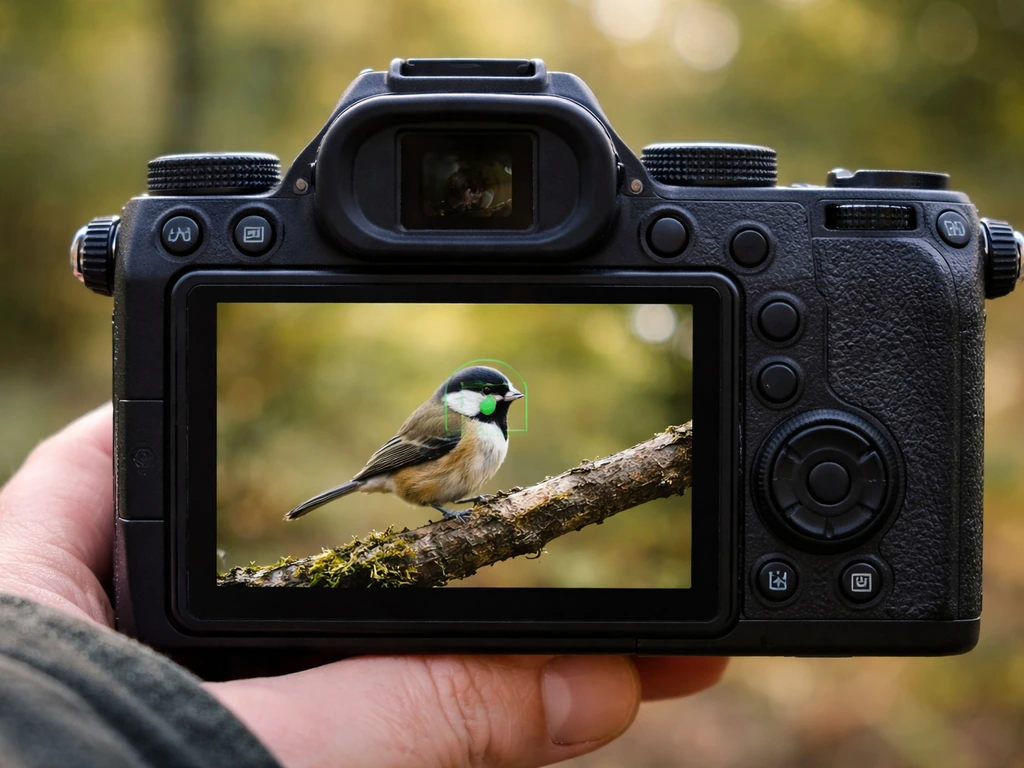
Use continuous autofocus: AF-C on Nikon bodies, AI Servo on Canon. This mode keeps adjusting focus as long as you hold the AF button, which is exactly what you need for a moving bird. For tracking erratic movement, use a wider zone of focus points rather than a single point. It's much harder to keep one point glued to a bird banking across the sky than to use a cluster that gives the system more to work with.
Modern mirrorless cameras take this further with subject detection and tracking. When the camera detects a bird, it places a tracking box around it and automatically repositions focus points to follow it. This is genuinely useful and worth enabling if your camera supports it. Some bodies also offer a Pre-AF mode that keeps the sensor continuously focusing even before you press any button, so by the time you react to a bird moving, focus is already partially established.
Back-button focus is worth learning early. The idea is to separate autofocus activation from the shutter button. You press a dedicated button on the back of the camera (usually AF-ON) to engage focus, and the shutter button only fires the shot. This means you can lock focus on a perched bird, then recompose without the camera hunting for a new subject when you half-press the shutter. blurring backgrounds in bird photography gets much easier once you're comfortable with back-button focus, because you have precise control over exactly what the lens is focused on.
Composition and storytelling: poses, angles, backgrounds
The technical settings get the shot sharp. Composition is what makes it worth looking at. A few principles that consistently produce stronger images:
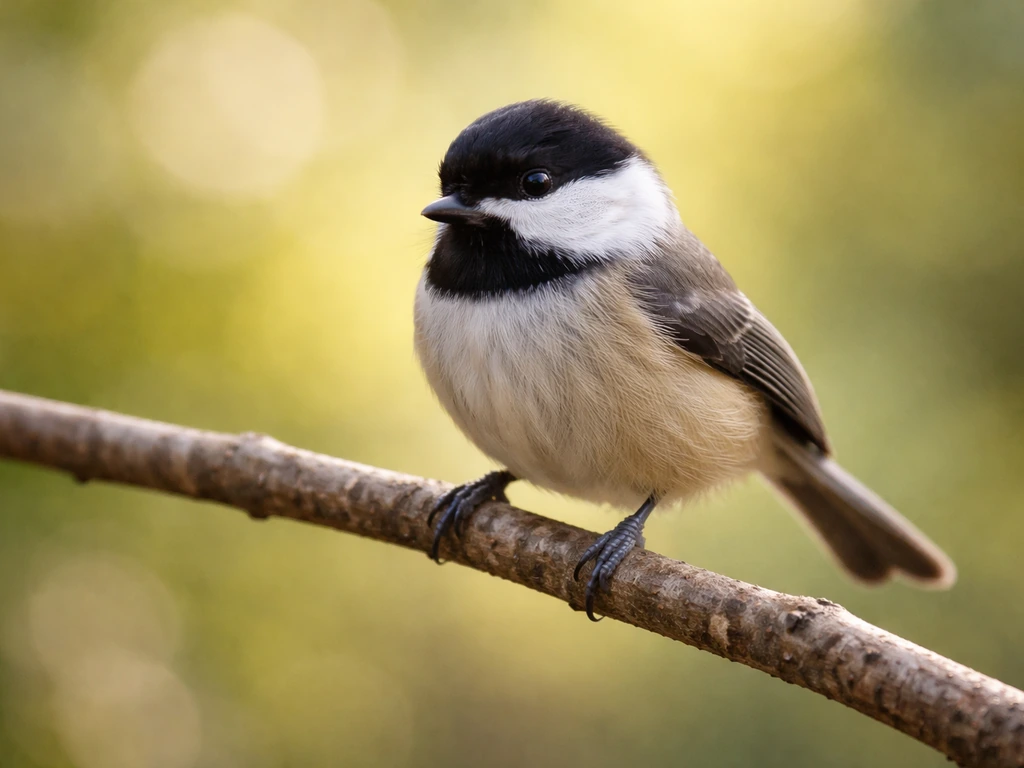
- Shoot at the bird's eye level whenever possible. Getting low, even lying on the ground, transforms a generic bird-on-a-branch shot into something with real presence.
- Leave space in the direction the bird is facing or moving. A bird looking left with empty space to its right feels natural. A bird crammed against the frame edge feels accidental.
- Fill the frame. The most common beginner mistake is leaving too much dead space around a small bird. Move closer, zoom in, or crop later.
- Wait for behavior. A bird eating, calling, stretching, or interacting with another bird tells a story. A bird sitting still is a record shot. Patience here pays off more than any technical adjustment.
- Pay attention to the background before you shoot. A cluttered background ruins an otherwise sharp photo. Shift your position even slightly to put sky, water, or shaded foliage behind the subject instead of a tangle of branches.
Background management is one of the bigger separators between snapshots and proper bird photos. A wide aperture (f/5.6 or wider) blurs the background, but your shooting angle and distance from background elements matter just as much as aperture. Getting low often replaces a messy forest floor with clean sky. Moving laterally a few steps can swap a bright distracting patch for a smooth dark shadow. It's a habit that becomes automatic once you start noticing it.
Light direction is the other compositional tool beginners often overlook. Front light (sun behind you, hitting the bird's face) brings out feather detail and color. Side light creates texture and drama. Backlight can produce beautiful rim lighting but makes exposure tricky. Morning and evening light is warmer and more flattering than midday. Whenever possible, position yourself so the light is coming from your side of the bird.
Practical workflow: practicing, reviewing, and improving
The fastest way to improve is to shoot a lot, review honestly, and make one specific change each session. After each outing, go through your keepers and your failures separately. For the blurry shots: was it shutter speed, missed focus, or camera shake? For the technically sharp shots that still look boring: what's the background doing? Where is the bird in the frame? Is there behavior happening or just sitting?
Editing is part of the process, not cheating. Exposure adjustments, white balance correction, and sharpening all help a good photo reach its potential. Learning how to edit bird photos properly will make your best field shots look dramatically better. And when composition wasn't perfect in the field, knowing how to crop bird photos effectively can rescue a great moment that was framed a little wide.
Practice your camera handling between outings too. Practice swinging a lens smoothly on a target, activating back-button focus, and dialing settings changes without looking at the camera. Birds don't wait while you remember which button does what. The more automatic these actions become, the more mental space you have to actually watch the bird and anticipate behavior.
If you're also working with bird-related tools and toys alongside photography, the same habit of reading documentation and practicing technique applies across the board. For example, learning how to use Skye bird effectively or understanding how to control the Skye bird device follows the same logic: read the basics, practice in a low-stakes setting, then try it in the field. Similarly, if you're referencing a guide to Skye's bird, taking the time to understand the tool before relying on it will save a lot of frustration.
Set a simple review routine: after every session, pick your three best shots and write down exactly what made them work. Pick your three worst and diagnose the specific failure. After a few weeks, you'll notice patterns. Most people discover they consistently lose shots to the same one or two fixable problems. Knowing that is half the battle.
The whole process compounds quickly. Better fieldcraft means better opportunities. Better settings mean more keepers per opportunity. Better composition means more of those keepers are actually good photos. And a steady review habit ties it all together. Start with one thing from this guide at your next session, not all of it at once. Pick the setting change or the location tool or the approach technique, apply it deliberately, and build from there.
FAQ
What shutter speed should I use if I am not sure how fast the bird is moving?
Start around 1/1600s for active small birds (swallows, finches), then move to 1/2500s or faster for erratic flight. If the bird is mostly perched and you are getting sharp results, you can sometimes drop closer to 1/800s to 1/1000s, but only if bursts stay consistently sharp. The key is consistency across a whole series, not a single successful frame.
Should I use RAW or JPEG for bird photography how to?
Use RAW so you can recover exposure swings from backlight and avoid losing feather detail in bright highlights. RAW also gives you more control over white balance on overcast days versus sunrise and sunset, where color shifts can look fine in-camera but degrade after cropping and editing.
How do I avoid missing focus when the bird is against branches or tall grass?
Use a wider AF area or tracking mode, but also favor an angle that reduces clutter behind the bird. If the bird keeps slipping behind high-contrast twigs, try placing your subject so the background contrast is lower, then fire short bursts when the bird clears. Background management is often the real fix when it looks like a focus problem.
Is it better to shoot bursts, or one photo at a time?
For flight and sudden head turns, use bursts. A longer burst window increases the odds of catching peak head angle and eye clarity, especially when focus is reacquiring. For perched birds that barely move, you can use single shots or small bursts to avoid filling the card unnecessarily.
What is the correct way to meter exposure when birds are dark against the sky or bright against leaves?
If the bird is a dark silhouette against bright sky, exposure compensation often needs to go positive to protect detail in the bird. If the bird is bright against dark foliage, it often needs to go negative to prevent blown highlights. In tricky light, rely on Auto ISO with Manual settings you control, and watch the histogram or highlight warnings for clipped feathers.
How far can I crop a bird photo without it looking low quality?
Cropping is workable, but it depends on your sensor size and how sharp the original file is. A common practical approach is to aim for composition in-camera so the subject fills most of the frame, then use only moderate crops for fine-tuning framing. If you must crop heavily, expect noise and less feather micro-detail, so prioritize sharpness and clean focus over extreme zoom later.
Do I need image stabilization if I use a tripod or gimbal?
With a stable tripod or gimbal, turn off lens or in-body stabilization if your setup supports it, because stabilization systems can sometimes introduce micro-corrections on firm platforms. When you handhold or use a monopod, stabilization can help smooth shake, but it still cannot replace proper shutter speed for moving birds.
How should I set autofocus priority to avoid the camera firing when it is not really locked?
If your camera offers options like focus priority versus shutter priority, choose focus priority for birds, so you do not get sharpness but out-of-focus frames. For fast action, you can experiment with tracking plus burst, but focus priority usually reduces the number of “almost in focus” keepers.
What settings should I change when overcast light turns the whole scene flatter?
Overcast often reduces contrast, so you will benefit from slightly tighter exposure control and careful background selection. Keep your shutter speed high for movement, but consider using the most flattering angle and background (clean sky or soft shade) since “good light” is no longer doing the work for you.
What is the safest way to approach if a bird is already watching me?
If the bird is looking directly at you or changing posture, slow down and stop moving. Let it settle first, then continue slowly from an angle, keeping a low profile and avoiding eye contact. If behavior changes persist, back off rather than trying to “thread the needle,” because repeated small advances can trigger stress cumulatively.
Can I use playback at all, for example outside nesting season?
Even when it might be legal or seemingly “less risky,” playback can still draw birds into unsafe areas or disrupt normal territory behavior. If you decide to use it, treat it as a last resort, keep volume low if your device allows it, and stop immediately if the bird shows stress signs. For beginners, the safest path is to skip playback entirely and rely on location, timing, and fieldcraft.
How do I handle my gear when the bird is already in the frame?
Prepare before the moment, then reduce fiddling. Set exposure mode, autofocus mode, and tracking before you start shooting, and avoid changing lenses on the fly if possible. Use a simple reload routine (swap batteries and cards only when you are not actively shooting) because most missed moments come from gear changes, not camera limitations.
What are common reasons photos look sharp but still “boring”?
Most boring results come from static framing and distracting backgrounds. Check whether the bird has an identifiable eye and posture, whether the background has clutter or bright patches, and whether there is a meaningful behavior element (head turn, feeding, interaction). A small angle shift that cleans the background often upgrades an otherwise technically perfect image.
How can I build a realistic review routine if I cannot review every session right away?
Do a quick triage on-site or soon after: flag frames with correct focus and a usable angle, then label failures by category (blur, missed focus, wrong background, bad light). When you have time later, only deep-review the flagged keepers and the top repeating failure category. This keeps the “one change per session” habit alive even with limited review time.
Next Article
How to Bird Mouth a Rafter: Step-by-Step DIY Guide
Step-by-step guide to cut the bird-mouth notch in a roof rafter, measure pitch accurately, and fit for a tight seat.