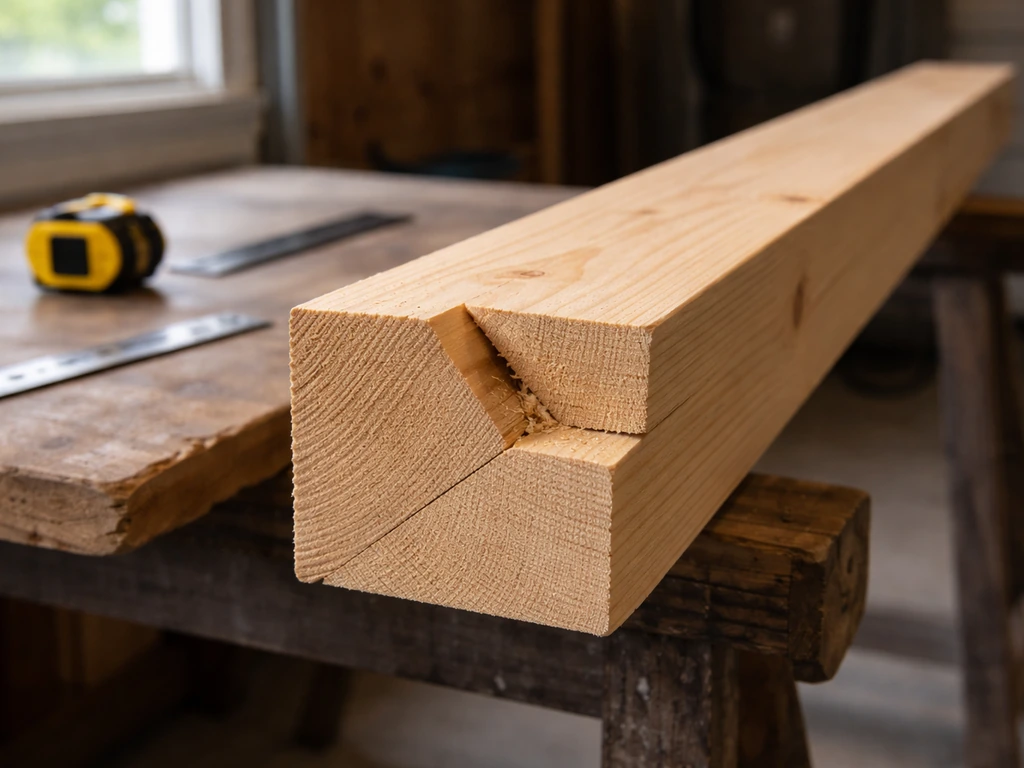
A bird-mouth cut is a notch you make near the lower end of a roof rafter so it sits flat and locked onto the top plate of your wall. You make two cuts that meet at a point: a plumb cut (vertical, parallel to the wall face) and a seat cut (horizontal, the flat surface that rests on the plate). Get both lines right for your roof pitch, keep the seat cut depth within code limits, and the rafter drops onto the plate with zero rocking and zero gap. That's the whole job.
How to Bird Mouth a Rafter: Step-by-Step DIY Guide

Marcus Hendricks
21 May 2026
What 'bird-mouth' actually means on a rafter

The bird-mouth (also written as birdsmouth or bird's mouth) is a triangular notch cut into the underside of a rafter at the point where it crosses the wall's top plate. When you look at it side-on, it genuinely looks like an open beak, which is exactly how it got the name. The notch has two faces: the seat cut, which lays flat on top of the wall plate and carries the rafter's load, and the plumb cut (sometimes called the heel cut), which stands vertical against the inside face of the plate.
The two cuts meet at a single point called the birdsmouth heel. Rapid Rafter explains that the birdsmouth heel is where the seat cut and plumb cut meet, and it uses pitch-based formulas (including HAP, or Height Above Plate) to help ensure the correct remaining bearing. That heel is the critical spot because it determines how high the rafter sits above the plate (called HAP, or Height Above Plate) and how much wood remains below the notch to carry structural load. The IRC building code (R802.7.1) caps how deep you can cut: the notch depth can't exceed one-third of the rafter's total depth. On a 2x8 rafter (actual depth 7.25 inches), that's a maximum notch depth of about 2.4 inches. Cut deeper than that and you're weakening the rafter and potentially failing inspection.
The geometry of the bird-mouth is driven entirely by your roof's pitch, expressed as rise over run (for example, 6/12 means 6 inches of rise for every 12 inches of horizontal run). The pitch sets the angle of your plumb cut, and the seat cut is always drawn perpendicular to that plumb cut face. For common rafters, the seat cut presents at 90° to the rafter’s plumb cut, meaning the seat line is perpendicular to the plumb-cut face so the two mating surfaces form the notch correctly the seat cut is always drawn perpendicular to that plumb cut face. Change the pitch setting and everything changes, so getting pitch right before you touch a pencil to wood is step one.
Tools and materials you need
- Rafter square (speed square or framing square): essential for marking both the plumb cut angle and the seat cut line at your specific pitch
- Tape measure: at least 25 feet; you'll use it to locate where the bird-mouth falls along the rafter
- Pencil or marking knife: a sharp pencil works fine; a knife gives a crisper line if you want maximum accuracy
- Circular saw: a 7.25-inch blade handles most rafter stock; a sharp framing blade (24-tooth) cuts cleanly
- Handsaw or jigsaw: for finishing the corner of the notch where the circular saw can't reach without overcutting
- Combination square or sliding bevel: helpful for double-checking angles
- Sawhorse or stable work surface: the rafter must not move while you mark or cut
- Safety glasses, hearing protection, and work gloves: non-negotiable when running a circular saw
- Rafter stock (your lumber): common sizes are 2x6, 2x8, or 2x10 depending on span and code requirements
One thing I'd add from experience: a cheap speed square is perfectly capable of handling this job. You don't need a dedicated rafter square unless you're framing a whole roof and want to speed things up. A standard speed square has pitch markings on the hypotenuse edge that let you set any common angle from 1/12 to 12/12 directly on the wood.
Step-by-step: measure and mark the bird-mouth cut
Work through these steps in order. Skipping ahead or doing them out of sequence is the single biggest cause of bad cuts, and I say that from personal experience after flipping plumb and seat cuts on my first solo rafter layout. Do the first one slowly, confirm it fits perfectly, then use it as a template for every rafter that follows. If you're also trying to figure out how to file a bird beak into an existing rafter, use the same template approach and remove material slowly until the notch fits perfectly.
- Confirm your roof pitch. Check your plans or measure the existing structure. Write it down: for example, '6/12.' Every measurement that follows depends on this number.
- Lay the rafter stock flat on sawhorses, crown (the slight bow in the wood) facing up. This is how the rafter will sit in the roof, so mark it in this position.
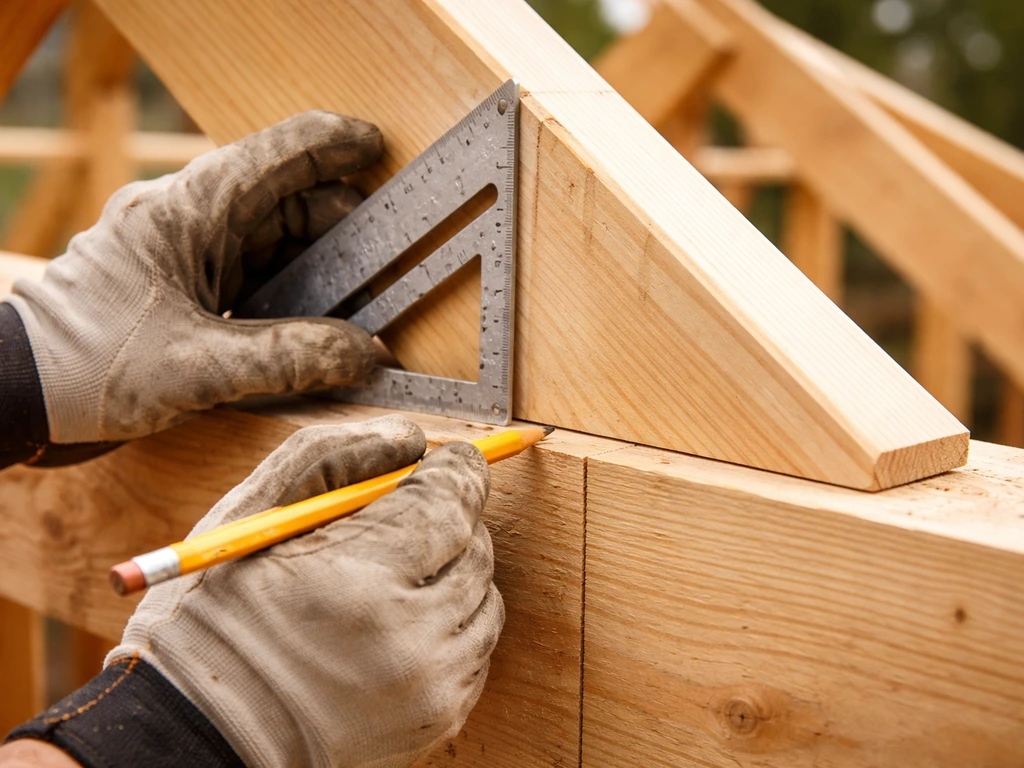
- Mark the ridge plumb cut at the top end of the rafter first. Set your speed square to your pitch number on the pivot point, place it at the top end of the board, and scribe a plumb line. This orients the whole rafter correctly before you locate the bird-mouth.
- Measure along the rafter to find the bird-mouth location. This measurement comes from your rafter run calculation (half the building width, adjusted for ridge thickness). Mark a point along the rafter's top edge at the correct rafter line length. This is your bird-mouth reference point.
- Mark the plumb cut line at the bird-mouth. Place your speed square at the bird-mouth reference point with the same pitch setting you used at the ridge. Scribe a plumb line across the rafter face. This is the heel/plumb cut of your notch.
- Mark the seat cut line. From the heel point (where the plumb line meets the bottom edge of the rafter), draw a line perpendicular to the plumb cut, running horizontally toward the rafter's lower end. The length of this line equals the width of your wall's top plate: typically 3.5 inches for a 2x4 wall or 5.5 inches for a 2x6 wall. Use a combination square set to 90 degrees off your plumb line to keep this exact.
- Check your HAP (Height Above Plate). Measure from the seat cut line up to the top edge of the rafter along the plumb-cut line. This is your Height Above Plate. All rafters in the same roof must have identical HAP values, so write it down and stick to it.
- Verify notch depth. Measure from the seat cut line straight down to the bottom edge of the rafter. This must be no more than one-third of the rafter's full depth (e.g., no more than 2.4 inches on a 2x8). If your mark puts you over that limit, shorten the seat cut length until you're within code.
Cutting methods, saw technique, and accuracy tips
Most carpenters use a circular saw for the bulk of both cuts, then finish the corner with a handsaw. Here's why: a circular saw blade is round, which means it naturally overcuts past the corner if you let it run through. Overcutting weakens the rafter and can fail inspection. Stop the blade exactly at the intersection of your two cut lines, then finish the corner by hand.
- Set your circular saw's bevel to 0 degrees (straight, no bevel). Both the seat cut and the plumb cut are made with the blade perfectly vertical relative to the rafter face.
- Start with the plumb (heel) cut. Align the blade precisely on your marked line on the waste side (the part being removed, which is the triangle of wood below and toward the rafter's lower end). Cut down to the point where the two lines meet, then stop. Do not let the blade cross that intersection.
- Make the seat cut. Align the blade on your seat cut line and cut horizontally toward the plumb cut. Again, stop exactly at the intersection point.
- Finish the corner with a handsaw or sharp chisel. A few careful strokes will free the waste triangle. Work slowly here; rough corners prevent the rafter from seating flat.
- Keep your blade sharp. A dull blade wanders, heats up, and produces rough cuts. If your blade is burning the wood, replace it before cutting rafters.
- Clamp the rafter to the sawhorse before every cut. A rafter that moves even slightly while you cut will produce a cut line that's off by a degree or two, and that adds up badly across a whole roof.
One accuracy tip that makes a real difference: after marking your lines, hold your speed square against the plumb cut line before cutting and sight down the blade to confirm they're aligned. It takes ten seconds and catches errors before they happen.
Common mistakes and how to avoid them
| Mistake | What goes wrong | How to fix it |
|---|---|---|
| Wrong pitch setting on the square | Plumb cut angle doesn't match roof pitch; rafter won't sit flat | Double-check pitch from plans before marking; cut a test rafter first |
| Swapping seat cut and plumb cut lengths | Notch is too deep or too shallow; rafter rocks on the plate | Seat cut = plate width (3.5" or 5.5"); plumb cut = driven by HAP, not a fixed number |
| Overcutting the corner with a circular saw | Structural notch is too deep; weakens the rafter | Stop blade at the intersection; finish with a handsaw |
| Seat cut not perpendicular to plumb cut | Rafter rocks or gaps on one side of the plate | Use a combination square to confirm 90 degrees before cutting |
| Notch depth exceeds 1/3 rafter depth | Code violation; structural failure risk | Shorten the seat cut length; adjust HAP if needed |
| Inconsistent HAP across rafters | Ridge or wall plate height varies; roof looks wavy | Cut a template rafter, check HAP, use it to mark all subsequent rafters |
The mistake I see most often, especially from beginners, is cutting the first rafter and immediately cutting all the others from the same layout without testing the fit. If that first layout is even slightly off, you've now cut 20 bad rafters. Cut one, test it, adjust if needed, then commit to mass production.
Fit-check, adjust, and secure the rafter
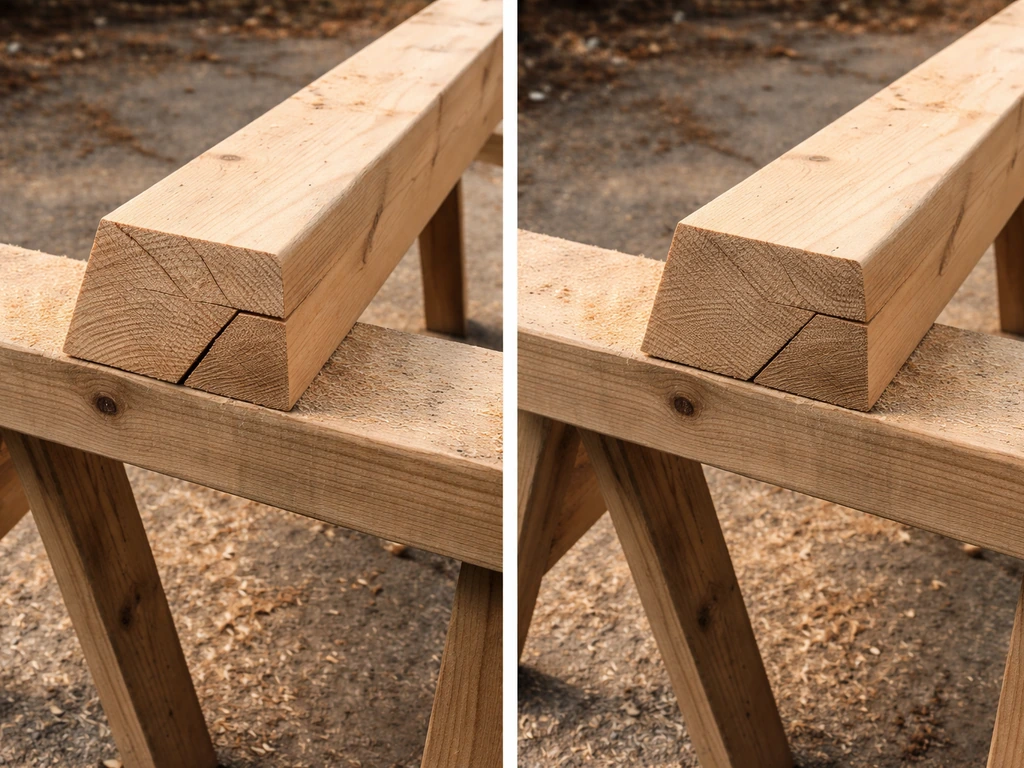
Once you have your first test rafter cut, take it to the wall and set it in place before doing anything else. Here's what to look for:
- The seat cut face should sit completely flat on the top plate with no rocking and no gap anywhere along the bearing surface
- The plumb cut face should be vertical, not leaning in or out relative to the wall face
- The rafter should not spring up off the plate when you press down at mid-span; if it does, the seat cut isn't fully bearing
- The HAP measurement from the top of the plate to the top of the rafter at the bird-mouth should match your planned value exactly
- There should be no twist along the rafter length; sight down the top edge from ridge to tail to confirm it's straight
If the rafter rocks toward the outside of the wall, your seat cut is slightly long or your plumb cut is angled slightly wrong. If there's a gap at the inside of the plate, the plumb cut is too shallow. Small gaps (under 1/8 inch) can often be shimmed, but anything larger means you should re-cut the rafter rather than shimming it, because a shimmed rafter is an unstable rafter.
To trim a plumb cut angle by a small amount, re-set your speed square to the correct pitch, scribe a fresh line, and take a thin pass with the circular saw. Go slow and check after each pass. Once the rafter sits perfectly, use it as your master template: lay it on top of each piece of rafter stock, trace the bird-mouth outline directly, and cut to the lines. If you are also installing a bird comb, the best way is to dry-fit it and adjust the bird-mouth seating so everything lines up cleanly along the ridge how to fit bird comb. This is the production workflow used on every job site from small sheds to full house frames.
Fastening the rafter once it's seated typically involves toenailing through the rafter into the top plate using 3-inch nails (two on each side), or using approved metal rafter ties for hurricane/seismic zones. Check your local code for the fastening schedule; the bird-mouth provides the seat, but the fasteners are what hold the rafter down against uplift forces. After the rafter is properly seated, you can use the same careful fastening approach when installing a whirly bird on a tin roof so it stays secure in wind fasteners are what hold the rafter down against uplift forces.
Safety, cleanup, and your next steps
Roof framing involves a circular saw running at full speed through lumber, often on an awkward work surface. Wear safety glasses every single cut, no exceptions. Flying wood chips from a circular saw can cause serious eye injury. Hearing protection is strongly recommended too: a circular saw produces around 100 decibels, and you'll be running it repeatedly. OSHA specifically flags kickback and flying particles as the two main hazards with handheld circular saws, and both are preventable with proper blade guards, sharp blades, and secured lumber.
- Always use the blade guard; never tie it back or remove it
- Replace any blade that is dull, bent, or has missing teeth before starting
- Clamp rafter stock to a sawhorse before every cut; never freehand a rafter cut
- Keep bystanders at least 10 feet away from the cutting area
- After cutting, sweep up sawdust and debris before moving on; loose chips underfoot near ladders are a fall hazard
Once your test rafter passes the fit-check, you're ready to cut your full set. Work in batches: mark all rafters using your template, then cut all plumb cuts, then all seat cuts. This keeps your saw set at one angle at a time and reduces the chance of mixing up cut lines mid-job. After all rafters are cut and stacked, do a quick visual scan across the bird-mouths to confirm they all look identical before you start installing.
If you want to go deeper on the math behind sizing the notch correctly, the topic of how to calculate bird mouth cut covers the geometry in detail, including how pitch, rafter depth, and HAP interact. That's a natural next step once you've got the physical cutting workflow down. Getting comfortable with the calculation side means you can adapt to any pitch or rafter size without guessing, which is the difference between a confident carpenter and one who's hoping the rafters fit when they go up. For exact bird formula instructions, use the rise over run (and your rafter dimensions) to generate the precise seat cut depth and angles before you mark any wood calculation side.
FAQ
Can I bird-mouth an existing rafter to fix a bad fit?
You can usually cut a bird-mouth on the rafter stock you already have, but you need to match the original rafter geometry, especially the pitch and the rafter’s actual bottom depth at the heel. Dry-fit the modified rafter against the top plate and confirm the seat cut is fully bearing (no rocking) before removing more material. If the notch would exceed the maximum notch depth allowed by your local code, the correct fix is not a deeper cut, it is using properly sized rafters or adjusting the framing plan.
What should I do if there is a gap after the bird-mouth cut, can I shim it?
Yes, but only for small issues. If the rafter has a gap smaller than about 1/8 inch at the inside of the plate, a thin shim can help temporarily, but you should still verify structural requirements and that the shim does not create a loose or crushable bearing surface. For larger gaps, plan on recutting, because shimming a bird-mouth that does not fully seat usually leads to movement and inspection failures.
How do I confirm the roof pitch before cutting bird-mouths?
Take a real measurement at the job site. Use the roof pitch from the framing plan if you have it, but confirm by measuring rise and run (or by using a pitch gauge) so your plumb cut angle matches the actual roof geometry, including any changes due to uneven plates. If the rafters are not level at the wall, correcting the layout later by changing notch angles usually causes other alignment problems.
If my plumb cut angle is slightly off, can I correct it without starting over?
Any time you change the seat bearing, you need to re-check how the rafter sits and how much wood remains below the heel. A common safe workflow is to adjust in thin passes: reset the speed square to the correct pitch, re-scribe, cut only enough to remove the error, then dry-fit again at the wall. If you suspect you already took too much off, stop and compare notch depth against the rafter depth because the limit is based on remaining structural depth.
What if there’s wiring, blocking, or an obstruction at the rafter heel?
Do not use the bird-mouth notch as a place to “make it fit” around obstacles. For soffit brackets, blocking, wiring, or plumbing runs, it is safer to reroute, add blocking, or alter the framing layout than to notch deeper or relocate the heel. If an obstruction forces the heel cut area to change, you generally need an engineering-approved framing modification.
Should I use screws or nails to “pull” a rafter into the notch?
The bird-mouth should provide bearing on the top plate, but it should not rely on fasteners to fix an incorrect notch. If you have to pull the rafter down into place with overdriven nails, something is wrong with the seating geometry. Confirm the seat cut is fully contacting the plate, then fasten according to your local fastening schedule (including any tie requirements for wind and seismic areas).
What’s the safest workflow to mass-produce bird-mouth rafters?
Yes, but you must keep the cuts consistent with your roof geometry. A fast way is to cut one rafter as a master, dry-fit it, correct it if needed, then use it as the template for tracing the bird-mouth outline on the rest. Cutting every rafter from the layout without confirming the first fit is where most batch problems happen.
Is it okay to use a circular saw for both cuts, or do I need a handsaw for the whole notch?
A circular saw can handle both cuts, but avoid letting the blade continue past the corner. The key is to stop the blade right at the intersection of your two cut lines, then finish the heel corner with a handsaw or chisel for a clean point. Overcutting at the heel can reduce bearing and weaken the notch area.
What do common “rocking” and inside-gaps usually mean, and where is the error coming from?
After the notch is cut, verify two things in the wall test: the seat bearing (no rocking) and the plumb cut alignment (no inside gap). If the rafter rocks outward, it usually means one face is slightly off length or angle. If there is an inside gap, it typically indicates the plumb cut is too shallow or the angle did not match the pitch. Small adjustments should be made with new lines and thin passes, not by enlarging the notch randomly.
Does bird-mouth seating alone satisfy rafter uplift resistance in high-wind or seismic areas?
Not always. If you are working in a snow-load or wind-load situation, local requirements may call for specific rafter tie hardware and fastening patterns beyond the bird-mouth bearing. Also, some designs may require additional members or different heel detailing. If your area is hurricane or seismic prone, plan on using approved ties and follow the fastening schedule rather than relying on the notch alone.
How can I quickly confirm my speed square and cut line alignment before I cut?
Yes, especially for repeating accurate angles. Place the speed square against the plumb cut line, then sight along the blade to confirm it matches your mark before starting the cut. This “confirm before cutting” step often catches pitch or line-drift errors that are hard to fix after material is removed.
Next Article
How to Fit Bird Comb Safely Step by Step
Step-by-step guide to fit a bird comb safely: tools, prep, positioning checks, fixes for loose or rubbing issues