If you picked up an Audubon bird call and are staring at it wondering what to do next, you are in the right place. The short answer: it is a small twist-and-chirp device, not a whistle you blow into. Once you get the motion right and keep the rosin fresh, it produces surprisingly realistic bird sounds in seconds. This guide walks you through everything, from figuring out exactly what you have, to making sounds on day one, to practicing until birds actually respond.
How to Use an Audubon Bird Call: Setup, Blowing, DIY

Marcus Hendricks
11 Apr 2026

What 'Audubon bird call' usually means (and what you probably have)
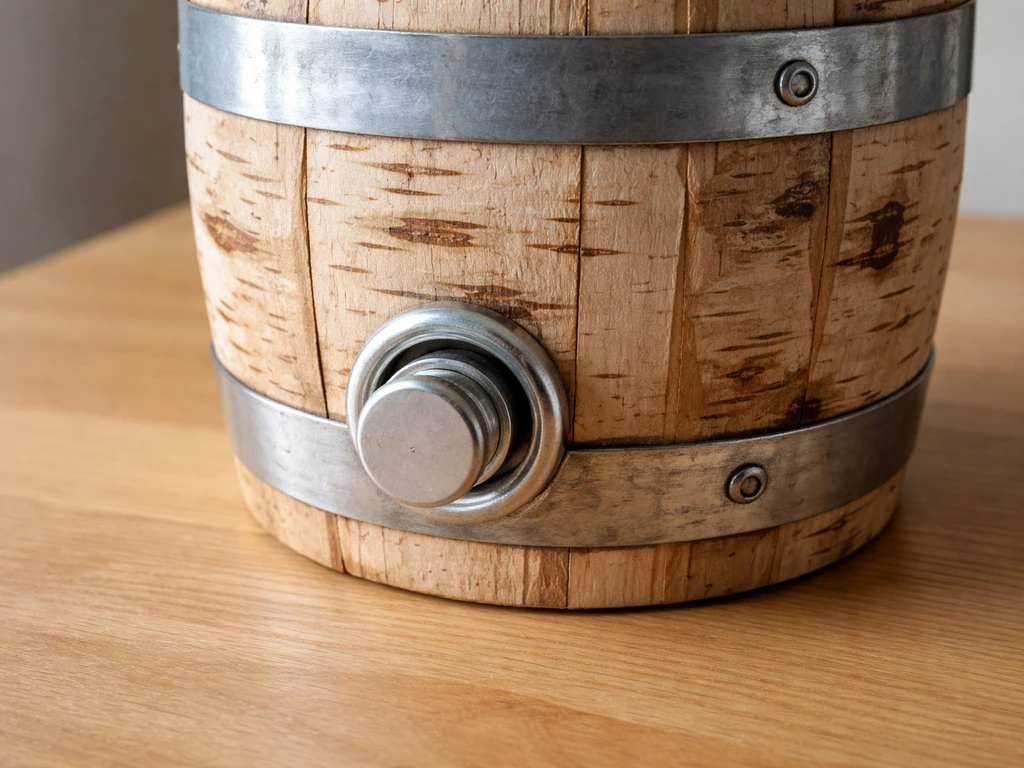
The term gets used a few different ways, so let's clear it up fast. Most people searching for this phrase are holding the original Audubon Bird Call made by American Bird Products. It is a two-piece friction call: a red birchwood barrel (the cylinder you grip) and a cast zinc metal plug or ring that fits into it. There is no mouthpiece. You make sound by twisting the two pieces against each other, not by blowing. The device comes with a small rosin capsule, and that rosin is what makes the whole thing work.
Less commonly, people mean a different kind of bird call entirely, like a wooden tube call or a reed-based call. If you have something you hold up to your mouth and blow through, you have a different style of device. For a broader breakdown of call types and how they work, how to use a bird call is a solid starting point. But if you have the red-and-silver twist device, keep reading, because this guide is exactly for you.
What you need before you start
Setup is minimal, which is one reason this call is so popular. Here is what to check before you try to make your first sound:
- Your Audubon Bird Call (the birchwood barrel and zinc plug/ring assembled together)
- The rosin capsule that came in the package, or replacement rosin if you lost it
- Dry hands (moisture kills the friction and kills the sound)
- A quiet spot to practice, ideally indoors first so you can hear what you're producing
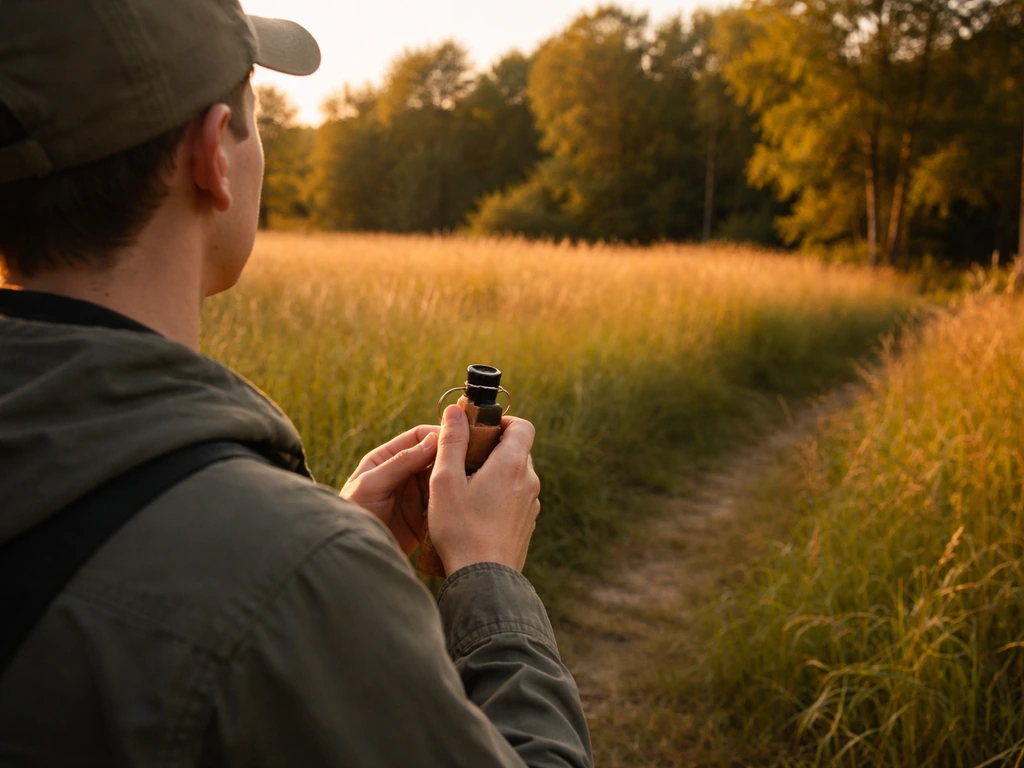
Holding it correctly matters more than most beginners expect. Grip the red birchwood barrel between your thumb and index finger on one hand. Then grip the metal ring between your thumb and index finger on your other hand. Your hands should be close together but not touching each other. All the motion comes from your wrists, not your arms. Think of it like cracking a small glow stick: controlled, small rotation, not a big crank.
Step-by-step: making realistic bird sounds
Here is exactly how to get your first sound out of this device. Go slow on the first few tries. The technique feels awkward for about five minutes and then clicks.
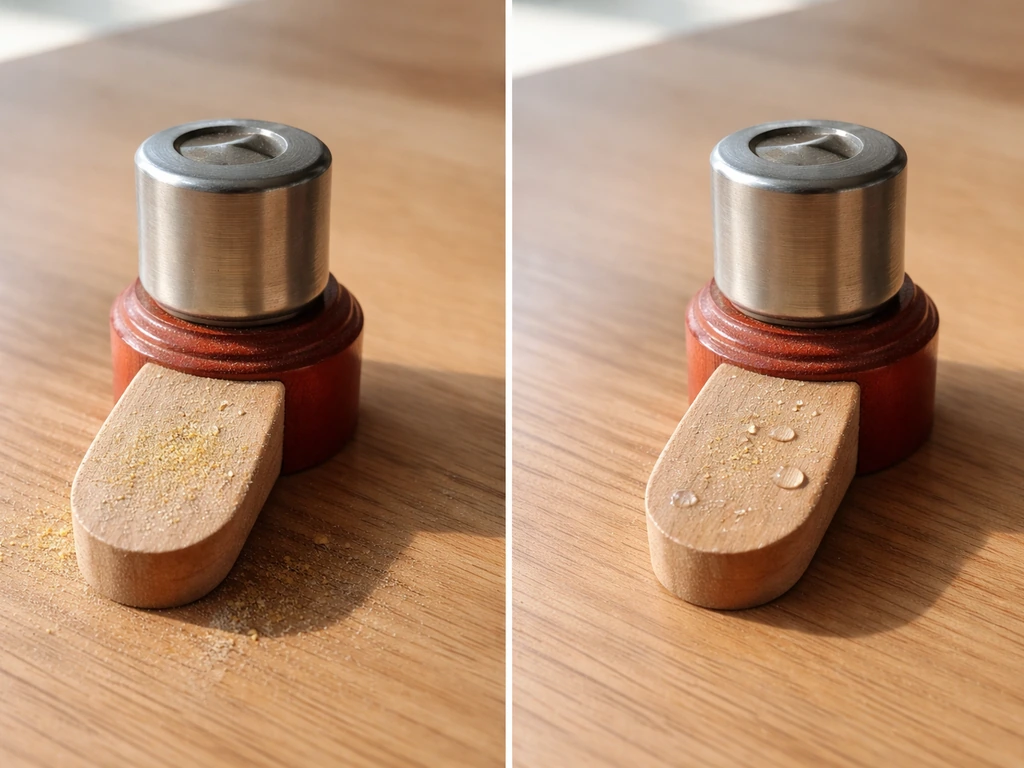
- Apply rosin first. Open the rosin capsule and rub a small amount of pine rosin powder onto the contact point where the wood meets the metal. You don't need a lot; a light coat is enough. Think of it like rosining a violin bow.
- Hold the barrel in your non-dominant hand, pinching it gently between thumb and index finger. Keep your grip relaxed, not tight.
- Hold the metal ring in your dominant hand the same way: thumb and index finger, light grip.
- Twist the metal ring back and forth against the wooden barrel with small, controlled wrist rotations. Do not spin it all the way around. Short back-and-forth movements of maybe 10 to 20 degrees produce the best chirp sounds.
- Vary the pressure between the two pieces as you twist. More pressure produces lower, rougher sounds. Less pressure produces higher, thinner chirps. This is where all the 'different bird' sounds come from.
- Experiment with speed. Fast, light twists produce rapid chirps. Slow, deliberate twists produce longer, more tonal squeaks.
- Combine pressure and speed changes mid-twist to mimic the rising and falling pitch of real bird calls. It takes practice, but even beginners can produce convincing chickadee-style sounds within a few sessions.
The device is designed to imitate the kinds of squeaks and chirp-type sounds that make birds think other birds are nearby. It works because it triggers natural curiosity in birds, not because it perfectly replicates one specific species. With some practice, you can get close to the sounds of chickadees, nuthatches, and several warbler species. For more detailed tips specific to this device, the Audubon bird call instructions page goes deeper on specific sound patterns.
How to make a simple DIY Audubon-style bird call
If you want to build something similar at home, you can. A friction call is one of the easiest bird call types to DIY because the physics are simple: two surfaces, rosin, and controlled friction. Here are the realistic options:
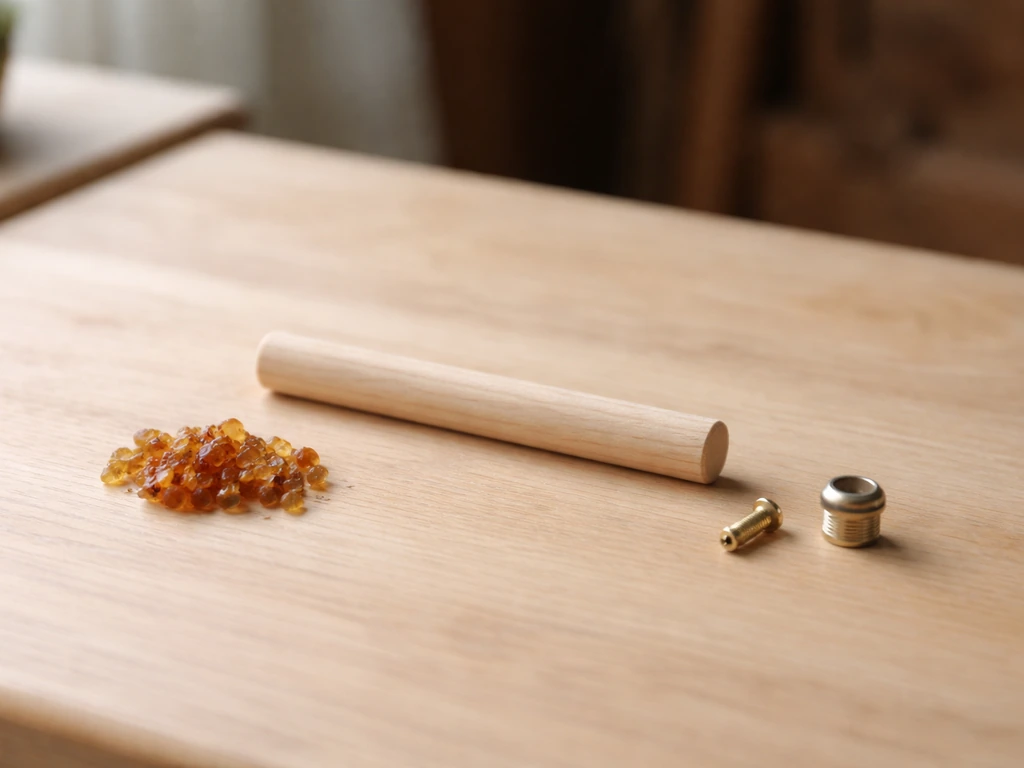
The simplest version uses a small hardwood dowel (birch or maple works great) and a metal washer or small bolt with a smooth shank. Sand the end of the dowel smooth, apply pine rosin, and rub or twist the metal piece against it. It will not be as refined as the manufactured call, but it produces similar squeaks. Pine rosin is available at most music stores (it's the same stuff used for violin bows) or online for just a few dollars.
A wooden tube call is another option, and slightly easier to shape if you have basic woodworking tools. A short section of small-diameter wooden tube, open at both ends, can be used as a pishing-style call by pressing it to your lips and making a quiet 'psshh' sound through it. The wood resonates and amplifies the sound in a way that carries further than your unassisted voice. For a full walkthrough of this style, how to use a wooden bird call covers the technique in detail.
Honestly though, for a beginner, just buying the original Audubon Bird Call is worth it. It costs under $15, it already has the right wood-to-metal friction ratio dialed in, and it comes with rosin. The DIY version is a fun project, but it takes a few rounds of adjustment to get the contact surfaces right. The commercial version is ready to go in two minutes.
Practice routines that actually build your skills
The single biggest mistake beginners make is practicing in the field before they know what their call sounds like. Practice indoors first. Record yourself on your phone so you can actually hear what you're producing. This sounds obvious but almost nobody does it, and it shortens the learning curve dramatically.
Here is a simple routine to build competence in about a week:
- Day 1 to 2: Focus only on getting a clean, consistent chirp. Apply rosin, make five minutes of sounds, check that each twist produces a tone (not silence or a scrape). If you are getting silence, add more rosin.
- Day 3 to 4: Try to produce three distinct sounds: a high short chirp (light pressure, fast twist), a low slow squeak (firm pressure, slow twist), and a mid-range chatter (medium pressure, rapid back-and-forth). Label them in your head so you can repeat them.
- Day 5 to 7: Find recordings of common local birds (chickadee, nuthatch, tufted titmouse) and try to match the rhythm of their calls, not necessarily the pitch. Matching rhythm is more important than perfect pitch for attracting birds.
Training your ear to recognize bird vocalizations is a skill on its own, and it pays off massively. The National Park Service frames this as 'birding by ear': once you know a bird's call tone and pattern, you can recognize it even before you see it. Start noticing calls on your daily walks. You will be surprised how quickly your brain starts sorting bird sounds automatically. Audubon also has a birding-by-ear resource series worth bookmarking if you want to go deeper on sound identification.
If you have another brand of call and want a comparison point, the Toysmith bird call instructions article shows how a similar friction-style call works, which can help you understand the shared technique across devices.
When things go wrong: common problems and fixes
Most problems with the Audubon Bird Call come down to one of four things: no rosin, too much moisture, wrong grip pressure, or poor technique. Here is a quick diagnostic:
| Problem | Most Likely Cause | Fix |
|---|---|---|
| No sound at all | Rosin is depleted or surfaces are wet | Dry both surfaces completely, then apply fresh rosin powder to the wood-metal contact point |
| Weak or scratchy tone | Too little rosin or too much grip pressure | Add a touch more rosin; loosen your grip on both pieces |
| Wrong pitch (too high or too low) | Pressure between surfaces is off | More pressure lowers pitch; less pressure raises it; experiment with small adjustments |
| Inconsistent sound, skipping | Uneven rosin coating or jerky wrist motion | Re-apply rosin evenly, and slow your twist motion down until it becomes smooth |
| Birds not responding | Overcalling or unnatural rhythm | Call for 10 to 15 seconds, then stop and wait 2 minutes; less is almost always more |
Overcalling is the most underrated mistake. Beginners get excited when a bird looks up and they keep calling. The bird hears something that sounds like a frantic, panicked chirper and gets suspicious. Real birds take pauses. They call, they listen, they call again. Mimic that rhythm and your results will improve immediately.
The other issue I ran into early on was using the call in wet conditions. Even a little hand moisture from holding the device too long reduces the friction dramatically. If you are out on a humid morning, keep the call in your pocket between uses and dry your fingers before picking it up.
Using it in the field: etiquette, timing, and your next steps today
The Audubon Bird Call works best in the first two hours after sunrise, when birds are most active and vocal. Late afternoon (the last hour before dusk) is the second-best window. Midday is usually a waste of time because most birds go quiet. In spring and early summer, breeding season means birds are far more responsive to any sounds suggesting territorial competition or nearby flock activity.
On field etiquette: use the call in short bursts, not as a constant soundtrack. Call for 10 to 15 seconds. Then wait at least 60 to 90 seconds in silence. Repeat once or twice if nothing responds. If a bird comes in and is clearly agitated, stop calling immediately. You have already succeeded, and continuing to call at that point causes real stress to the bird.
It is worth knowing that the broader birding community has genuine concerns about overuse of bird calls and recordings. Several Audubon chapters and ethics guides note that repeated or high-volume use of bird sound tools can disrupt feeding, nesting, and normal behavior, particularly in sensitive habitats or during breeding season. Some parks and preserves restrict the use of bird calls entirely. Always check local rules before using your call in a protected area, and aim to minimize disturbance. The friction-based Audubon Bird Call is generally lower impact than a speaker playing recordings at full volume, but the same principle applies: use it with restraint.
If you want to do something useful right now today: get your call out, apply rosin, and spend five minutes just making sounds in your kitchen or backyard. American Bird Products also sells a “Refresh rosin kit” and directs users to apply a small amount of natural pine rosin powder to the contact point between the wood and metal on the Audubon Bird Call apply rosin.
Do not worry about matching a specific bird yet. Just get comfortable with the motion and find your three basic sounds (high, low, chattering). That is genuinely all you need to start attracting birds on your next walk. Everything else, the matching, the timing, the field technique, comes naturally once the physical skill is there.
FAQ
How do I tell if I have the original red-and-silver Audubon two-piece friction call versus a different bird call?
Check for a gripable red birchwood cylinder and a separate cast zinc metal plug or ring that twists into it. There should be no mouthpiece, no reed, and you should generate sound by friction between wood and metal (not by blowing into a tube).
If my Audubon bird call produces no sound, what should I check first?
Most often it is rosin related, either the rosin is missing or too dry. Open the rosin capsule and rub or apply it to the contact area, then make a few slow test twists. Also make sure your fingers are dry, because moisture on your hands can shut down friction quickly.
What grip pressure should I use, soft or firm?
Use controlled, wrist-driven pressure that stays light-to-moderate. If you press too hard you can get scratchy, distorted chirps, and birds may not respond. If you press too lightly you will get weak squeaks. Aim for repeatable sound in a few seconds before you go into the field.
Why does my call sound different at home versus outside?
Temperature and humidity change how the wood-metal surfaces behave. Outdoors, humid air and even mild hand moisture reduce friction, so you may need more frequent drying and occasional re-rosining, especially early in the morning.
How do I avoid overcalling while still getting birds to notice me?
Use short bursts only (about 10 to 15 seconds), then pause 60 to 90 seconds. If a bird approaches but looks tense, stop immediately. Think in cycles of call, listen, and call again, not continuous calling.
How long should I practice before I expect real bird responses?
Expect the motion to feel awkward for a few minutes, then get usable fairly quickly. For responses, give yourself at least several practice sessions and focus on consistency (high, low, and chattering). Bird reaction depends more on timing and your rhythm than on perfect species matching.
Can I use the Audubon bird call during midday, or is it a waste?
Midday is usually less effective because many birds quiet down. If you do try it, use it sparingly and only if you are near active birds already calling naturally, otherwise you are more likely to waste rosin and risk unnecessary disturbance.
What is the best way to keep the rosin from running out or going stale?
Reapply in small amounts instead of flooding the contact area, then keep the call dry between uses. Store it in a pocket or small pouch when you are not actively playing it, and avoid leaving it in a damp environment.
Should I record myself, and what should I listen for in the playback?
Yes, recording is one of the fastest ways to diagnose technique. Listen for whether you can reliably produce your three basic sound types (high, low, chattering) and whether the tone stays steady without squeaking that sounds scratchy or overly aggressive.
What if I get a response but the bird seems agitated or distant?
That is a sign you may be calling too often or using an overly intense pressure. Stop calling right away and give silence for a few minutes. Then resume only with a single short burst, and increase pauses rather than turning up frequency.
Are there rules or restrictions on using bird calls in parks or preserves?
Yes, some parks and preserves restrict bird-call use entirely, and others may limit it in sensitive habitats or during breeding season. Check local regulations before you use your call, even if it is a low-volume friction device.
Can I DIY a similar friction call, and how close will it sound to the commercial Audubon model?
A DIY friction call can produce similar squeaks, but it usually takes iteration to get the right wood-to-metal contact and rosin amount. Expect it to sound less refined until you adjust surface smoothness and re-rosinize more consistently than the manufactured version.
Next Article
How to Use a Bird Call: Beginner Guide and Field Routine
Step-by-step how to use a bird call device, pick the right type, run field routines, and troubleshoot ethically.