Here is the short answer: set up a feeder about 10 to 15 feet from a natural perch, position yourself or your camera 10 to 20 feet away with a 400mm or longer lens, shoot in burst mode at 1/1000s or faster, and let your camera's subject-detection autofocus do the heavy lifting. That setup alone will get you usable shots within your first session. Everything below explains the why and how behind each piece so you can dial it in for your specific yard.
Backyard Bird Photography Setup: Step-by-Step Starter Guide

Marcus Hendricks
12 Apr 2026
Know your backyard goal and constraints first
Before you buy anything or move a single feeder, spend five minutes observing your yard. Where do birds actually land? Which direction does the morning sun hit? How much space do you have between the feeder area and wherever you plan to stand or sit? These three questions shape every decision that follows.
Distance matters more than most beginners realize. If your yard is small and birds land within 10 feet of where you can sit, a 300mm lens might be plenty. If birds stay on a fence 40 feet away, you need more reach. Be honest about the light too. A north-facing yard with deep shade all morning is a harder environment than an east-facing garden with soft golden light at 7 a.m. You can work around both, but knowing your constraints upfront saves a lot of frustration.
Also decide what behaviors you want to capture. Perching at a feeder is the easiest starting point. Hopping and foraging on the ground is doable but requires a lower camera angle. Takeoffs and flights are the hardest and need faster shutter speeds and more responsive autofocus. If you are just starting out, focus on feeder perching first and build from there.
Essential gear: what you actually need (and what to skip for now)
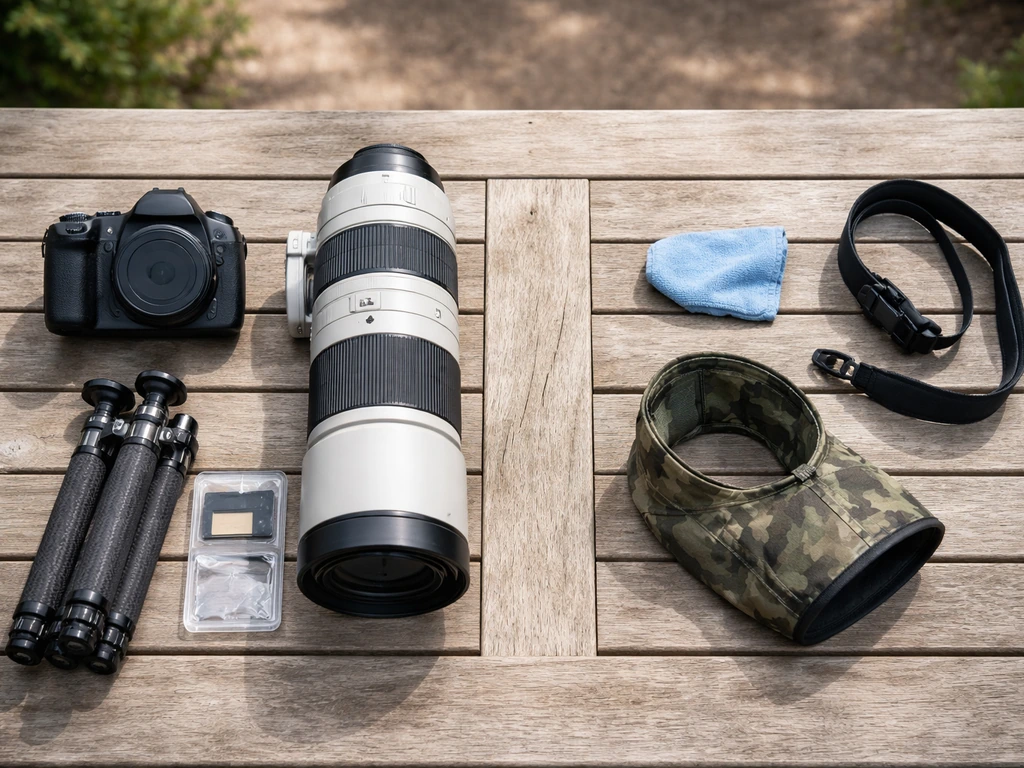
Camera bodies
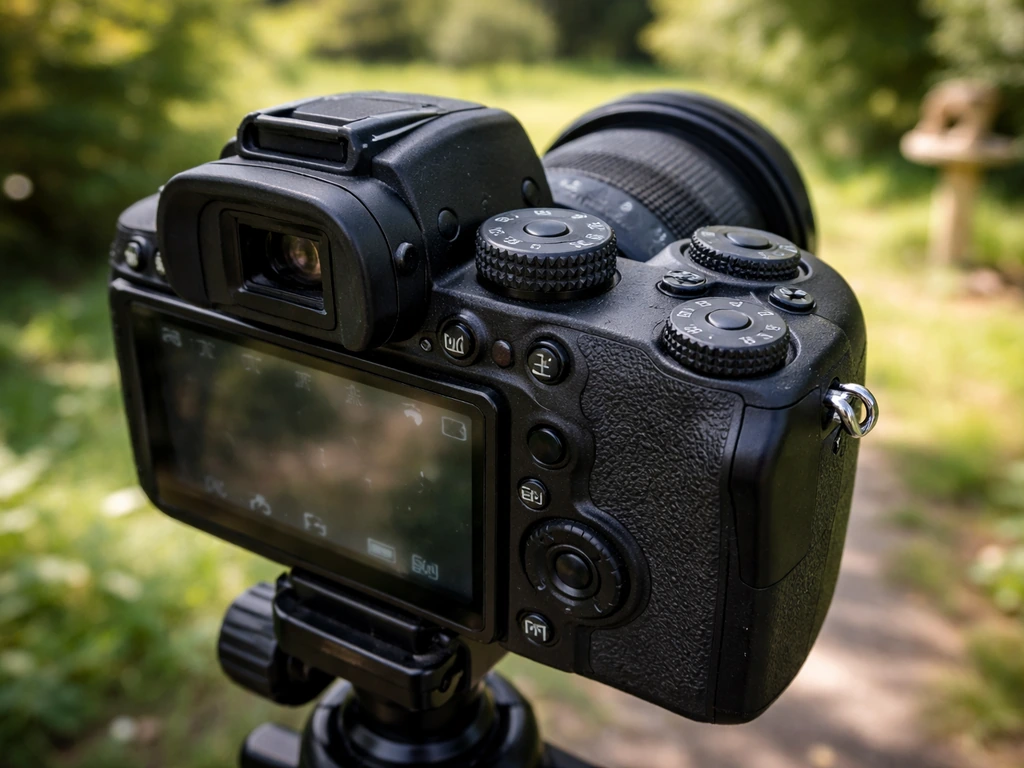
You do not need a flagship camera to get great backyard bird photos. A modern mirrorless or DSLR body with decent autofocus tracking will work. That said, the gap between budget and mid-range bodies is most noticeable in autofocus speed and burst rate. If you are picking a new body or using what you have, prioritize one with subject-detection AF. Nikon Z-series bodies, for example, can display a focus point directly over a detected bird's eye when you select 'Birds' in the AF subject detection options. Canon EOS R-series bodies with Animal subject detection and Whole Area Servo AF do the same thing. Either ecosystem works well for backyard shooting.
Lenses
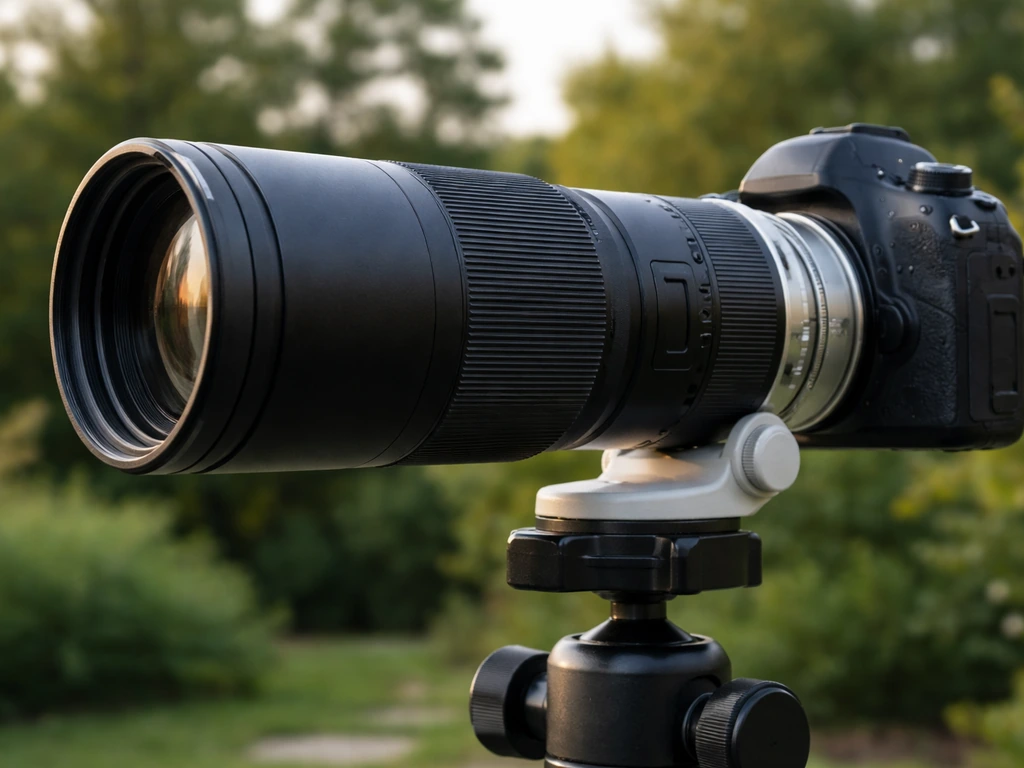
Reach is king in bird photography. A 400mm focal length is the practical starting minimum for most backyard setups where birds are 15 to 40 feet away. A 100-400mm zoom gives you flexibility. A 500mm or 600mm prime gives you more reach and often better optical quality but less flexibility. If budget is tight, a 150-600mm third-party zoom (Sigma or Tamron) delivers impressive reach at a fraction of prime prices. Whatever you choose, a lens with image stabilization helps when you are hand-holding or the light is low.
Stabilizing mounts
A sturdy tripod with a gimbal head is the gold standard for backyard setups where you are stationary. A gimbal head lets you swing the camera smoothly in any direction to track a bird without fighting the weight of a heavy telephoto. Look for one with a 360-degree pan base and a built-in bubble level so you can set it up level quickly. Some gimbal heads like the Benro GH5C are rated for loads up to 30 kg (66 lbs), which is overkill for most setups but reassuring with big lenses. If you are moving around the yard or want to hand-hold for more spontaneous shooting, a monopod is a solid middle ground between full tripod stability and hand-holding freedom.
Where to put everything: placement is half the battle
The single biggest mistake beginners make is placing the feeder where it looks good in the yard rather than where it creates a good photo opportunity. Think about the shot first, then put the feeder where it enables that shot.
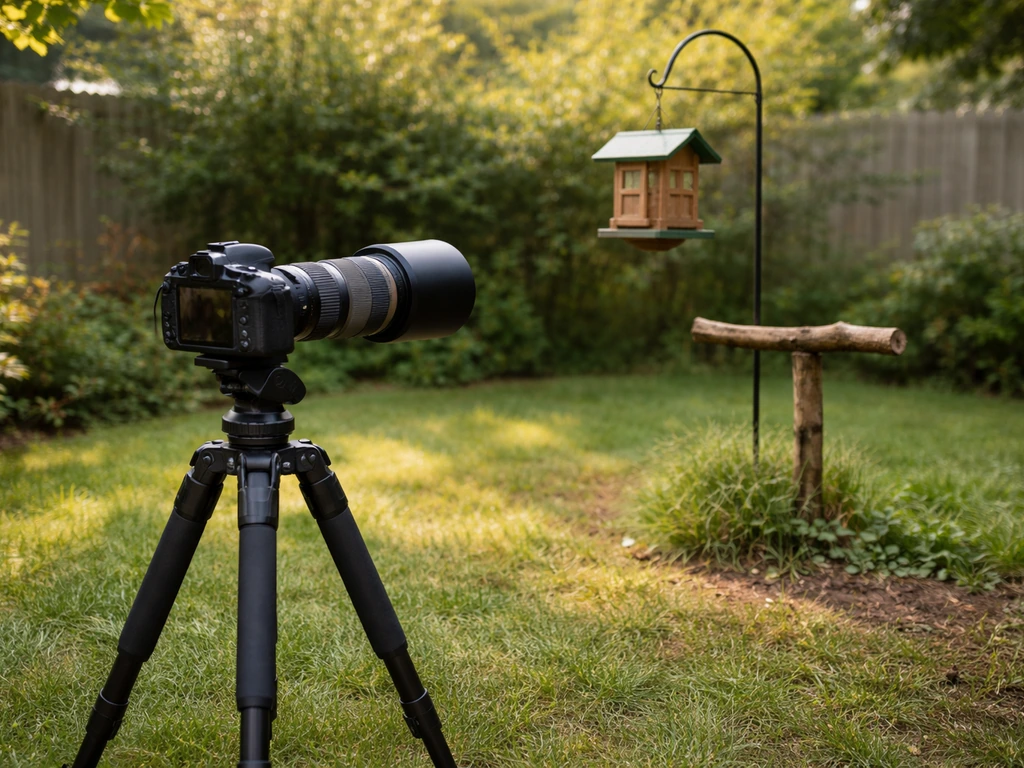
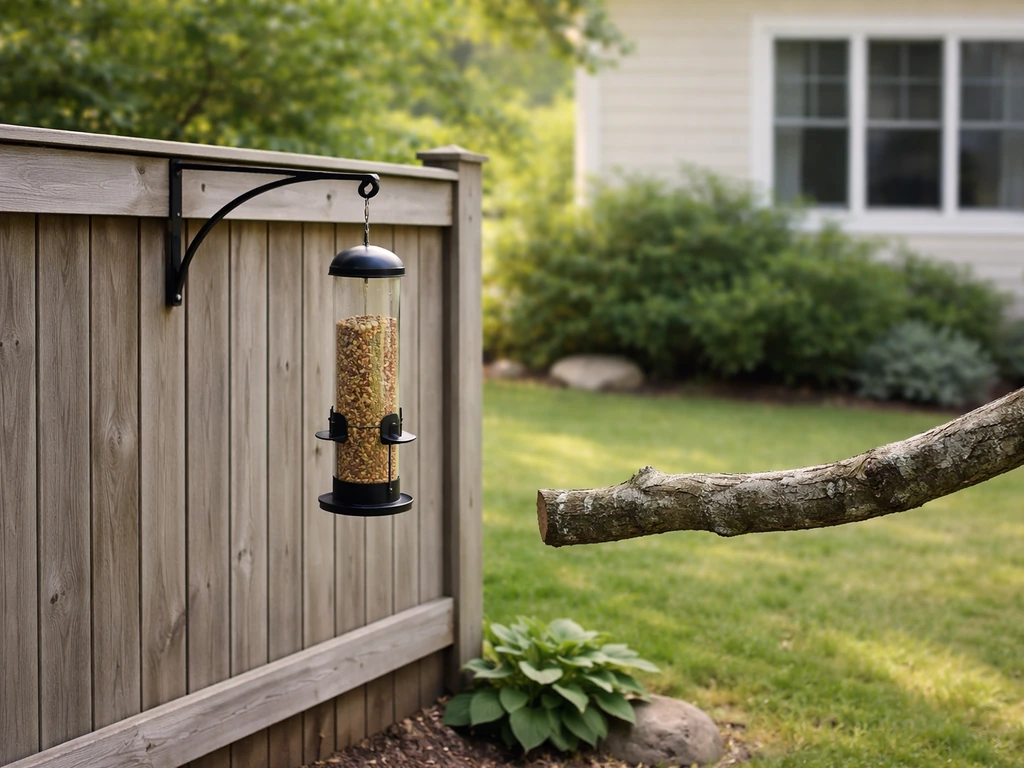
Place your feeder 10 to 15 feet from a natural perch like a branch, fence post, or decorative stick you've added yourself. Birds almost always stop on a perch before dropping to the feeder, and that perch moment is often your best photo opportunity. Keep the background in mind too. Position the feeder so that when you shoot from your chosen camera angle, the background is a clean green hedge, dark foliage, or open sky rather than a fence panel, garden hose, or trash can.
Window proximity matters for safety, not just optics. Place feeders either closer than 3 feet (about 1 meter) from a window or farther than 30 feet (10 meters) away. Feeders in that middle zone give birds enough speed to seriously injure themselves if they panic and fly toward glass. The safe zone under 3 feet works because birds cannot build up dangerous momentum at that range. The safe zone beyond 30 feet works because birds see the window as a separate structure and avoid it naturally.
For your camera position, set up your tripod roughly 10 to 20 feet from the feeder or perch depending on your lens focal length. Use a garden chair, low blind, or even a beach umbrella to break up your silhouette if birds are skittish. Position yourself so your back is roughly toward the sun, which puts clean, even light on the birds rather than blasting your lens with glare. If you have a small garden shed or corner fence to lean against, use it. Anything that makes you look less like a lurking predator helps.
Attractants and feeders that actually work
Black oil sunflower seeds attract the widest variety of common backyard birds. Black-oil sunflower seed is generally the preferred best all-around attractant for many backyard birds, according to UF/IFAS Extension [Black oil sunflower seeds attract the widest variety of common backyard birds. ](https://edis. ifas.
ufl. edu/publication/UW192). Nyjer (thistle) seed pulls in finches specifically. Suet cakes attract woodpeckers and nuthatches.
A shallow dish of fresh water is often more effective than any food at bringing in birds, especially in dry conditions. Avoid honey, raw dough, and salty or processed foods. These can harm birds and in some areas leaving out certain attractants has local restrictions, so check your municipality's guidelines. The goal is a reliable feeding station that birds trust, which means keeping it clean and topped up consistently in the days leading up to your shoot.
Camera settings that actually work for birds
Camera settings for bird photography can feel overwhelming at first. Here is how to think about each one without getting lost in the weeds. For beginner bird photography, the goal is to lock in settings that give you sharp, well-exposed images even when the bird does something unexpected.
Autofocus mode
Use continuous autofocus (called AI Servo on Canon or AF-C on Nikon and Sony). This keeps the camera refocusing as long as you hold the shutter halfway or use back-button AF. Set your AF area mode to the widest tracking option available. On Canon R-series bodies, 'Whole Area Tracking Servo AF' with Subject set to 'Animals' is the recommended starting point. It makes framing easier because you do not have to keep a small focus point on the bird. On Nikon Z bodies, Wide-area AF with Animal subject detection works the same way. When eye detection kicks in, the camera locks onto the bird's eye automatically, which is exactly what you want.
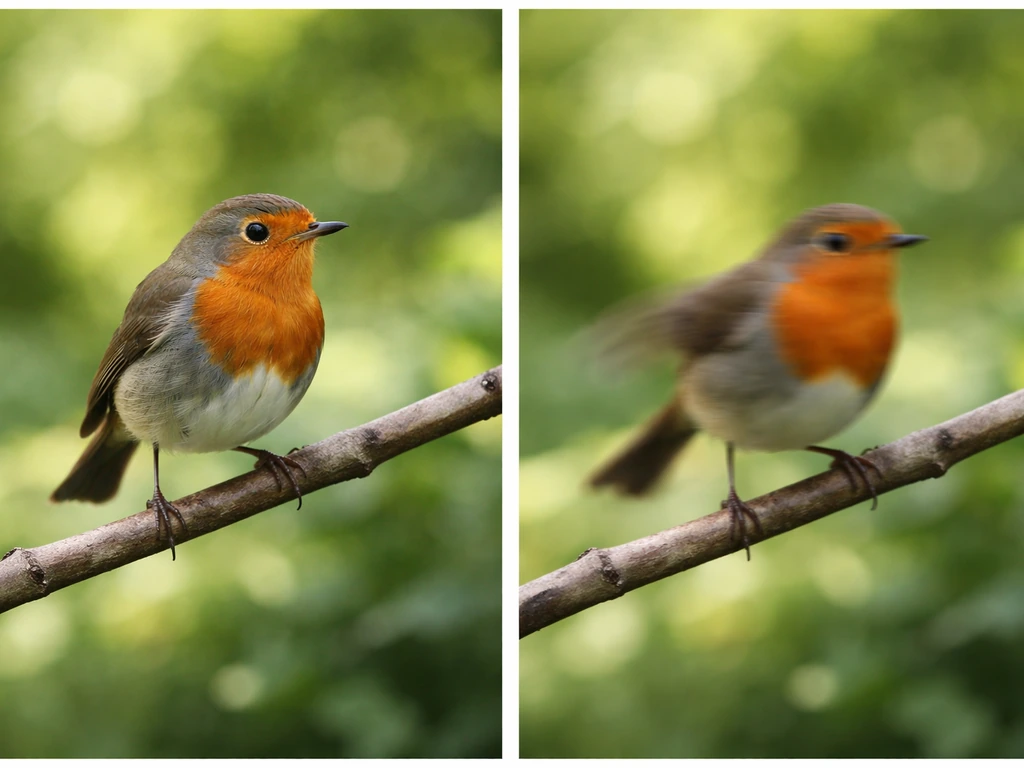
Shutter speed
For perching birds, 1/500s is the minimum. For birds hopping and moving at a feeder, push to 1/1000s. For any kind of flight or takeoff, you want 1/2000s to 1/4000s. A good general starting point that covers most feeder situations is 1/1000s at f/5.6 and ISO 800. From there, adjust ISO up if the image is too dark, or push shutter speed higher if you are seeing motion blur on moving wings.
Aperture and ISO
Shoot wide open (f/5.6 or f/6.3) for a blurred background that makes the bird pop. If the bird is very close and fills the frame, stop down to f/8 or f/11 to keep the whole bird sharp from beak to tail. ISO follows your shutter speed and aperture needs. Start at ISO 800 and work up in stops (800, 1600, 3200) as light drops. Modern mirrorless cameras handle ISO 3200 cleanly enough for most uses. Do not be afraid of it.
Burst mode
Turn on continuous (burst) shooting and use it liberally at feeders. Birds shift position, blink, ruffle feathers, and take off with no warning. Shooting a burst of 5 to 10 frames per second means you are far more likely to capture the exact moment with the best pose and sharpest eye. High-speed burst modes on mirrorless cameras (including pre-release burst options on cameras like the Nikon Z9) are particularly useful because they can capture frames just before you fully press the shutter. You can delete the rejects later.
| Situation | Shutter Speed | Aperture | ISO Starting Point |
|---|---|---|---|
| Perching, still bird | 1/500s | f/5.6 – f/8 | 400 – 800 |
| Active feeder, hopping | 1/1000s | f/5.6 | 800 |
| Takeoff / short flight | 1/2000s | f/5.6 – f/8 | 800 – 1600 |
| Full flight, fast action | 1/2000s – 1/4000s | f/5.6 – f/8 | 800 – 3200 |
Light and background: the things that make or break a shot
The best light for backyard bird photography happens when the sun is at roughly a 30 to 60-degree angle above the horizon. In practice, that means the first two hours after sunrise and the last two hours before sunset. Midday light from directly overhead is harsh, creates ugly shadows under the bird's body, and washes out color in pale plumage. If you can only shoot at noon, move into open shade rather than fighting direct overhead sun.
Position yourself with the sun at your back when possible. This puts clean, even light on the bird and prevents glare from hitting your lens. If you are shooting toward the light (backlit), you can still get beautiful shots, especially against a dark background like dense foliage. In that situation, dial in negative exposure compensation (try minus 1 to minus 1.5 stops) to keep the bird from becoming a silhouette while using the dark background to your advantage.
Background clutter is a silent shot-killer. A technically sharp image of a beautiful bird is ruined by a bright garden hose, a plastic chair, or a gate latch in the background. Before your first shoot, walk to your planned camera position and look through the viewfinder at your feeder or perch. Move anything distracting out of frame. Consider adding a piece of dark burlap or a green hedge panel behind the perch to create a clean, natural-looking background that your camera can blur into a smooth bokeh with a wide aperture.
Step-by-step setup workflow for your first shoot
- Set up your feeder or perch stick the day before the shoot so birds have time to discover and trust it. Fill it with black oil sunflower seeds or appropriate local seed.
- On shoot day, go out 30 minutes before sunrise or at first light. Move slowly and avoid sudden movements near the feeder area.
- Set up your tripod and gimbal head at your chosen camera position. Use the bubble level to get the head level. Attach your lens and camera body.
- Set your camera: AF mode to continuous (AI Servo or AF-C), AF area to widest tracking, subject detection to Animals or Birds, shutter speed to 1/1000s, aperture to f/5.6, ISO to 800. Switch to burst/continuous drive mode.
- Compose your frame so the feeder or perch stick is in the left or right third of the frame (not dead center), leaving space in the direction the bird is likely to face.
- Wait quietly. Do not move, check your phone, or make noise. Birds will return within a few minutes if you are still.
- When a bird lands, hold the shutter down in burst mode. Let the camera track the eye. Fire at least one burst while the bird is still, and another if it shifts or spreads wings.
- After the bird leaves, chimp (review) two or three frames. Check for sharp eye focus and motion blur. Adjust shutter speed up if you see blur, or ISO up if the image is too dark.
- Repeat and refine throughout the session. The first 30 minutes will teach you more than any article can.
When things go wrong: quick fixes for common problems
Birds are skittish and won't come close
This is the most common beginner complaint. First, be patient. Sit still for at least 15 minutes before concluding birds are avoiding you. If they genuinely seem spooked, reduce your visual profile. Drape a piece of camo netting over your chair and tripod, or shoot from inside through an open window. Wearing dull, dark clothing helps. If birds visit the feeder when you are not there but disappear when you set up, introduce yourself gradually by sitting nearby for shorter sessions over a few days before bringing the camera out.
Images are blurry
Blur has two causes: camera shake and subject motion. Camera shake at long focal lengths is fixed by increasing shutter speed, using image stabilization, or locking the tripod head more firmly. Subject motion (like a flapping wing) needs a faster shutter speed. If your images are consistently slightly soft but not motion-blurred, check whether your AF is landing on the bird's eye or on the feeder behind it. Subject detection helps but is not perfect. If the camera keeps focusing on the wrong thing, try switching to a smaller AF zone and placing it manually over the bird's head.
Autofocus misses the bird or hunts
AF hunting (the lens racking in and out without locking) usually means there is not enough contrast or the background is confusing the system. Try pre-focusing on the perch stick manually, then switching back to AF when the bird lands. Nikon's own guidance for wild bird detection notes that you sometimes cannot predict which way a bird will face, and recommends pre-focusing at an expected landing point in tricky situations. That advice is worth following. Lock focus on the perch, and as soon as the bird lands, half-press to let AF acquire the subject before firing your burst.
Birds are too far away
If birds consistently stay at the far end of your yard, move the feeder closer to your camera position gradually over several days. You can also add a second perch stick closer to your shooting position as an intermediate stop. If your lens simply does not have the reach, consider adding a 1.4x teleconverter if your lens supports it. Losing one stop of light is a worthwhile trade for the extra reach in most backyard situations. For a deeper look at capturing birds that simply will not sit still, the guide on photographing a bird sitting has some clever tricks for encouraging natural perching behavior.
Safety, wildlife ethics, and not being that neighbor
A healthy backyard bird photography setup respects the birds first and the photos second. Never use recorded bird calls or playback to attract birds during nesting season. It causes real stress and can cause birds to abandon nests. Keep your feeders clean (scrub them weekly) to prevent bacterial and fungal growth that harms birds. Use only foods appropriate for your local species. And as mentioned earlier, keep feeders either within 3 feet or beyond 30 feet of windows to prevent deadly collisions.
Check local bylaws before setting up feeders if you live in an area with wildlife management rules. Some municipalities restrict feeding wildlife, particularly in areas with bear or raccoon activity. A feeding station that attracts rodents can also create problems with neighbors. Using a seed catcher tray under the feeder and cleaning spilled seed regularly helps a lot.
From a photography ethics standpoint, never approach an active nest for a closer shot. Never remove vegetation to improve your frame. And if a bird shows obvious stress (alarm calling, flying away repeatedly, puffing up defensively), back off. The photo is not worth disturbing an animal. Most backyard birds are used to humans at reasonable distances, so a calm, patient approach almost always works better than pressing closer.
Your starter checklist and what to upgrade next
Use this list before your first session to make sure you have everything in place.
- Feeder filled and positioned 10 to 15 feet from a natural or added perch
- Feeder placed either under 3 feet or over 30 feet from any window
- Camera set to continuous AF, widest tracking zone, subject detection on
- Shutter speed at 1/1000s or faster, aperture at f/5.6, ISO at 800
- Burst/continuous drive mode enabled
- Tripod level, gimbal head unlocked and moving freely
- Camera position with sun roughly at your back
- Background checked for clutter from your shooting position
- Dark or dull clothing on, phone silenced
Once you have nailed feeder shots and want to push further, the natural next step is capturing birds in motion. Learning how to photograph a bird in flight opens up a whole new level of challenge and reward. You will use the same camera settings foundation you built here but with faster shutter speeds and different panning techniques.
On the gear side, if you started with a kit lens or a shorter zoom, the upgrade path is clear: move to a dedicated telephoto of 400mm or longer. A dot sight accessory (sometimes called a red-dot finder) mounted on your camera hot shoe helps enormously when tracking fast birds that are hard to find in a narrow telephoto viewfinder, and Nikon specifically recommends this for super-telephoto wildlife work.
For dialing in the finer details of exposure, framing, and timing as your skills develop, there are tips for bird photography that go deeper into the nuances of reading bird behavior, anticipating movement, and refining your compositional instincts. And if you want a broader overview of the entire craft and how to take bird photos from start to finish, that is worth bookmarking for your next rainy afternoon. Right now, though, the best thing you can do is get outside with whatever gear you have and start shooting.
Your first session will be messy. You will miss shots, the autofocus will occasionally land on the feeder post instead of the bird, and the light will change right when the most beautiful goldfinch shows up. That is completely normal. Every missed shot teaches you something. The setup described here gives you a solid foundation. The rest comes from time in your own backyard, watching how your specific birds behave and adjusting accordingly. For a complete walkthrough that covers how to take bird photos from composition to post-processing, that guide pairs well with everything you have just set up.
FAQ
What autofocus mode should I use if my camera keeps switching focus between the bird and the feeder or perch?
Try a narrower AF area (or smaller tracking zone) and place it deliberately over where the bird’s head will be, then switch back to wider tracking only once you consistently acquire the eye. Also check that the feeder and perch are not brighter or higher-contrast than the bird, because that can pull the AF to the background object even with subject detection.
Is it better to use a tripod with a gimbal head or a monopod for backyard bird photography setup when birds are unpredictable?
Use a tripod plus gimbal when birds are perching at the same spots, because it lets you keep framing stable through bursts. Choose a monopod when you need faster repositioning, but plan for shorter bursts and more frequent breaks to recompose, since panning can be less steady than a tripod at long focal lengths.
How do I prevent birds from landing behind my camera or outside the frame during setup?
Once you’ve chosen your camera angle, watch the viewfinder from your shooting position and test the “bird landing zone” by checking where a bird would land relative to the edge of the frame. If you’re regularly cutting off the head or tail, adjust either the feeder-to-perch spacing or your camera distance before changing lens settings.
What should I do if my images are sharp on the perch but blurry on the bird’s face?
That pattern usually points to focus acquisition delay or AF “late capture.” Keep bursts short, fire as soon as eye detection locks, and consider pre-focusing on the perch stick, then immediately triggering the moment the bird lands. If the camera is still hunting, reduce confusion by using a cleaner background and avoiding busy highlights behind the perch.
Should I use exposure compensation at a feeder, and how much is reasonable?
Yes, especially with backlit scenes or bright seed reflecting sunlight. A common starting range is about minus 1/3 to minus 1.5 stops depending on how bright the background is, then adjust after reviewing the histogram or blinkies. If the bird becomes too dark, increase compensation (less negative) rather than only raising ISO.
What shutter speed should I use if I’m photographing birds at dawn or in heavy shade?
Follow the motion rule first, then let ISO rise. If you’re getting motion blur on wing beats, stay at least around 1/1000s for feeder movement and move toward 1/2000s for takeoffs. If light is too low, you’ll usually get better results by keeping shutter speed high and accepting higher ISO rather than lowering shutter speed and fixing softness later.
How can I keep birds coming reliably without overfilling the feeder or attracting pests?
Offer small, consistent amounts and clean up spilled seed daily or as needed, especially under windy conditions. Use a seed catcher tray and wipe the feeding surfaces regularly, because wet, old seed attracts rodents and can also reduce bird activity due to food quality changes.
Do I need a teleconverter, and when is it a bad idea?
A teleconverter can help when birds are consistently beyond your current framing range. It’s a poor choice if it forces shutter speeds too low for wing motion, or if your camera’s autofocus struggles at the narrower effective aperture. If you use one, re-check autofocus acquisition and confirm you can still hit your minimum shutter speed for the behaviors you’re targeting.
How should I choose between f/5.6 and f/8 or f/11 for a backyard bird photography setup?
Use a wider aperture (like f/5.6 to f/6.3) when birds are at a predictable distance and you want maximum subject separation. Stop down to f/8 or f/11 when the bird is closer to the camera, fills more of the frame, or you’re missing sharpness on the far edge of the body due to shallow depth of field.
What’s the safest way to use water for a backyard bird photography setup?
Use shallow, clean water that birds can land on comfortably, and place it where you can control the background and keep it away from hazardous splashing. Refresh water frequently in warm weather, because algae and debris reduce bird visits and can create slippery surfaces that increase injury risk.
How do I handle reflections or glare from the feeder or perch in my photos?
Look for shiny seed trays, wet perches, or glossy feeder housings, especially in morning or late-day sun. If glare is in the line of sight, adjust your position so the sun is more behind you, shade the lens with your camera strap or a small lens hood, and consider swapping to matte hardware on the feeder area.
What’s the best way to introduce myself gradually so birds don’t abandon the spot?
Start by visiting the area without the camera, then add the camera session with no shooting or with minimal bursts. Over several days, increase your time near the setup while keeping movements slow and predictable, then begin shooting only when birds show consistent perching. This reduces the chance that the birds associate your presence and sudden shutter bursts with danger.
Next Article
You Are Trying to Photograph a Bird Sitting: A Step-by-Step Guide
Step-by-step bird photography guide for still birds: approach, gear, settings, composition, light, and quick troubleshoo
