A bird call tutorial can mean two very different things depending on who you ask. Some people want to open their mouth and whistle like a robin. Others want to cup their hands together and produce a haunting owl-like hoot. Both are real skills, both are learnable, and this guide covers both from scratch. If you have never made a convincing bird sound in your life, you are in exactly the right place.
Bird Call Tutorial: Vocal Imitation and Hand Call Steps

Marcus Hendricks
8 Apr 2026

Two paths: vocal imitation vs hand-based calls
When beginners search for a bird call tutorial, they usually fall into one of two camps. The first group wants to vocally imitate birds, using their voice, mouth, lips, and tongue to produce whistles, chirps, and trills that sound like real species. Merriam-Webster defines “whistle” as a “shrill clear note,” which helps clarify the terminology when you are aiming for a birdlike vocal imitation whistles, chirps, and trills. The second group is looking specifically for the hand technique where you cup your hands (or put fingers in your mouth) and blow through a small gap to create a whistle or resonant hoot. Knowing which path you are on saves a lot of frustration.
Vocal imitation is about copying the acoustic qualities of a bird's actual call or song. Before going further, it helps to understand the difference between a "call" and a "song." Calls are short, functional vocalizations used for things like alarm signals or flock contact. Songs are longer, more complex displays typically used for territory or courtship. Both are fair game for imitation, and learning how to do bird sounds with your voice covers both categories.
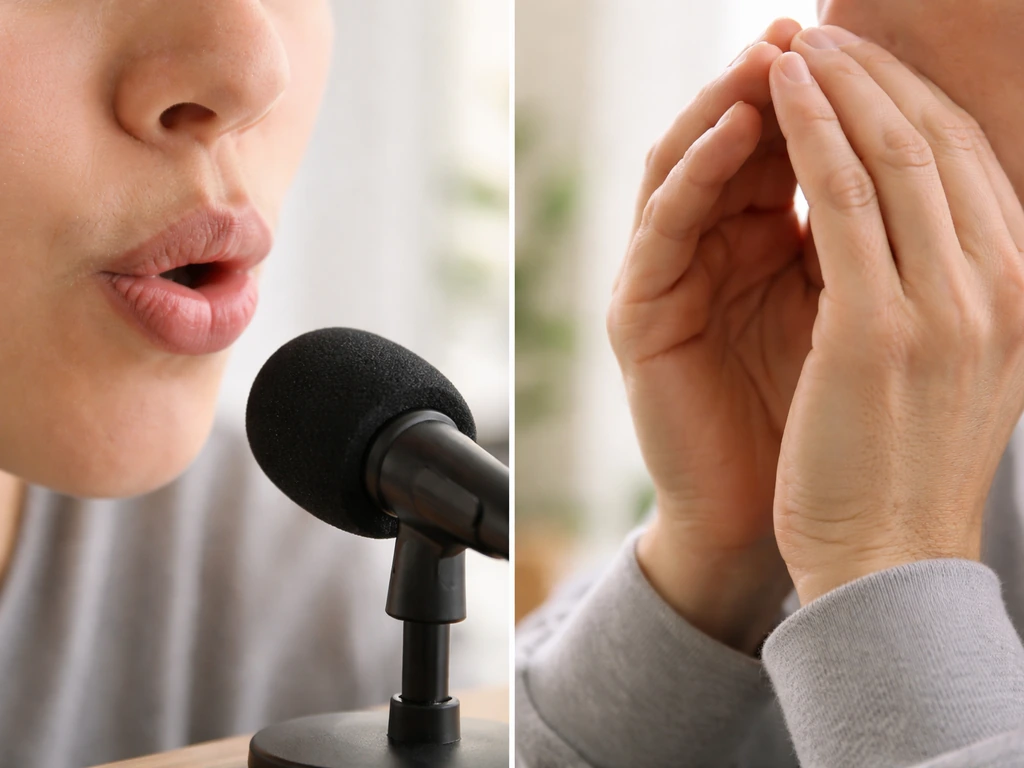
Hand-based calls are a physical technique. The most common version is finger whistling: you place one or two fingers in your mouth, create a small controlled air gap, and use tongue and lip positioning to produce a sharp whistle. A variation uses cupped palms with no fingers in the mouth at all, blowing across a tiny opening between your thumbs to create a low, breathy hoot. Both methods are covered in depth below.
Core vocal techniques: syllables, pitch, timing
If you are going the vocal route, the four acoustic dimensions you need to control are pitch (high or low), tone (clear and flutelike vs harsh and scratchy), volume, and rhythm. Most beginners focus only on pitch and then wonder why they still sound nothing like a real bird. Rhythm and tone matter just as much, sometimes more.
Pitch is the frequency of the sound. High-pitched calls like the American Goldfinch require a tight, forward placement in your mouth. Low calls like the Great Horned Owl need more chest resonance and a more open throat. Tone is the texture: a Northern Cardinal produces a clean, pure whistle, while a Blue Jay sounds raspy and complex. When you are imitating a specific bird, identify which tonal category it falls into first. Cornell Lab categorizes bird sounds as clear whistle, harsh or scratchy, liquid, flutelike, or trill. Pick one category and practice that tonal quality before worrying about the exact pitch.
For syllable patterns, break the call into discrete chunks the same way you would break down a word. The Eastern Towhee is often described as "drink-your-teeeea." The Black-capped Chickadee says its own name: "chick-a-dee-dee-dee." These mnemonic syllables are not just memory tricks. They force you to match the cadence and rhythm of the real call, which is exactly what experienced birders and imitators use. One common beginner mistake is to get the pitch roughly right but rush or drag the timing. The rhythm is what makes it recognizable.
The hand call tutorial: posture, finger positions, and technique

The hand-based bird call is one of the most satisfying things you can learn, and it confuses beginners mainly because there are several valid finger configurations. Here is the breakdown of the two most practical methods.
Method 1: Finger whistling (sharp, high whistle)
This technique produces a piercing whistle that works well for imitating clear, high-pitched calls like hawks or shorebirds. Start by forming an "OK" shape with your thumb and index finger (or thumb and middle finger, whichever feels more natural). The goal is a small, clean circle. Place the fingertips just inside your lips so the tips touch the underside of your tongue. Tuck your lips over your teeth so they are fully covering them. Now curl your tongue back slightly so the tip points toward the gap between your fingers. Blow a steady, controlled stream of air. You will probably get nothing or a faint hiss on the first attempt. That is normal.
The "sweet spot" is a specific angle and placement that varies from person to person. Shift your fingers slightly forward or back by a millimeter or two and try again. Experiment with how much of the fingertips are inside versus outside the mouth. Also try different finger pairs: some people get better results with two middle fingers placed side by side rather than the thumb-index combination. Keep your jaw relaxed and your lips firmly tucked. The moment you find the sweet spot, you will hear a clear, loud tone. Once you have it, stay still and memorize the exact position.
Method 2: Cupped hands (resonant, breathy hoot)

This method is better for low, breathy sounds like owl hoots. Interlace your fingers loosely and press your palms together, leaving a small hollow chamber inside. Bring both thumbs side by side along the top edge, and create a tiny gap between them, about the width of a pencil. Press your lips against the knuckle area of your thumbs and blow a slow, steady stream of air across the gap rather than into it, like blowing across the top of a bottle. The hollow space inside your hands acts as a resonating chamber. To change pitch, open or close your lower hand slightly to adjust the chamber size. A bigger chamber produces a lower tone.
Posture matters here. Hold your hands at chest level, not too high or low. Keep your wrists neutral and relaxed, not bent sharply. Tension in your wrists and fingers kills the resonance. Once you get a clear tone, practice modulating it by rhythmically opening and closing your bottom fingers against your palm. That pulsing effect mimics the warbling quality of many owl and dove calls.
Your practice plan: from warm-up to real calls
The biggest mistake beginners make is skipping straight to imitating a full call without any warm-up or structured progression. Here is a plan you can start today and build on daily.
- Warm-up (5 minutes): Do a few gentle lip trills (like a motorboat sound), then practice producing a single sustained whistle, either vocal or hand-based, for five seconds without breaking. This just gets your muscles and airflow consistent before you try anything precise.
- Listen first (5 minutes): Pull up a recording of the specific call you want to learn. Listen to it three or four times and try to identify the rhythm pattern using syllables. Tap the beat on your knee. Do not attempt to imitate yet.
- Match the tone, not the pitch (5 minutes): Try to reproduce the tonal quality (clear, breathy, scratchy) of the call without worrying about being on the exact right pitch. Get your voice or hands into the right "texture" first.
- Add pitch (5 minutes): Now layer in the correct pitch. Compare your attempt against the recording. If you have the Merlin Bird ID app open, it analyzes sound in roughly three-second intervals, so record a short rep and check whether the app picks up any bird matches. This is not a perfect test, but it gives you a real-time signal.
- Add rhythm (5 minutes): Run through the full syllable pattern at the right tempo. Use your tapping exercise from step 2 as a guide. Record yourself and compare to the original.
- Repetition sets (5 to 10 minutes): Do ten clean reps of the call with a short pause between each. Rest, then do another set. Consistency across reps matters more than nailing it once.
For progressions, start with just one call for the first week. When you can produce it consistently on demand across multiple sessions, add a second call. Do not try to build a library of ten sounds before any of them are solid. Depth beats breadth at the beginner stage.
Picking the right call to start with
Not all bird calls are equally beginner-friendly. Some calls are short, single-note, and easy to reproduce. Others are complex multi-note songs that even experienced imitators struggle with. Below is a practical starting map for common calls ordered by difficulty.
| Bird | Call type | Difficulty | What to focus on |
|---|---|---|---|
| Black-capped Chickadee | Short contact call (its name) | Easy | Rhythm and the descending "dee-dee" ending |
| Northern Cardinal | Clear descending whistle | Easy | Pure, clean tone with a slow glide down in pitch |
| American Robin | Liquid, flutelike song phrases | Medium | Breathy tone, rising and falling melodic phrases |
| Eastern Towhee | Rhythmic 3-part call | Medium | Syllable pattern: drink-your-teeeea, long final note |
| Great Horned Owl (cupped hands) | Deep resonant hoot | Easy for hands | Low, breathy tone using cupped-hand method |
| Red-tailed Hawk | Raspy descending scream | Medium | Harsh, scratchy tone with a sharp drop in pitch |
| Wood Thrush | Complex flutelike spiraling song | Hard | Not a beginner call, requires very good pitch control |
A smart approach is to start with backyard birds you actually hear regularly. If you can already recognize the Chickadee by ear, you already have the rhythm memorized, which gives you a head start on the imitation. The Natural History Museum recommends exactly this kind of familiar-first approach for beginners, and it genuinely speeds things up. Imitation practice has a much shorter feedback loop when you can step outside and compare your attempt to the real thing.
Context also matters when choosing a call. Birds use different sounds for different situations: an alarm call, a contact call, and a territorial song are all distinct even within the same species. If you are practicing for bird watching purposes rather than just fun, knowing which call fits which situation adds a useful layer of realism. Think about how to imitate bird sounds in context, not just in isolation.
Troubleshooting the most common problems
Cracking or unstable pitch
Pitch cracking usually means your airflow is inconsistent. Try sustaining a single note for five full seconds and listen for wobble. If you hear it, slow down your breath. You are likely blowing too hard, which forces the pitch to jump. For hand calls, cracking often means your finger or lip position is slightly off from the sweet spot. Do not try to fix pitch while also maintaining rhythm. Separate them: drill sustained pitch stability first, then add rhythm on top.
Weak or thin tone
A thin, weak tone is the most common problem in both vocal and hand-based calls. For vocal imitation, try opening your throat more and relaxing your jaw. Tension squeezes the tone thin. For hand calls, check that the hollow in your cupped palms is actually creating a resonant chamber and that there are no large gaps letting air escape from the sides. Also check your lip seal against the thumb knuckles. Even a small air leak collapses the tone. If you are doing finger whistling and getting only a hiss, revisit your tongue and lip position before adjusting anything else.
Inconsistent rhythm
Inconsistent rhythm almost always comes from skipping the listening phase of practice. If you have not internalized the cadence from recordings, your rhythm will drift differently every time. Go back to basics: listen to the call three times, tap the beat on your knee, then imitate just the rhythm using a simple neutral sound (like "doo") before adding pitch or tone. Tracy Aviary's bird song learning approach specifically recommends drilling tone and rhythm as separate dimensions and then combining them, which is exactly the fix for this problem.
"It just doesn't sound right" (general mismatch)
When you feel like something is off but cannot identify what, record yourself and compare directly to the reference recording. If you are using Merlin to test your imitation, record a longer clip rather than a single short burst. The app works best with a few seconds of audio, so a very brief attempt may not give you useful feedback. Load both clips and listen back to back, then ask yourself whether the mismatch is in tone, pitch, or rhythm. Usually it is only one of the three, and isolating it makes it fixable. If your imitation is in the right ballpark but Merlin is not recognizing it, the issue is usually rhythm or tonal texture rather than pitch.
Tools, apps, and where to practice
Your most important tool is a good reference recording. The Merlin Bird ID app from Cornell Lab is free, has an enormous sound library, and includes a spectrogram display that shows you the frequency of a sound over time. That visual gives you a concrete target: you can see whether a call rises, falls, stays flat, or follows a particular wave pattern. When you record your own attempt and compare the spectrogram to the original, you get much more precise feedback than just listening. Learning to read a spectrogram is easier than it sounds, and the Cornell Lab's Bird Song Hero tool walks you through it with a structured matching exercise.
For recording your own practice sessions, you do not need special equipment. A phone works fine. If you have an iPhone, recording bird sounds on an iPhone with the built-in microphone is more than adequate for practice reference. Record directly in Merlin's Sound ID feature or use Voice Memos and import the file. To share recordings made with Merlin Sound ID with eBird checklists and the Macaulay Library, eBird Support recommends exporting and then manually adding the recording to your checklist and media workflow blank" rel="noopener noreferrer">Merlin's Sound ID feature. When you want to go deeper and capture higher-quality audio for comparison or sharing, it is worth reading up on how to record bird sounds properly, including microphone placement and background noise reduction.
Where you practice matters more than most people realize. Outdoor practice in a quiet garden or park gives you immediate feedback from real birds and ambient sound context. Indoor practice in a small room is useful for hearing yourself clearly without wind interference, but the acoustics can be deceptive. A bathroom or tiled room will make your calls sound fuller than they actually are outdoors. Practice in the space where you intend to use the calls. The dawn chorus, which peaks in early morning hours, is a genuinely useful time to practice alongside real birds. You get live comparison material and immediate feedback from the environment.
If you want structured audio feedback beyond Merlin, the Macaulay Library inside the Cornell Lab ecosystem has thousands of verified recordings organized by species. You can find recordings that match the specific call type you are working on (alarm, contact, song) and use them as your daily reference material. Pair that with a bird read-aloud setup to hear calls on repeat while you practice.
Your next steps starting today
Pick one call. Listen to it five times in a row. Tap out the rhythm. Try the tone without worrying about pitch. Add pitch. Record yourself after ten attempts and compare. That is your entire first session and it takes about twenty minutes. Tomorrow, do it again with the same call. After three days, you will be surprised how much closer you sound to the real thing. Most people quit after one attempt because they expect to sound right immediately. You will not. That is not failure, that is the normal process.
Once you have a basic call locked in, you have a foundation to build on. The hand techniques and vocal methods complement each other, and most people find that practicing both makes each one stronger. Keep your reference recordings handy, use the spectrogram tools to check your work, and stay patient with the rhythm work. That is where the real progress lives.
FAQ
Why do my bird call imitations sound close but still not recognizable?
If you can produce a clear sound but it is always the wrong “shape,” you are usually imitating the wrong call category (tone texture and rhythm) rather than the wrong pitch. Pick a single reference call, then practice it in layers, first rhythm only (use a neutral “doo”), then tone, then pitch, for 3 to 5 minutes each layer before trying the full call.
What type of bird call should I start with for the fastest progress?
Short “chirps” often work better than long songs for day one, because they let you practice airflow control without stretching. Start with one-phrase calls, aim for 1 to 2 seconds of accuracy, then build to longer segments only after you can repeat the same sound across multiple sessions.
How can I stop pitch “cracking” or wobbling during a vocal bird call?
For vocal imitation, try sustaining one note at a comfortable volume before attempting the full call. If the sound wobbles after a few seconds, reduce breath pressure and slow your airflow (you should feel steady control, not force). After you can hold it steady, reintroduce the rhythm pattern in small chunks.
My finger whistle only makes a hiss, what should I adjust first?
For hand (finger) whistles, if you get a hiss or nothing, focus on the seal and tongue direction first. Re-check that your lips are tucked over your teeth, that fingertips are positioned just inside the mouth, and that the tongue tip points toward the finger gap. Only after you can produce a stable tone should you adjust millimeter-level finger position.
Does temperature or fatigue affect hand call quality, and how do I compensate?
Warm up your hands and jaw. Cold hands often change resonance because they stiffen your lip seal and finger pressure. Do 1 to 2 minutes of gentle cupping and lip seal rehearsal before the first attempt, then begin with slow hoots to find a steady chamber tone.
What’s the quickest way to fix inconsistent rhythm?
If your rhythm is drifting, do not guess. Listen to the reference three times, tap the beat while you listen, then imitate only the timing using a neutral syllable. Once the timing matches for three attempts, add tone, then pitch. This prevents you from “fixing” rhythm by accident while focusing on sound quality.
How should I record my practice so Merlin (or similar apps) recognizes it?
If Merlin or another app keeps misclassifying your attempt even when it sounds similar to you, record a longer clip that contains the clearest part plus the transitions before and after it. Many tools perform better with a few seconds and with consistent cadence, not a single burst.
Is it better to practice indoors or outdoors for best results?
You can practice indoors for comfort, but the acoustics can mask flaws. If you are learning an owl-like breathy hoot, indoor practice may make the tone seem fuller than outdoors. Plan one short outdoor session each week specifically to test resonance and carry, especially in the morning when birds respond.
When I’m off target, how do I know whether to work on pitch or rhythm first?
Avoid chasing both pitch and rhythm at the same time when something is off. Use a two-step drill: first get a stable sustained tone (no pattern), then reapply the call’s syllable timing over that stable tone. If you try to “fix” pitch while you change timing, you often end up with both inaccuracies.
Should I practice many different bird calls at once or focus on one?
Use one call per week until it is repeatable on demand, then add a second. Switching calls too often prevents the brain from locking in cadence and makes your reference comparisons noisy. Depth for 7 days usually beats breadth for 1 day.
Do I need to learn multiple calls per species, or just one?
Yes, because birds use different call functions (alarm, contact, territorial) even when it’s the “same” species. Choose the specific call type you want to learn, then practice that one in the right sequence or tempo, since most “almost right” imitations fail on the functional cadence rather than the notes alone.
What should I do if I feel “something is off” but I cannot tell what?
Record yourself back-to-back with the reference and compare spectrogram or waveform patterns if available. If you only have audio, look for consistent gaps between syllables and whether the sound rises, falls, or stays flat across the phrase. Rehearse only the mismatching section, not the entire call, for the next 2 to 3 minutes.
Next Article
How to Do Bird Sounds: Learn Bird Calls Step by Step
Step by step guide to mimic and learn bird calls, using pitch and rhythm, practice routine, and troubleshooting outdoors