Yes, you can absolutely learn to whistle like a bird using just your fingers and mouth. It takes some setup, some awkward experimentation, and a little patience, but once you hit that "sweet spot," the sound clicks into place and you'll know it immediately. This guide walks you through every step: what you need, how to shape your mouth, where to put your fingers, how to control your breath, and how to fix it when nothing comes out but air. Stick with it. Even people who "can't whistle" can learn this.
How to Whistle With Fingers Like a Bird: Step-by-Step

Marcus Hendricks
13 Apr 2026

What You'll Need and How to Set Up

The good news is you don't need any equipment. Just your hands, your mouth, and a quiet space where you're not worried about looking silly while you make weird faces. Here's how to set yourself up for success before you even try to make a sound.
- Wash and dry your hands thoroughly. Your fingers are going inside or right against your mouth, so hygiene matters here. Wet or lotioned hands can also slip, which messes up your form.
- Find a comfortable seated or standing position. You don't need perfect posture, but slouching compresses your lungs and makes breath control harder.
- Have a glass of water nearby. Dry lips don't seal well, and you'll need to wet your lips repeatedly during practice.
- Give yourself at least 10 to 15 minutes of uninterrupted time. Short, focused sessions beat marathon frustrated attempts.
- Stop and rest if you start feeling lightheaded. Controlled repeated exhaling can cause mild dizziness, especially at the start. It's normal, but take breaks.
One thing I wish someone had told me early on: practice in front of a mirror. Watching your lip position and finger placement makes it much easier to catch what's going wrong. You'll see small shifts that you'd never feel otherwise.
Basic Mouth Shapes for a Bird-Like Whistle
Before your fingers even come near your face, you need to understand what your mouth is doing. A whistle works by pushing air through a very small, precise opening. The lips, tongue, and teeth all shape that opening together. Get this wrong and no amount of blowing will help.
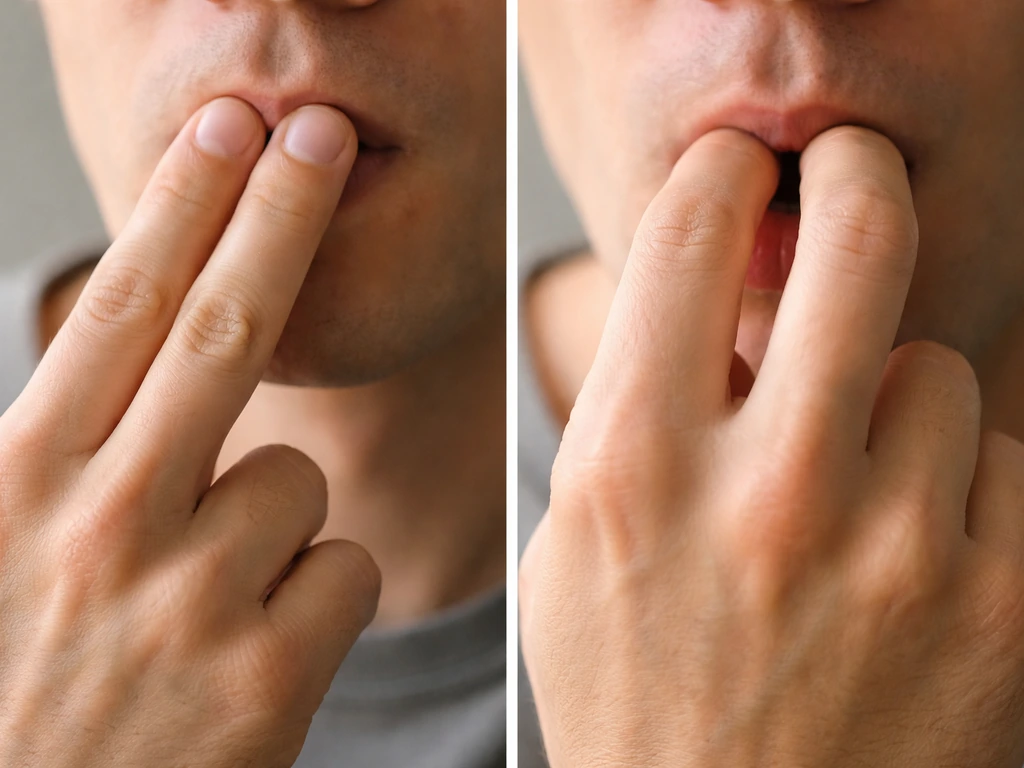
Start with your lips. Wet them first (lick them lightly), then tuck both lips inward over your teeth, like you're pulling them into your mouth slightly. This is called the "lip tuck," and it's the foundation of the whole technique. You're not pursing your lips outward like a kiss; you're folding them inward so your teeth are covered and the tissue of your lips creates the air channel.
Now the tongue. For the bird whistle finger method, you fold the tip of your tongue back on itself, pointing it slightly downward toward the floor of your mouth. Think of it as curling the tip back, so the underside of your tongue tip faces outward. This folded tongue acts almost like a ramp, directing air upward and forward through the small gap created by your lips and fingers. You can also experiment with resting the tongue tip just behind your lower front teeth, which changes the pitch and tone slightly.
The goal is to create a small, controlled airway. Not a big open mouth. Not clamped shut. A tight, tuned gap. If you want to understand how this connects to making bird sounds in a broader sense, the article on how to bird whistle covers the underlying mechanics really well and is worth reading alongside this guide.
Finger Placement and Hand Positions That Shape the Sound
This is where most beginners get confused, so let's be specific. There are two main finger combinations used in the two-finger whistle technique, and each produces slightly different results.
| Finger Combo | How to Hold | Sound Character | Best For |
|---|---|---|---|
| Index + Middle (same hand or both hands) | Tips pointing inward toward the tongue, side by side | Higher, sharper pitch | Mimicking small songbirds |
| Thumb + Index (one or both hands) | Form a U-shape, tips pointing inward | Deeper, more robust tone | Mimicking larger birds or a louder call |
| Two index fingers (one from each hand) | Both tips meeting at center, pointing toward tongue | Balanced, mid-range pitch | General practice and control |
Whichever combo you choose, the placement is the same: insert your fingertips about half an inch to three-quarters of an inch into your mouth. They should rest on top of your tongue, just enough to hold the folded tongue tip in place, while your lips tuck tightly around the fingers. The fingers aren't blocking the air, they're shaping the channel it travels through.
Point your fingertips slightly downward and inward as they enter your mouth. This angle is important. Flat fingers create a sloppy air path. Angled fingers, pointed at roughly a 45-degree downward angle toward your tongue, help focus the air into a stream rather than a wide spray. Keep your lower lip stretched and firm against the underside of your fingers. The fingers and lower lip work together to seal and direct the airflow.
Don't force your fingers in deep. The most common mistake is going too far in, which blocks everything. You want just enough contact to hold the tongue fold and keep the lip seal tight. If you're curious how this compares to hand-cupping techniques without any mouth contact, check out the guide on how to bird whistle with your hands for a different angle on the same skill.
Breath Control and Timing: Making the Whistle on Purpose
Getting the setup right is half the battle. The other half is the breath. This is where a lot of people give up too early, because they try once, hear nothing, and assume they're doing it wrong. Most of the time, the setup is fine but the breath is off.
Here's the key: you want a steady, moderate exhale, not a sharp blast and not a lazy puff. Think of it like blowing across the top of an open bottle to make it ring. That's actually your target sound as a beginner milestone. When you start hearing something like a low, airy tone similar to blowing over a beer bottle, you're close. That's the pre-whistle, and it means your setup is almost right.
blank" rel="noopener noreferrer">Breathe from your belly, not your chest. When you take a breath in, your stomach should expand first, not your shoulders rising. This is diaphragmatic breathing, and it gives you much more control over the exhale than shallow chest breathing does. The American Lung Association describes blank" rel="noopener noreferrer">belly (diaphragmatic) breathing as a technique that helps with breath control and can help people manage shortness of breath. A controlled, even exhale lets you hold the whistle tone instead of it cutting out after a second.
The timing sequence looks like this:
- Set your finger position and lip tuck first, before you breathe.
- Take a slow, deep breath in through your nose (so you don't disturb the mouth setup).
- Exhale in a steady stream through the small opening between your lips and fingers.
- As you blow, make micro-adjustments to finger angle and lip tuck without breaking the seal.
- Hold the exhale long enough to hear what's happening. Don't give up after one second.
Vary your airflow speed gradually during practice exhales. Too slow and you get nothing. Too fast and you get a raspy squeak or distorted burst. The whistle lives in the middle range, and finding it is a matter of dialing in slowly rather than blasting and hoping.
Troubleshooting: No Sound, Muffled Tone, Squeaks, and Unstable Pitch
If you're not getting a clear whistle yet, you're in good company. Here's what's probably going wrong and exactly how to fix it.
No Sound at All (Just Air)
This usually means the air is escaping without being shaped into a tone. Check three things: First, are your lips dry? Wet them again. Dry lips don't seal around the fingers properly, so air leaks out the sides. Second, is your lip tuck firm enough? Lips should be tucked over your teeth and pressing against your fingers with light tension. Third, is the opening too large? Try closing the gap slightly by tightening the lip seal or adjusting your finger angle inward by just a few degrees.
Muffled or Dull Sound
A muffled tone usually means your fingers are too far in, or your tongue fold is blocking the air path. Pull your fingers back slightly until just the tips are resting on the tongue. Also check that your tongue is folded but not clenched. The tongue should feel firm but relaxed, not pressed up hard against your fingers.
Squeaks or Cracking Sound
A squeak means you're blowing too hard, or the air channel is slightly misaligned and creating turbulence in the wrong place. Ease off the exhale pressure first. If the squeak continues, shift your finger angle slightly (try a degree or two up or down) and see if the squeak resolves into a cleaner tone. Squeaks are actually a good sign that you're close to the right position.
Unstable or Wavering Pitch
Pitch instability almost always comes from finger position shifting mid-exhale. Your fingers are probably moving slightly as you blow. Press your fingers more firmly against your lower lip to lock the position, and make sure your wrists are braced against your chin or cheek for stability. Also, check your breath: an uneven exhale produces a wavering pitch. Practice holding a steady, constant airflow before worrying about pitch variation.
One thing I kept running into early on: I was adjusting too many things at once. Change one variable per attempt. Finger angle, then lip tuck, then airflow speed, one at a time. Otherwise you lose track of what actually worked. If you've been focused purely on the finger method and want to explore mouth-only alternatives, reading about how to chirp like a bird can give you some great complementary techniques that reinforce the breath control skills you're building here.
Practice Drills and a Progression Plan to Master It

Consistent short practice beats long frustrated sessions every time. Here's a realistic progression plan for the first two weeks.
Week 1: Find the Sound
- Drill 1 (2 minutes): Practice the lip tuck alone, no fingers. Just tuck your lips over your teeth, wet them, and blow steadily. Get comfortable with what that airflow feels like.
- Drill 2 (3 minutes): Add your fingers. Set up your chosen finger combo, lock the lip tuck, and blow 5-second exhales. Don't adjust anything for the first 3 attempts. Just listen to what you're getting.
- Drill 3 (5 minutes): Micro-adjust one variable per exhale. Start with finger angle, then lip tuck tension, then airflow speed. When you hear a tonal sound (even a rough one), hold that position and repeat it.
- Rest 2 minutes between drill sets. If you feel dizzy, stop for the day.
Week 2: Stabilize and Refine
- Drill 4 (3 minutes): Once you can produce a consistent tone, work on sustaining it. Hold the whistle for 5 full seconds per exhale, 10 repetitions.
- Drill 5 (3 minutes): Practice pitch variation by slowly moving your tongue tip forward or backward during a held note. Notice how it shifts the pitch up or down. This is how you start shaping bird call patterns.
- Drill 6 (4 minutes): Try short call bursts. Two short whistles, pause, one long whistle. This trains your breath timing and starts to mimic real bird call rhythms.
- Try switching finger combos (index+middle vs thumb+index) and note how the tone changes. Keep a quick log of what works best for you.
By the end of week two, most people can produce a clear, repeatable whistle tone and are starting to experiment with pitch and rhythm. That's when it gets genuinely fun, because you can start mimicking actual bird calls. If you want to take it even further and replicate specific bird song patterns, the guide on how to use a bird whistle is a great next step for understanding how real whistle tools are played, which gives you a useful reference point for the sounds you're trying to recreate.
Tone Variations for Different Bird Call Styles
Once you have a stable whistle, you can start shaping it to mimic different bird species. The two biggest levers are finger combo and tongue position.
- High, thin calls (like a chickadee or warbler): Use index + middle fingers, keep the airway small, and position your tongue tip close to your lower teeth. Blow with lighter pressure.
- Bold, carrying calls (like a hawk or large songbird): Use thumb + index fingers, open the airway slightly more, and push your tongue back slightly to lower the pitch. Use a stronger, steadier exhale.
- Trilling or fast repeated calls: Use short, pulsed exhales in rapid succession rather than one continuous blow. Practice the pulse rhythm separately before adding it to your whistle.
- Rising calls: Start with tongue tip low and gradually slide it forward and up during the exhale. This raises pitch progressively and mimics many common songbird calls.
It's worth noting that some bird-specific sounds involve techniques that go beyond the standard finger whistle. Certain regional styles, like the Chicano bird whistle style, use different oral cavity shaping and embouchure patterns that produce distinctly different tones. Exploring those variations once you've locked in the basics can dramatically expand your range.
And if you ever want a shortcut for reference sounds while you practice, an actual bird whistle toy can be surprisingly helpful. Listening to one while you practice gives your ear a target tone to aim for. The guide on how to use a bird whistle toy explains exactly how to get the best sounds out of those little tools. For a deeper look at how one specific kind works mechanically, the breakdown of how a water bird whistle works is genuinely fascinating and helps you understand the physics behind the sounds you're trying to copy with your own voice.
The finger whistle is one of those skills that feels impossible until it doesn't. One session you're blowing air into your hand, and the next something clicks and the tone rings out clear and sharp. Keep your setup consistent, change one thing at a time, and trust that the sweet spot exists. You just have to find it.
FAQ
Can I learn the two-finger bird whistle if I wear braces or a retainer?
Yes, you can still learn. If you have orthodontic braces or retainers, try placing your fingers so they rest on the tongue and avoid rubbing directly against brackets. Also tighten the lip tuck slightly to compensate for the changed tooth shape, and practice in short bursts because braces can make the seal fatigue faster.
What should I do if I have to blow very hard to get any sound?
If you feel like you need to blow harder than is comfortable, stop and reset. Instead, verify the seal first (lip tuck touching your fingers) and then reduce airflow speed to the middle range. Painful pressure is usually a sign the air path is being blocked or misdirected, not that you simply need more force.
How can I change pitch without changing finger placement?
Tongue position can be tweaked without fully starting over. A small change such as curling the tongue fold slightly more or letting the tongue tip rest a fraction closer to your lower front teeth can raise or lower pitch, but make only one adjustment per attempt so you know what caused the change.
Why does the whistle work sometimes but not other times, especially in different rooms?
Warm up first, especially in dry or cold rooms. Dry tissues make the lip seal leak and the whistle sputter. Try a few normal exhale practice rounds, re-tuck your lips, and if needed lightly re-wet them again, then go for the controlled mid-range exhale.
Is it normal if the whistle comes and goes during practice?
No, you should not hear a continuous whistle right away every attempt. Early on, it can take several cycles to find the stable airflow “sweet spot.” Focus on steady airflow and consistent lip-finger contact, and aim for brief successful tones rather than expecting a long sustained note immediately.
How important is timing between inhale and exhale?
Use your nose as a guide for timing, not your eyes. Inhale normally, then start the exhale smoothly right away, without pausing. A pause often lets the airflow stop being steady, which causes pitch to wobble or the sound to cut out quickly.
My sound is breathy or muffled, what is the most likely fix?
If you get only a muted, breathy noise, check for an opening that is too large. Tighten the lip tuck slightly and angle your fingers a touch more downward and inward. If that still fails, pull your fingers back a little so they support the tongue fold without blocking the channel.
I can make a low airy tone, but I cannot reach the clear whistle. How do I transition?
If you can produce a pre-whistle low airy tone but cannot “snap” into a clear whistle, slow the exhale. Then gradually increase speed only in small steps until the raspy squeak resolves into a cleaner tone. The goal is to land in the middle of airflow speed, not the extremes.
What is the best way to prevent pitch from wavering?
Try making the setup stable before going for sound. Keep wrists braced against your face, lock finger angle, and avoid moving during the exhale. If your fingers shift even slightly, pitch instability is common, so practice first with a silent exhale to feel the hold.
How long should I practice before adjusting and trying again?
Aim for short, frequent attempts with a reset between them. If you are not getting results after several tries, stop and recheck one element only (lips, tongue fold, or finger angle) instead of changing everything. This reduces “chasing” the problem and speeds up finding the right configuration.
Next Article
How to Chirp Like a Bird: Beginner Step-by-Step Practice
Learn how to chirp like a bird with beginner drills for breath, tongue timing, pitch, listening feedback and quick pract