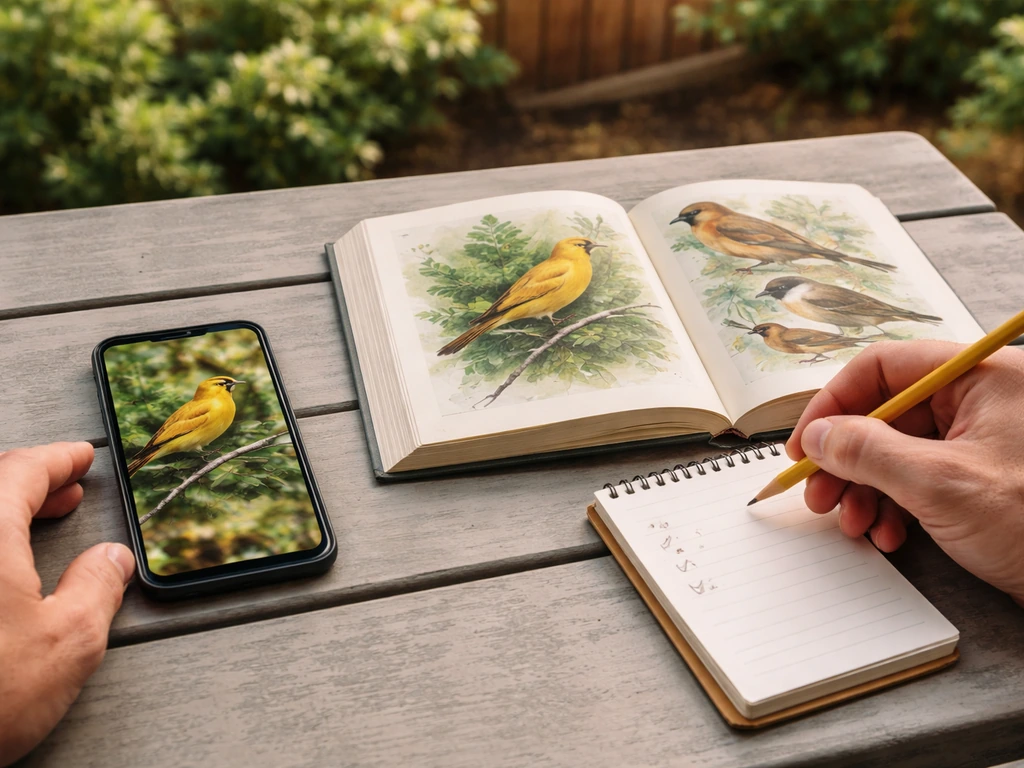
Yes, you can identify a bird from a photo, and you don't need to be an expert to do it well. The trick is working through what you can actually see in a logical order: image quality first, then size and shape, then color and markings, then bill and feet, and finally the context of where and when the photo was taken. Pull all of that together and you'll land on a confident ID most of the time, even with a halfway-decent smartphone photo.
How to Identify a Bird From a Photo: Step by Step

Marcus Hendricks
6 Apr 2026
Start with what you can see in the photo
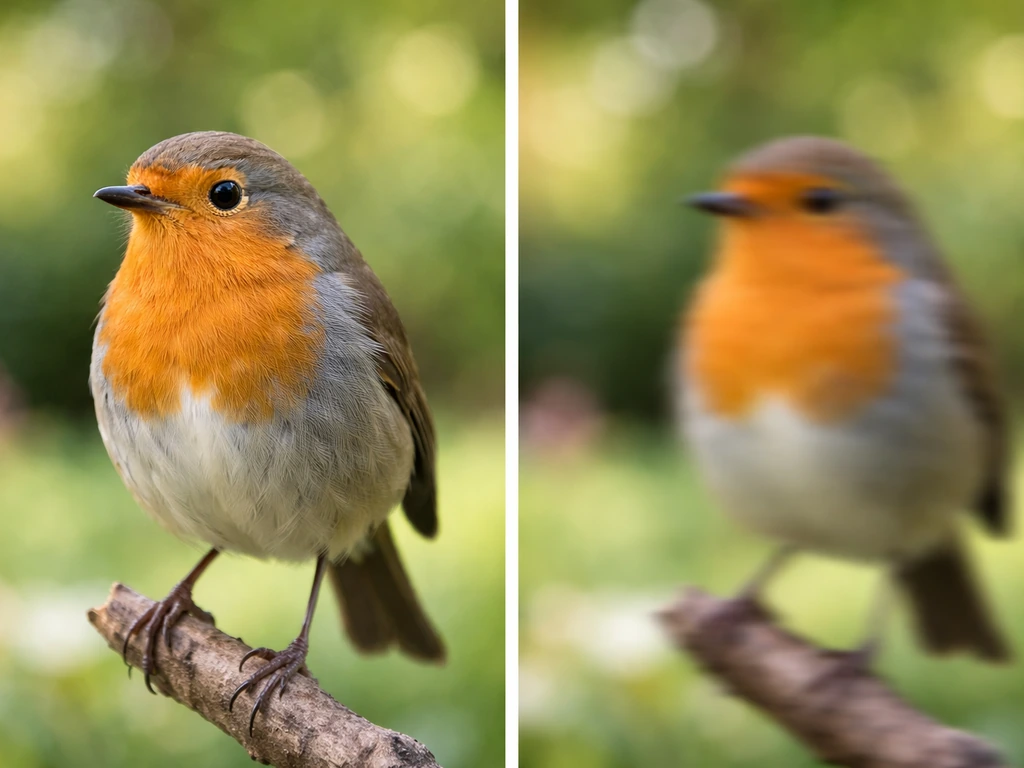
Before you dig into field marks, take ten seconds to assess what your photo actually shows. A blurry or backlit shot gives you far less to work with, and knowing that upfront saves you from a wrong ID. Ask yourself these questions before anything else:
- Is the bird in focus, or is it blurry? Blurry photos can still show size and basic shape, but fine markings are gone.
- Is the bird lit from behind (backlit)? Backlit shots often look like silhouettes and wash out color entirely.
- How much of the bird is visible? A full side view is ideal. Rear views and odd angles hide most of the diagnostic features.
- Is the bird in the open, or partially hidden by branches or leaves?
- Is this a single bird or a group? Flocking behavior narrows things down fast.
If the photo is genuinely poor, make a note of what you can still extract (silhouette, approximate size, habitat) and park the rest. A partial ID is still useful. If you have a chance to reshoot, get closer, turn off your flash, and aim for a side-on angle in decent light. You'll thank yourself later.
Key identification clues: size, shape, and posture
Size and shape are the first things experienced birders lock onto, and they're available even in a low-quality photo. The problem is that size is relative in a photo with no reference point. So look for context: is the bird perched on a fence post, a twig, a power line? Is there a leaf, a human hand, or another known bird nearby? Even a rough sense of scale (sparrow-sized, pigeon-sized, crow-sized, heron-sized) cuts your options dramatically.
Shape tells you even more. These structural clues hold up even when color is washed out:
- Body shape: Is it round and compact, or long and slim? Stocky or streamlined?
- Tail: Short and square? Long and rounded? Forked? Cocked upward?
- Wings: Pointed or rounded at the tip? Long relative to body length?
- Neck: Does it have one, or does the head sit right on the body like an owl?
- Legs: Long and wading-type, or short and perching-type?
Posture matters too. An upright, alert posture with a short tail cocked up suggests a wren family. A hunched, horizontal posture leaning forward on a branch points toward something like a flycatcher. If the bird is in flight, look at how it holds its wings: flat and straight like a buteo hawk, bent and angled like a falcon, or bowed downward like certain seabirds. These are the first filters before you even look at color.
Plumage & pattern features (color, markings, wing bars, tail shape)
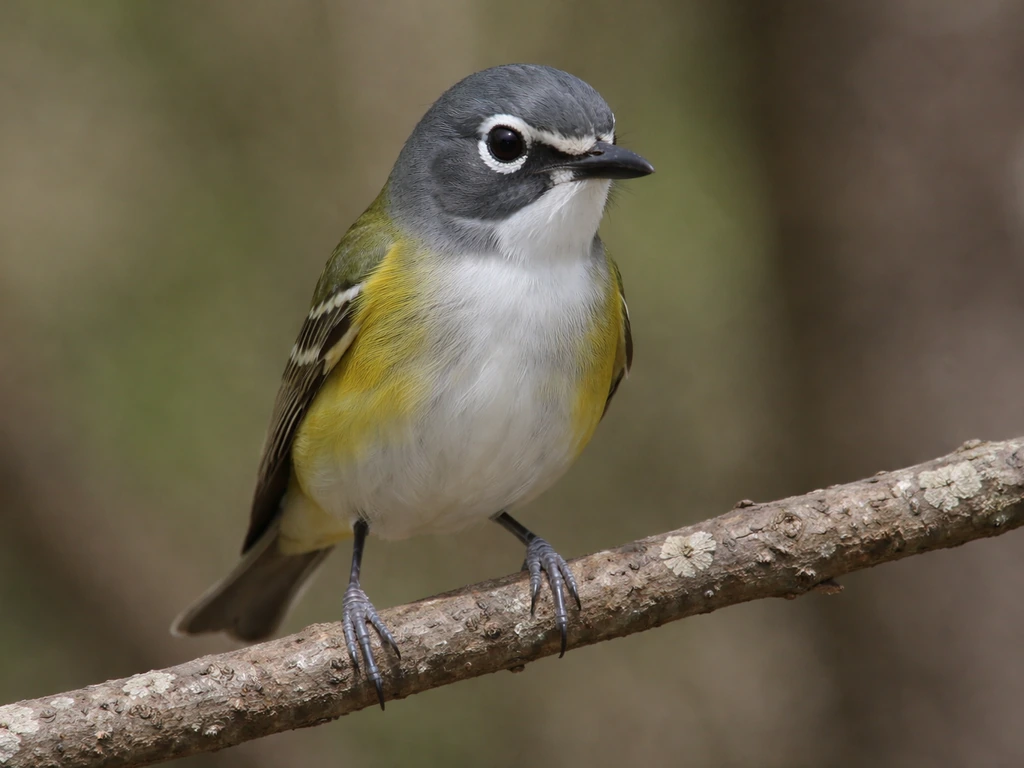
This is where most people start, and it's worth doing it systematically. Work from head to tail so you don't skip anything. Ornithologists call these "topographical regions," which just means going region by region across the bird's body. Here's the order I use:
- Crown and cap: Is the top of the head a different color from the face? Is there a stripe through the eye (eyestripe) or above it (supercilium)?
- Throat and chest: Often the most contrasting part of the bird. Look for a bib, a spotted breast, or a band across the chest.
- Back and wings: Is the back plain or streaked? Look carefully for wing bars, which are horizontal stripes across the folded wing. One wing bar or two? Wide or thin?
- Belly and flanks: Plain, streaked, spotted, or washed with a warm color on the sides?
- Tail: What color is it from above and below? Is the tip a different color? When the bird fans its tail, does it flash white outer feathers or rufous (reddish-brown) patches?
- Overall color tone: Is the bird warm-toned (brown, orange, rufous) or cool-toned (gray, blue, olive)?
Wing bars are one of the most useful features you can find in a still photo of a perched bird. Two clear white wing bars on a small olive-green bird almost certainly point you toward a vireo or warbler. No wing bars on a similar-sized bird shifts you elsewhere. Don't skip them. Also pay attention to whether any marking is a true sharp edge or a gradient, because that subtlety alone separates closely related species.
If you're dealing with a young bird and the plumage looks inconsistent or patchy, don't assume the photo is bad. Juvenile plumage is genuinely different from adult plumage in many species. How to identify a fledgling bird covers this in detail and will save you a lot of frustration when your mystery bird turns out to be a youngster still growing into its adult colors.
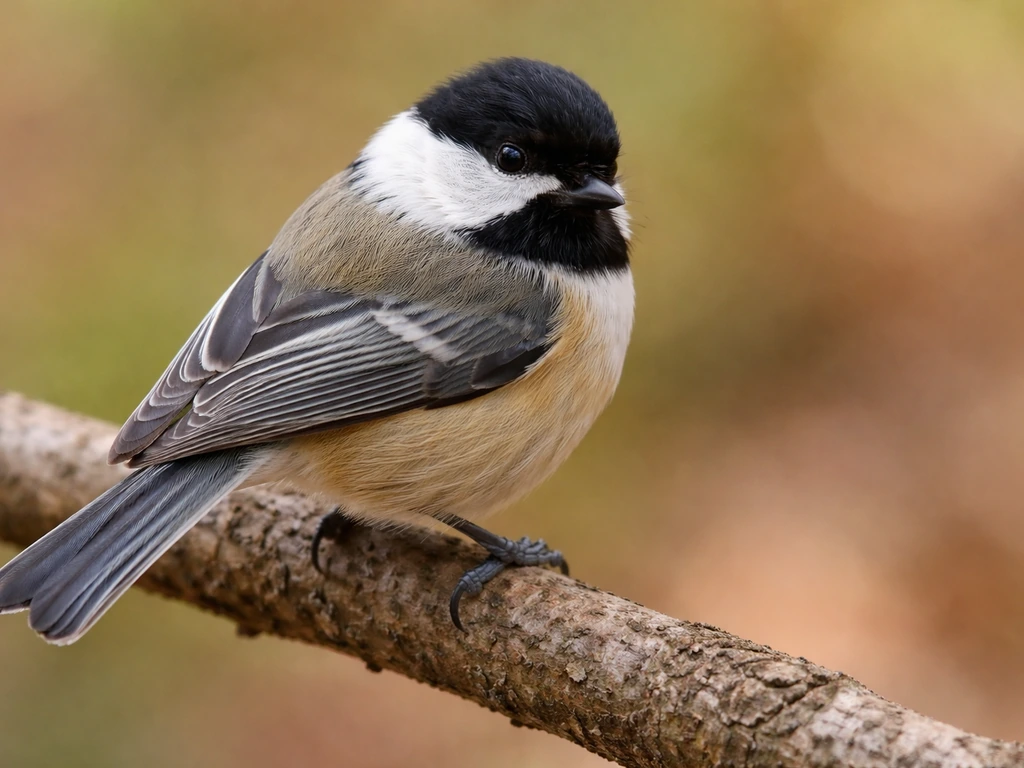
Bill, beak, and feet details
Bill shape is one of the single most diagnostic features you can use from a photo. It reflects what the bird eats, and diet is closely tied to species. Get a clear look at the bill if the photo allows it, then match it to one of these broad categories:
| Bill Type | What It Looks Like | Likely Bird Group |
|---|---|---|
| Thick, conical | Short, chunky, seed-cracker shape | Finches, sparrows, grosbeaks |
| Thin, pointed | Needle-like, sometimes curved slightly | Warblers, wrens, hummingbirds |
| Hooked tip | Sharp downward curve at the tip | Raptors, shrikes |
| Flat and wide | Duck-like, broad and spatulate | Ducks, spoonbills, nightjars |
| Long and straight | Probing shape, longer than the head | Sandpipers, herons, woodpeckers |
| Crossed tips | Tips cross each other | Crossbills (very distinctive) |
Feet are less visible in most photos, but when you can see them, use them. Long, spindly toes that spread out for wading belong to shorebirds and herons. Short, strong grasping feet belong to songbirds perching on twigs. Talons (sharp, curved claws) mean raptor. Webbed feet mean waterbird. Even a partial shot of the feet in the foreground of your photo is useful data.
If the bird in your photo has a leg band or any kind of tag, that's actually a bonus clue. Banded birds are individually tracked, and understanding how to read bird tags can sometimes tell you exactly which species you're looking at and where it came from.
Habitat, location, date, and season context
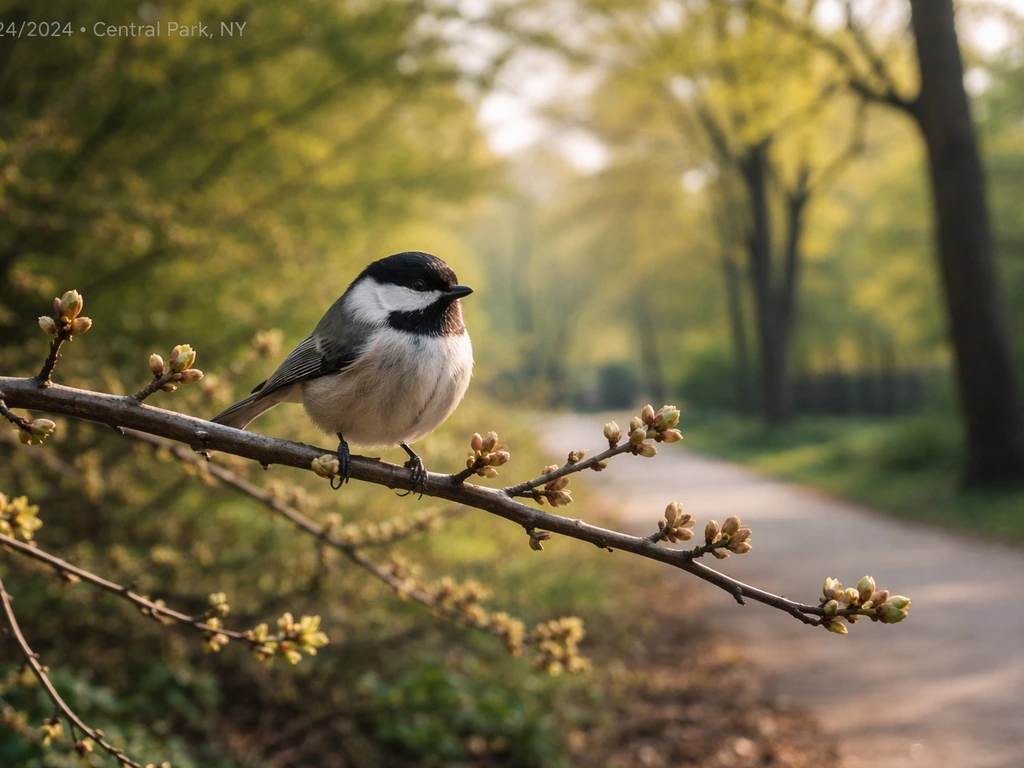
Here's something beginners often overlook: a bird's location and the time of year can eliminate half your candidates before you even look at the photo. A bird that looks vaguely like a painted bunting seen in January in Maine is almost certainly not a painted bunting. Range and seasonality matter enormously.
Pull the metadata from your photo if you can. Most smartphone photos embed GPS coordinates and a timestamp. That gives you exact location and date without guessing. Plug that into a tool like eBird's species explorer and you can see which species have actually been reported in that area at that time of year. That list is your realistic candidate pool.
Habitat type adds another filter. Look at what's in the background of your photo:
- Dense forest understory: Think thrushes, ovenbirds, wood warblers.
- Open meadow or grassland: Sparrows, meadowlarks, kestrels.
- Wetland or marsh edge: Rails, herons, marsh wrens, red-winged blackbirds.
- Suburban backyard feeder: House finches, chickadees, nuthatches, doves.
- Coastal beach or mudflat: Sandpipers, plovers, gulls, terns.
- Open water: Ducks, loons, grebes, cormorants.
The Cornell Lab makes a great point here: after you've settled on a likely species, go back and ask yourself honestly whether that species could occur in that habitat at that time of year. If the answer is "probably not," reconsider. It's the final sanity check that prevents confident wrong IDs. For a deeper dive into using habitat and environmental cues together, how to identify a wild bird walks through the full process in a real-world context.
Compare to likely species: field marks + quick narrowing workflow
Once you've gathered your clues, it's time to compare. In bird identification, these visible or behavioral “blank" rel="noopener noreferrer">field marks” can be plumage, flight characteristics, calls, or behavior that help narrow down what you are seeing. Here's the workflow I use, and it works whether I'm at my desk with a field guide or using an app on my phone:
- Write down every feature you've observed: size class, shape notes, bill type, color regions, any markings you found.
- Narrow by location and date: use eBird or a regional field guide to build a realistic species list for that place and season.
- Filter by size and shape: drop every species that doesn't match the approximate body size and silhouette.
- Filter by bill: drop species whose bill type doesn't match what you see in the photo.
- Filter by habitat: drop species that wouldn't realistically occur in the background environment you identified.
- Compare remaining candidates by plumage: focus on the most distinctive field marks for each candidate. What would separate Species A from Species B in a single photo? Look for exactly that in your image.
- Check whether the feature you're relying on is age or sex dependent: some markings only appear in adult males, for example.
When you're down to two or three candidates, focus on what birders call the most "diagnostic" feature, the one mark that appears only on one species and not the others. For warblers, that might be a specific head pattern. For shorebirds, it might be the length of the bill relative to the head. Prioritize that one feature over everything else.
If the photo is blurry or the bird is at an odd angle, be honest about your confidence level. "Likely a Song Sparrow based on size, habitat, and what looks like streaking on the breast" is a perfectly good result. Don't force a species ID you can't actually support. In those cases, note the features you could confirm and use them to know what to look for if you spot the bird again.
App-based ID vs. doing it yourself
AI photo ID apps like Merlin Bird ID (from Cornell Lab) and iNaturalist have gotten very good. Merlin's photo ID is worth trying, especially for common backyard and North American species. But these apps work best when you already understand what the app is telling you. If you don't know what "wing bars" or "supercilium" means, a suggested ID from an app is harder to verify. Use the app as a starting point or a sanity check, not as a replacement for the process above. Cross-referencing the app's suggestion against your own field mark observations is how you build real skill over time.
Species that look similar to each other (called "confusing species" in field guides) are where beginners struggle most. If you've narrowed to finches, for example, how to identify male and female finches goes through exactly the features that separate them, which makes for great practice in applying the field mark method to a real group of similar-looking birds.
When the bird in your photo is a chick or juvenile
Young birds break all the usual rules. A juvenile robin doesn't look like an adult robin. A baby hawk doesn't look like an adult hawk. If your photo shows a bird with fluffy down, patchy feathers, or an oversized head relative to its body, you're probably looking at a chick or a very young bird, and the standard field marks won't apply. How to identify bird chicks breaks down what to look for specifically in young birds and is worth a read before you spend an hour trying to match a baby bird to an adult photo in your field guide.
Building your ID skills beyond the single photo
Getting a single ID right feels great, but the bigger payoff comes from developing pattern recognition over time. The more species you learn to recognize on sight, the faster each new ID goes. The best way to build that skill is deliberate practice: go out regularly, take photos, work through your ID notes afterward, and check yourself against a trusted reference.
If you want a structured approach to growing your overall identification ability, how to learn bird identification lays out a progression from absolute beginner to confident birder with a clear roadmap of what to study and in what order.
And if you ever find yourself photographing a bird that has a tag or band on its leg, it's worth knowing that those tags carry real data. Learning how to tag a bird gives you a behind-the-scenes look at why researchers band birds in the first place, and it makes the whole process feel more connected to the science of tracking bird populations.
The bottom line: identify the bird by working from the biggest clues to the smallest. All About Birds describes a similar four-part approach to bird identification that moves from major visible clues to a confident ID the biggest clues to the smallest. Start with what the photo actually shows you, filter by location and season, use size and shape before color, check the bill, then compare field marks against a realistic candidate list. That process works every time, even when the photo isn't perfect.
FAQ
What should I do if I can’t see the bill, feet, or wing markings in my photo?
Use a “confidence ladder” instead of forcing a species name. If you can only support genus-level features (for example, bill shape and overall size), record it that way, plus one or two observable traits you would check if you see the bird again (wing bars, tail shape, head pattern). This prevents the common mistake of overcommitting when key field marks are missing.
How can I tell if a field mark I’m seeing is real or caused by angle, crop, or shadow?
Check the photo orientation and framing. Many IDs go wrong because people interpret mirror images or crop effects as true field marks. If you can, compare the bird’s left and right sides (or look for repeated pattern symmetry), and make sure the “wing bars” you see are on the actual wings, not on branches, shadows, or motion blur.
How reliable are location and date for identifying birds from photos?
Separate two different tasks, range and identification. For range, metadata like GPS and timestamp help, but still treat them as a starting filter because some species wander or irrupt outside normal patterns. For identification, rely on structural traits you can verify, especially posture, wing shape, and bill proportions, not just color intensity.
Can I identify a bird if the head is blurry but the body shape is clear?
A perched bird photo with a blurred head is often still identifiable using non-head cues. Prioritize silhouette and posture first (upright versus hunched, tail position, body profile), then use wing shape in flight or wing markings if visible. Only use head-only traits when they are crisp enough to distinguish sharp edges from gradients.
What’s the best approach for heavily backlit or overexposed bird photos?
Yes, but be conservative. Backlighting can wash out pale and dark contrasts, making wing bars look like gradients or vanishing entirely. In those cases, base your decision on shape and contrast in areas with less glare (overall silhouette, tail length and shape, wing posture), then treat color-based matches as “possible,” not definitive.
How do I identify birds when the plumage looks faded, molting, or seasonally different?
Look for diagnostic features that remain stable across molts and seasons, then note uncertainty. For example, bill shape, overall wing structure, and tail form usually hold up better than body color. Also watch for molt-related patterns like uneven feather replacement that can make adults look “juvenile-like.”
What if my photo suggests a bird that doesn’t match any species perfectly?
If you suspect a hybrid or an unusually colored individual, rely on multiple independent traits and avoid choosing based on a single “mostly right” color. Record the best-matching normal traits you can confirm (bill shape, wing bars presence, tail pattern), then compare alternatives that share those same traits. If multiple key traits disagree, label it as uncertain rather than forcing a perfect match.
How should I use a set of photos from the same moment (burst or multiple shots)?
Treat duplicates like multiple clues, not separate guesses. Compare the clearest frame for each feature, then reconcile differences by checking which trait is consistent across shots (same posture, same bill profile, same wing pattern). A common mistake is averaging impressions from several blurry frames and ending with the wrong species.
How do I correctly identify wing bars versus lighter feather patterns or lighting effects?
Wing bars are useful, but only when they are clearly on the bird’s wings and not just on the background. Confirm they appear as consistent parallel lines that change with wing position. Also verify whether the “bars” are true edges versus lighter feather centers, which can look similar in low light.
How can I identify a bird from a photo taken while it is in flight?
If the bird is moving, prioritize flight posture over static color. Focus on wing angle (flat and straight, or bowed), tail shape, and the overall flight silhouette. For flight IDs, even a good photo can miss fine patterns, so your confidence should be tied to shape cues you can actually see.
How do I handle “confusing species” when two birds look almost identical in my photo?
Start with a shortlist based on habitat and time, then verify with one diagnostic structure trait you can see. For example, in similar-looking songbirds, bill shape relative to head and tail length often separate lookalikes better than general color. If you cannot see the diagnostic trait, keep two candidates and list the specific missing feature you would need.
What are the key signs that a photo shows a juvenile or fledgling rather than an adult?
Use a “juvenile check” before you assume it is an adult. Look for downy or fluffy texture, patchy or inconsistent plumage, and proportions that look off (oversized head, shorter tail, thick-looking juvenile bill). If those cues are present, switch to juvenile-focused reasoning rather than matching adult field marks.
If there’s a band or tag in the photo, what’s the safest way to use it for identification?
If you have a band or leg tag, document the exact wording or code you can read, plus the location. Many tags include alphanumeric combinations that can be searched in banding or reporting systems, but readability varies with distance and angle. Don’t guess characters, if you cannot read them clearly, capture another shot focused on the tag.
How should I use AI photo ID apps without letting them override my field marks?
First, treat the app result as a hypothesis, then validate with at least one field mark you can see (posture, wing bars presence, bill category, tail shape). Apps can be right for common species, but they can also overconfidently match to superficially similar birds. The best workflow is cross-checking the app’s proposed key features against your own notes.
Next Article
How to Bird Mouth a Rafter: Step-by-Step DIY Guide
Step-by-step guide to cut the bird-mouth notch in a roof rafter, measure pitch accurately, and fit for a tight seat.