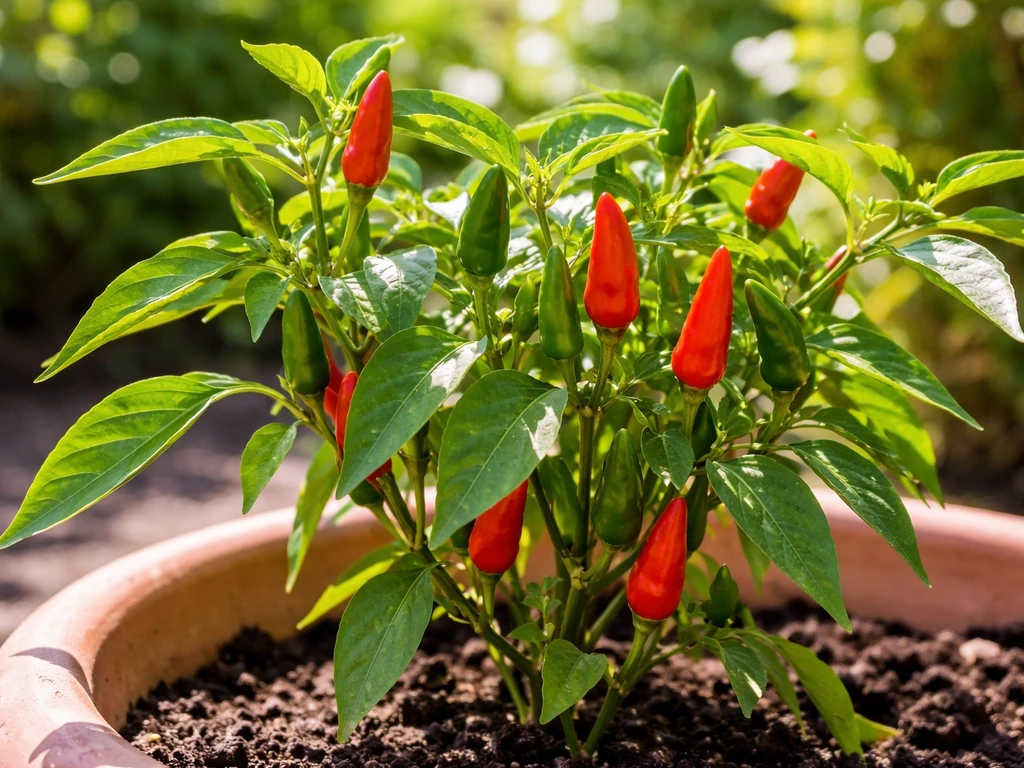
Bird peppers are small, fiery chillies (typically Capsicum annuum or Capsicum frutescens) that you grow exactly like any other hot pepper: start seeds indoors about 8 weeks before your last frost, keep them warm and bright, transplant after danger of frost has passed, and harvest repeatedly once the fruits size up. The main things that trip beginners up are not enough warmth during germination, too much nitrogen when feeding, and temperature swings that cause flowers to drop before they set fruit. Get those three things right and you'll have more bird peppers than you know what to do with. If your goal is to become a registered bird breeder, you will also need to follow local breeding, housing, and documentation rules.
How to Grow Bird Peppers From Seed to Harvest

Marcus Hendricks
18 May 2026
What bird peppers actually are (and why they're worth growing)
The name "bird pepper" gets applied to several different small-fruited wild and semi-wild chilli varieties. You'll mostly see it on Capsicum frutescens (the same species as Tabasco peppers) and Capsicum annuum bird's eye types, which clock in at roughly 50,000 to 100,000 Scoville heat units. Bird’s eye chili (Capsicum annuum) is listed with a Scoville range of about 50,000, 100,000 SHU 50,000 to 100,000 Scoville heat units. Both are genuinely hot, noticeably small-fruited, and incredibly productive once they get going. Capsicum frutescens tends to have a slightly more pungent, funky heat; Capsicum annuum bird's eye types are sharper and brighter. Either way, you're growing a warm-season crop that needs 3 to 4 months of frost-free conditions to really deliver.
The reason to grow them yourself is straightforward: fresh bird peppers taste completely different from dried ones, they're nearly impossible to find in most grocery stores, and a single healthy plant can supply you with dozens of tiny pods. They also look striking in containers on a patio or balcony, which makes them a fun double-duty plant. If you're already interested in creating habitat for wild birds, it's worth knowing birds actually love these peppers (capsaicin doesn't affect them the way it does mammals), so growing a patch can be a nice way to attract them too. If you’re planning how to become a bird sanctuary, think beyond a single plant and focus on year-round food, water, and safe nesting habitat create habitat for wild birds. If you want to turn those peppers into income, the next step is planning how to monetize your bird photography skills how to make money with bird photography. If your goal is to learn how to start a bird sanctuary, turning these container-friendly peppers into consistent habitat can be a simple, practical first step.
Picking the right seeds, varieties, and growing setup
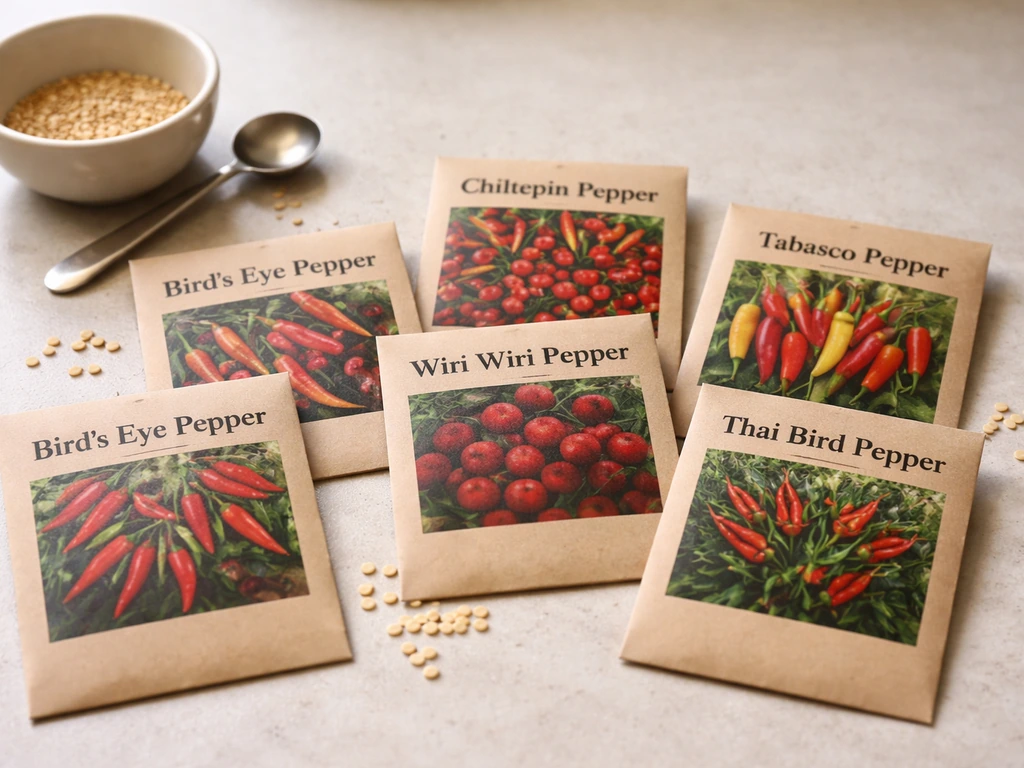
Because the name "bird pepper" covers more than one species, pay attention to what you're actually buying. Look at the species on the seed packet. If you want the classic Tabasco-adjacent heat and flavor, go for Capsicum frutescens. If you want something closer to a Thai bird's eye chilli, look for Capsicum annuum bird's eye types. Either will work for a beginner; just know that days to maturity and exact heat level will differ depending on the specific seed source, so read the packet carefully.
For containers, go bigger than you think you need and plan on one plant per pot. Compact bird pepper varieties can get away with a bit less spacing (around 12 to 14 inches apart if you're planting in a bed), while larger or more sprawling plants need closer to 18 to 24 inches. In containers, a 5-gallon pot is a reasonable minimum for a single plant. Raised beds work beautifully too, especially if you're in a cooler climate where raised soil warms up faster in spring.
Soil, light, water, and temperature: the basics that matter most
Soil
Bird peppers want well-draining soil with a pH between 6.5 and 6.8 for the best yields, though they'll tolerate a slightly wider range (roughly 5.5 to 7.0). If you're growing in containers, a good-quality potting mix is fine. In garden beds, work in compost to improve drainage and organic matter. Poor drainage is one of the faster ways to kill pepper plants, so if your native soil is heavy clay, either amend it heavily or grow in raised beds.
Light
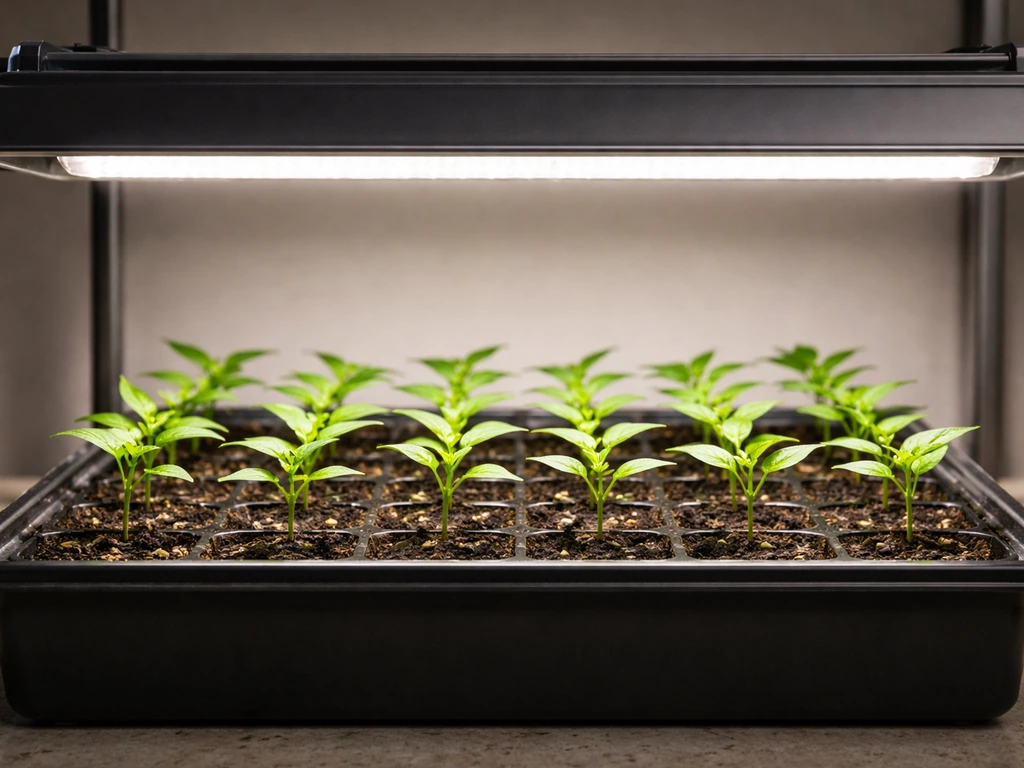
Full sun means full sun here, at least 6 to 8 hours of direct sunlight per day. Indoors during the seedling stage, a grow light placed close to the tray (2 to 4 inches above the seedlings) prevents the leggy, stretched growth that happens when seedlings reach for a distant light source. Outside, pick the sunniest spot you have. Bird peppers that fruit best tend to get 8 to 12 hours of daylight, which aligns nicely with a normal summer day.
Watering
Water deeply and consistently rather than a little bit every day. The top inch of soil can dry out between waterings, but the soil below should stay slightly moist. A good rule of thumb: if your area gets less than about 1 inch of rain per week, soak the soil thoroughly at least once a week. Sandy soils drain faster, so you may need to water more frequently. Inconsistent moisture is one of the main causes of blossom-end rot, a calcium-deficiency problem that shows up as a dark, sunken patch on the bottom of developing fruits, so keeping watering steady really does matter.
Temperature
This is where most beginners lose the most time. Pepper seeds germinate best at soil temperatures of 65 to 70°F (18 to 21°C), and seedlings grow fastest when air temperatures are in the 70 to 80°F range. For flowering and fruit set, you want nighttime temperatures between 60 and 70°F. Here's the critical part: if nighttime temps drop below 58°F or daytime temps climb above 85°F, pollination basically stops. Flowers drop without setting fruit. This is frustrating but completely normal. The plants recover when temperatures stabilize, so don't panic and pull them out.
From seed to garden: planting and transplanting step by step
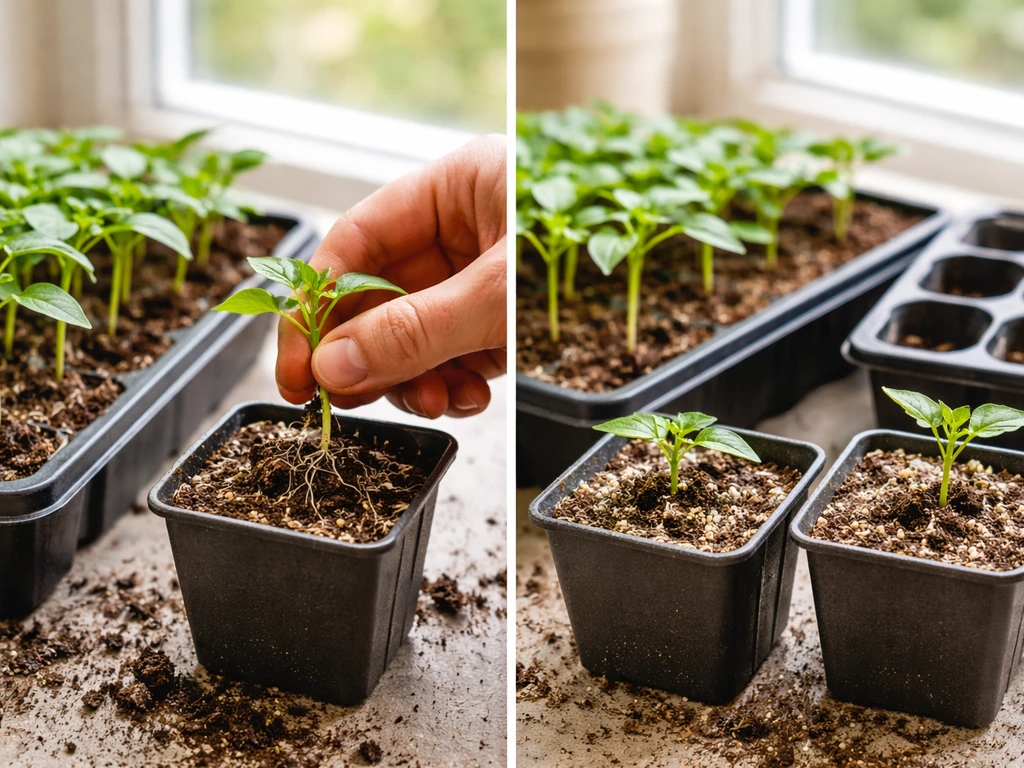
- Start seeds indoors about 8 weeks before your expected last frost date. Fill small cells or seed trays with a sterile seed-starting mix.
- Plant seeds about 1/4 inch deep, cover lightly, and water gently. Keep the growing medium consistently moist but not waterlogged.
- Place the tray somewhere warm, ideally with bottom heat (a seedling heat mat works well) to keep soil temps at 65 to 70°F. Germination typically takes 10 to 21 days.
- Once seedlings emerge, move them under a grow light or to your sunniest window. Keep air temperatures between 70 and 80°F during the day.
- When seedlings have 2 to 3 sets of true leaves and nighttime temps reliably stay above 50°F, start hardening off. Set them outside in a sheltered, partly shaded spot for an hour or two each day and gradually increase exposure over 7 to 10 days.
- Transplant into the garden or final containers after your last frost date, when nighttime temps are consistently above 55°F. Keep the stem at the same depth it was in the seedling pot. Burying the stem deeper can cause rot.
- Water thoroughly right after transplanting and keep soil consistently moist for the first two weeks while roots establish.
One thing I learned the hard way: skipping hardening off properly leads to sunscald and transplant shock that can set a plant back by two to three weeks. UMass Extension also emphasizes transplanting only after proper hardening off to reduce transplant shock for peppers hardening off properly. Take the full 7 to 10 days. It feels slow but it pays off.
Feeding, pruning, and keeping pests away
Feeding
The most reliable in-season feeding approach is to sidedress with a balanced fertilizer (like 10-10-10) after the first fruits have set, using roughly 1.5 oz per plant or about 1.5 to 2 pounds per 100 square feet. Before that, a light starter fertilizer when transplanting is enough. The biggest mistake is going heavy on nitrogen: too much nitrogen pushes lush leafy growth at the expense of fruiting and also increases the risk of blossom-end rot by disrupting calcium uptake. Less is more here.
Pruning
Bird peppers are small and bushy by nature, so they don't need heavy pruning. What does help is removing the very first flower bud that appears early in the season (sometimes called the "first fruit" removal). This encourages the plant to put energy into root and branch development before it starts fruiting heavily, which means a bigger overall harvest later. You can also remove any weak or inward-facing branches to improve airflow, which reduces disease risk.
Common pests and how to handle them
- Spider mites: Tiny mites that cause stippled, bronzed leaves and fine webbing. Knock them off with a strong spray of water from a hose. Avoid certain broad-spectrum insecticides that can actually make spider mite populations explode.
- Hornworms: Large caterpillars that chew holes in fruits and leaves. Pick them off by hand; they're big enough to spot.
- Thrips: Tiny insects that cause silvery streaking on leaves. Insecticidal soap or spinosad sprays work well for minor infestations.
- Damping-off (seedlings): A fungal problem that causes seedlings to collapse at the soil line, with brown water-soaked areas at the stem base. Prevent it by using sterile seed-starting mix, sterilizing reused trays, and avoiding overwatering. If it hits, there's no saving the affected seedlings; just start fresh with clean equipment.
- Aphids: Clusters of small soft-bodied insects on new growth. A strong water spray or insecticidal soap handles most outbreaks.
Pollination, knowing when to harvest, and storing your peppers
Getting your plants to actually set fruit
Pepper flowers are self-fertile, meaning each flower carries both male and female parts and can pollinate itself. Outdoors, wind and visiting insects (including bees) do the job naturally. To start planning your trip, look up the flight and ferry route options to Bird Island Seychelles, since access typically depends on timing and operator schedules. Indoors or in very still conditions, you can gently shake the plant once flowers open to mimic the effect of wind. The main reason flowers drop without setting fruit is temperature: nights below 58°F or days above 85°F both shut down pollination. If that's happening, wait for a more moderate stretch of weather rather than trying to force the issue.
When to pick
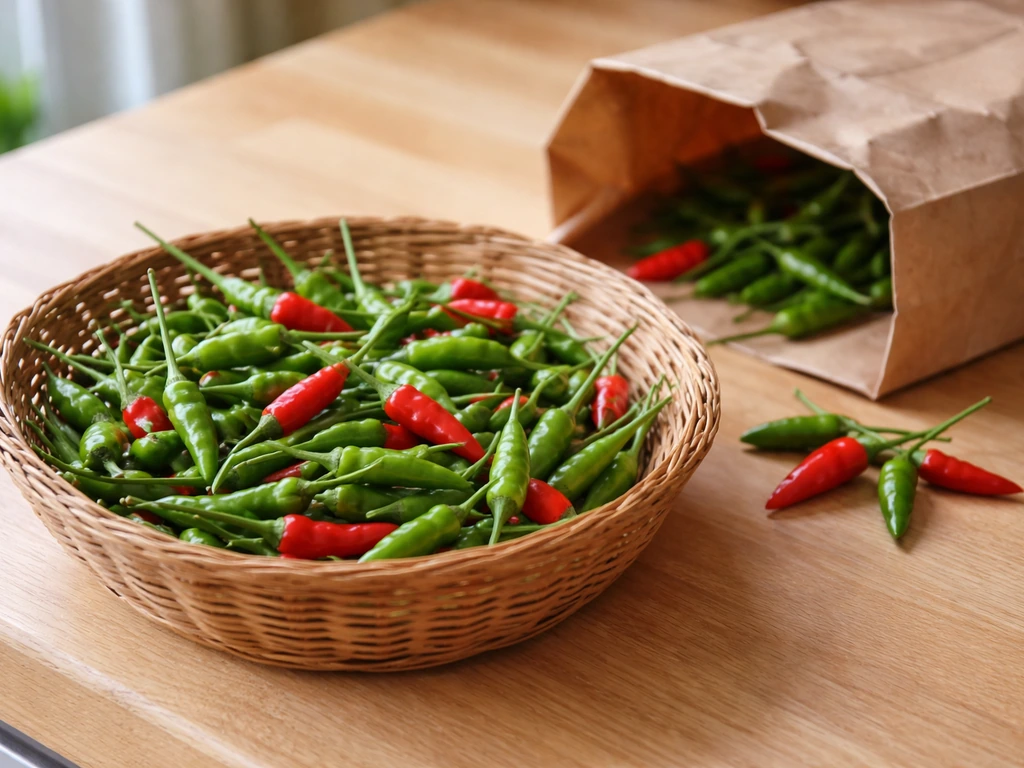
Bird peppers can be harvested once they reach full size even if they haven't changed color yet. Green bird peppers are usable and fully hot. If you leave them on the plant, they'll turn red (or orange or yellow depending on variety) and develop a slightly deeper, richer flavor. Either stage is fine. The key is to harvest regularly: picking ripe and mature fruits consistently encourages the plant to produce more. If you're trying to turn your harvest into extra income, you can also use the same beginner-friendly approach from how to make money with bird pepper tips to decide whether to sell fresh, dry, or make hot sauce. A plant you're actively harvesting from will outproduce one left to ripen on its own.
Storing your harvest
| Storage Method | How to Do It | How Long It Lasts |
|---|---|---|
| Refrigerator | Place unwashed peppers in a paper bag or loosely sealed container | About 1 week (longer storage can damage the skin) |
| Freezing | Wash, dry, and freeze whole or sliced on a tray, then transfer to a bag | Up to 12 months |
| Drying (dehydrator) | Set dehydrator to 100 to 120°F (38 to 49°C) and dry for 10 to 15 hours until brittle | 6 to 12 months in an airtight container |
| Air drying (string/rack) | Thread whole peppers on string or spread on a rack in a warm, dry, well-ventilated space | Several months if fully dried before storage |
When things go wrong: fixing common bird pepper problems
Slow or no germination
Almost always a temperature problem. If your seed-starting area is below 65°F, germination slows to a crawl or stops. Get a seedling heat mat and put it under the tray. Pepper seeds can take up to three weeks even under good conditions, so don't give up too quickly.
Leggy, stretched seedlings
Not enough light, full stop. Move the grow light closer (2 to 4 inches above seedlings) or move the tray to a brighter window. Rotate the tray daily if you're relying on a window so seedlings don't lean toward the glass. You can bury a slightly leggy seedling a little deeper at transplant time to compensate, but it's better to fix the light situation early.
Yellow leaves
Yellowing on lower leaves that progresses upward usually signals a nitrogen deficiency. A balanced fertilizer application typically fixes it within a week or two. Yellowing across the whole plant, especially when soil is staying wet, often points to overwatering and root problems. Check drainage and let the soil dry out more between waterings. If the yellowing is on new growth at the top, it may be an iron or magnesium deficiency, which a balanced micronutrient spray can address.
Flowers dropping before setting fruit
This one is frustrating because it feels like failure, but it's almost always just temperature. Check your nighttime lows and daytime highs. If nights are dipping below 58°F or days are regularly hitting 85°F or above, flower drop is expected. The plants will recover when temperatures come back into the right range. Make sure you're also watering consistently, since poor soil moisture weakens flowers and small developing fruits.
Flowers but no fruit (plant stays vegetative)
If you're seeing plenty of flowers but they're not turning into fruit even when temperatures seem fine, check whether you've been heavy-handed with nitrogen fertilizer. Too much nitrogen pushes the plant into leafy growth mode and suppresses fruiting. Back off feeding for a few weeks and hold off on any high-nitrogen fertilizer. Also double-check that pollination is actually happening: gently shake flowering stems and see if that makes a difference.
Dark, sunken spots on the bottom of fruits (blossom-end rot)
This is a calcium delivery problem caused by inconsistent watering, not usually a lack of calcium in the soil. Water more steadily and avoid letting the soil swing between bone-dry and waterlogged. Also cut back on nitrogen if you've been fertilizing heavily. Affected fruits won't recover, but consistent watering from here on will protect new ones.
Leaf curling or bronzing (spider mites)
If leaves are stippled, curling, or showing fine webbing underneath, look closely for tiny moving dots: spider mites. They thrive in hot, dry conditions. Hit the undersides of leaves with a strong jet of water every couple of days and keep up humidity around the plants. Don't reach for a broad-spectrum insecticide; some of them kill off the natural predators that keep mite populations in check and can make the infestation worse.
FAQ
Do bird peppers need cross-pollination to set fruit?
No. Bird peppers are self-fertile, so each flower can pollinate itself. If you see flowers but no fruit, the first checks are temperature (nights below about 58°F or days above about 85°F) and nitrogen being too high, then confirm there is some air movement (outdoors) or gentle shaking (indoors).
How can I tell when my seedling stage is too cold or too hot?
Use the soil temperature for germination, aiming around 65 to 70°F. For growth, seedlings do best when the air is roughly 70 to 80°F. If you cannot control indoor nights, consider raising the seedlings onto a warmer surface or using a heat mat, because daytime warmth alone often cannot fix cold nights that later affect flowering.
Should I start bird pepper seeds in soil or a seed-starting mix?
For best results, use a seed-starting mix rather than heavy garden soil. Seed-starting mix holds moisture but drains better, which reduces damping-off risk. Keep the mix evenly moist, and do not let it fully dry out during the germination window, since pepper seeds can take up to three weeks.
How do I avoid over-fertilizing if my plants look healthy and green?
Bird peppers often look vigorous even when they are being pushed too hard with nitrogen. After transplanting, stick to a light starter feed, then sidedress with balanced fertilizer only after the first fruits set. If you see heavy leafy growth with fewer flowers or pods, pause fertilizing for a couple of weeks and switch to a lower-nitrogen approach.
Can I grow bird peppers on a balcony in a container if summers are mild?
Yes, but you need enough heat and sun. Choose the sunniest spot you have and protect plants from cool nights with a temporary cover or by moving containers closer to a warm wall. If nighttime temperatures regularly dip into the 50s, expect flower drop until conditions stabilize.
What size pot is enough for one bird pepper plant?
A 5-gallon container is a reasonable minimum for one plant. Smaller pots can work for compact types but they dry out faster, which can lead to blossom-end rot from moisture swings. Ensure the pot has drainage holes and use a quality potting mix that drains well.
Why do my peppers have dark spots at the bottom even though the fruits are still small?
That is usually blossom-end rot, caused by inconsistent watering and calcium delivery issues, not a simple calcium shortage. Keep the soil from swinging between dry and waterlogged, water deeply when the top inch dries, and avoid heavy nitrogen feeding while the plant is fruiting.
Do bird peppers need pruning beyond removing the first flower?
Usually not. Keep pruning minimal, remove the early first bud only if you want to encourage stronger roots and branches, and remove weak or inward-facing growth to improve airflow. Heavy pruning can reduce the number of fruiting sites, which matters because bird peppers are productive once established.
My seedlings are leggy, should I throw them away?
Usually no. Leggy growth mainly signals insufficient light. Move the grow light closer to about 2 to 4 inches above seedlings, or improve the window light and rotate the tray daily. When transplanting, you can bury a slightly leggy seedling a bit deeper to stabilize it, but fix the lighting right away to prevent more stretching.
How often should I harvest bird peppers?
Harvest as soon as fruits reach full size, even if they are still green. Pick regularly, because leaving mature fruit to ripen longer can slow new pod production. If you want higher heat and deeper flavor, you can also selectively leave some pods to change color.
Can I overwinter bird pepper plants indoors, or should I start over each year?
Bird peppers are warm-season plants, so many gardeners treat them as annuals. If you want to overwinter, bring containers indoors before frost and provide strong light and stable temperatures. Expect slower growth and fewer fruits, but some plants can continue producing with consistent light and watering.
What should I do if flowers drop but temperatures seem almost okay?
Re-check the pattern, not just averages. Short stretches where nights dip below about 58°F or days spike above about 85°F can interrupt pollination. Also confirm you are watering consistently, since drought stress and moisture swings can weaken small developing fruits and contribute to drop.
How do I manage spider mites without using harsh insecticides?
Start with mechanical control, spray the underside of leaves with a strong water jet every couple of days to knock down mites. Increase humidity around the plants if your environment is very dry. If you do use any treatment, choose targeted options and avoid broad-spectrum sprays that can wipe out beneficial predators, which can make mites rebound.
Next Article
How to Become a Certified Bird Sanctuary: Step-by-Step
Learn how to become a certified bird sanctuary: requirements, permits, habitat setup, safety, documentation, and certifi